Sony DAV IS50 Operating Instructions - Page 81
Advanced Settings and Adjustments, PAUSE MODE] DVD VIDEO/DVD-R
 |
UPC - 027242730953
View all Sony DAV IS50 manuals
Add to My Manuals
Save this manual to your list of manuals |
Page 81 highlights
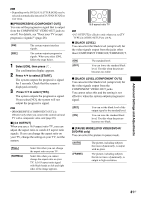
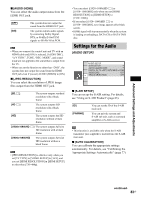
Advanced Settings and Adjustments Note • Depending on the DVD, [4:3 LETTER BOX] may be selected automatically instead of [4:3 PAN SCAN] or vice versa. x [PROGRESSIVE (COMPONENT OUT)] You can set the progressive signal that is output from the COMPONENT VIDEO OUT jacks to on/off. For details, see "Does your TV accept progressive signals?" (page 28). [ON] [OFF] The system outputs interlace signals. The system outputs progressive signals. When you select [ON], follow the steps below. 1 Select [ON], then press . The confirmation display appears. 2 Press C/c to select [START]. The system outputs the progressive signal for 5 seconds. Check that the screen is displayed correctly. 3 Press C/c to select [YES]. The system outputs the progressive signal. If you select [NO], the system will not output the progressive signal. Note • [PROGRESSIVE (COMPONENT OUT)] is effective only when you connect the control unit and TV with a component video cord (page 20). x [4:3 OUTPUT] When you use a 16:9 aspect ratio TV, you can adjust the aspect ratio to watch 4:3 aspect ratio signals. If you can change the aspect ratio on your TV, change the setting on your TV, not the system. [FULL] [NORMAL] Select this when you can change the aspect ratio on your TV. Select this when you cannot change the aspect ratio on your TV. A 16:9 aspect ratio signal with black bands on left and right sides of the image appears. 16:9 aspect ratio TV Note • [4:3 OUTPUT] is effective only when you set [TV TYPE] in [VIDEO SETUP] to [16:9]. x [BLACK LEVEL] You can select the black level (setup level) for the video signals output from the jacks other than COMPONENT VIDEO OUT/HDMI OUT. [ON] [OFF] The standard level. You can lower the standard black level. Use this when the picture becomes too white. x [BLACK LEVEL (COMPONENT OUT)] You can select the black level (setup level) for the video signals output from the COMPONENT VIDEO OUT jacks. You cannot select this and the setting is not effective when the system outputs progressive signal. [OFF] [ON] You can set the black level of the output signal to the standard level. You can raise the standard black level. Use this when the picture becomes too black. x [PAUSE MODE] (DVD VIDEO/DVD-R/ DVD-RW only) You can select the picture in pause mode. [AUTO] [FRAME] The picture, including subjects that move dynamically, is output with no jitter. The picture, including subjects that do not move dynamically, is output in high resolution. 81US
-
 1
1 -
2
-
3
-
4
-
5
-
6
-
7
-
8
-
9
-
10
-
11
-
12
-
13
-
14
-
15
-
16
-
17
-
18
-
19
-
20
-
21
-
22
-
23
-
24
-
25
-
26
-
27
-
28
-
29
-
30
-
31
-
32
-
33
-
34
-
35
-
36
-
37
-
38
-
39
-
40
-
41
-
42
-
43
-
44
-
45
-
46
-
47
-
48
-
49
-
50
-
51
-
52
-
53
-
54
-
55
-
56
-
57
-
58
-
59
-
60
-
61
-
62
-
63
-
64
-
65
-
66
-
67
-
68
-
69
-
70
-
71
-
72
-
73
-
74
-
75
-
 76
76 -
 77
77 -
 78
78 -
 79
79 -
 80
80 -
 81
81 -
 82
82 -
 83
83 -
 84
84 -
 85
85 -
 86
86 -
87
-
88
-
89
-
90
-
91
-
92
-
93
-
94
-
95
-
96
-
97
-
98
-
99
-
100
-
101
-
102
-
103
-
104
-
105
-
106
-
107
-
108
-
109
-
110
-
111
-
112
-
113
-
114
-
115
 |
 |
