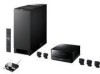
Sony DAV IS50 Operating Instructions - Page 64
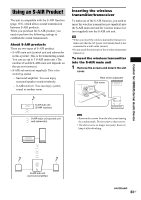
For the surround amplifier not supplied, For the S-AIR receiver not supplied, Establishing sound - wireless
 |
UPC - 027242730953
View all Sony DAV IS50 manuals
Add to My Manuals
Save this manual to your list of manuals |
Page 64 highlights
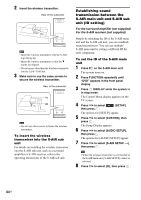
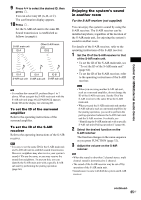
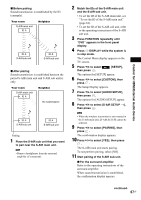
2 Insert the wireless transmitter. Rear of the subwoofer Note • Insert the wireless transmitter with the S-AIR logo facing up. • Insert the wireless transmitter so that the V marks are aligned. • Do not insert other than the wireless transmitter into the EZW-T100 slot. 3 Make sure to use the same screws to secure the wireless transmitter. Rear of the subwoofer Note • Do not use other screws to fasten the wireless transmitter. To insert the wireless transceiver into the S-AIR sub unit For details on installing the wireless transceiver into the S-AIR sub unit, such as a surround amplifier or S-AIR receiver, refer to the operating instructions of the S-AIR sub unit. Establishing sound transmission between the S-AIR main unit and S-AIR sub unit (ID setting) For the surround amplifier (not supplied) For the S-AIR receiver (not supplied) Simply by matching the ID of the S-AIR main unit and the S-AIR sub unit, you can establish sound transmission. You can use multiple S-AIR main unit by setting a different ID for each component. To set the ID of the S-AIR main unit 1 Press "/1 on the S-AIR main unit. The system turns on. 2 Press FUNCTION repeatedly until "DVD" appears in the front panel display. 3 Press DISPLAY while the system is in stop mode. The Control Menu display appears on the TV screen. 4 Press X/x to select [SETUP], then press . The options for [SETUP] appear. 5 Press X/x to select [CUSTOM], then press . The Setup Display appears. 6 Press X/x to select [AUDIO SETUP], then press . The options for [AUDIO SETUP] appear. 7 Press X/x to select [S-AIR SETUP t], then press . Note • When the wireless transmitter is not inserted in the S-AIR main unit, [S-AIR SETUP] cannot be selected. 8 Press X/x to select [ID], then press . 64US
-
 1
1 -
2
-
3
-
4
-
5
-
6
-
7
-
8
-
9
-
10
-
11
-
12
-
13
-
14
-
15
-
16
-
17
-
18
-
19
-
20
-
21
-
22
-
23
-
24
-
25
-
26
-
27
-
28
-
29
-
30
-
31
-
32
-
33
-
34
-
35
-
36
-
37
-
38
-
39
-
40
-
41
-
42
-
43
-
44
-
45
-
46
-
47
-
48
-
49
-
50
-
51
-
52
-
53
-
54
-
55
-
56
-
57
-
58
-
 59
59 -
 60
60 -
 61
61 -
 62
62 -
 63
63 -
 64
64 -
 65
65 -
 66
66 -
 67
67 -
 68
68 -
 69
69 -
70
-
71
-
72
-
73
-
74
-
75
-
76
-
77
-
78
-
79
-
80
-
81
-
82
-
83
-
84
-
85
-
86
-
87
-
88
-
89
-
90
-
91
-
92
-
93
-
94
-
95
-
96
-
97
-
98
-
99
-
100
-
101
-
102
-
103
-
104
-
105
-
106
-
107
-
108
-
109
-
110
-
111
-
112
-
113
-
114
-
115
 |
 |
