Sony DCR-IP5 Operating Instructions - Page 100
To return to the FN screen, To erase the label you have made, To enter a space
 |
UPC - 027242597945
View all Sony DCR-IP5 manuals
Add to My Manuals
Save this manual to your list of manuals |
Page 100 highlights
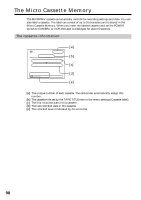
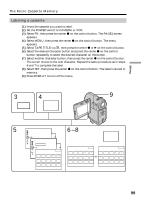
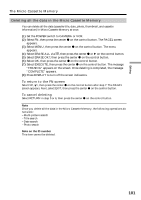
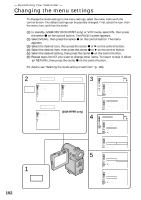
The Micro Cassette Memory To return to the FN screen Select , , then press the center z on the control button after step 8. The PAGE1 screen appears. Next, select EXIT, then press the center z on the control button. To erase the label you have made Select C, then press the center z on the control button in step 6. The last character is erased. To change the label you have made Insert the cassette for which you want to change the label, and proceed in the same way as you do to make a new label. If you set the write-protect tab of the tape to lock You cannot label the tape. Slide the write-protect tab to release the write protection. Note on recorded areas A blank portion between recorded areas is also indicated as a recorded area. Note on cassette information You can turn off the cassette information using the q INFODSPL item in the menu settings. When " " is flashing Remove the cassette and insert it again. If the message is still displayed, the Micro Cassette Memory may be corrupted. Replace the cassette with another cassette. To erase the title Select C, then press the center z on the control button. The last character is erased. To enter a space Select c, then press the center z on the control button. To enter the same character on the same button in succession Select c, then press the center z on the control button to move the cursor to the next position, and enter the character. 100
-
 1
1 -
2
-
3
-
4
-
5
-
6
-
7
-
8
-
9
-
10
-
11
-
12
-
13
-
14
-
15
-
16
-
17
-
18
-
19
-
20
-
21
-
22
-
23
-
24
-
25
-
26
-
27
-
28
-
29
-
30
-
31
-
32
-
33
-
34
-
35
-
36
-
37
-
38
-
39
-
40
-
41
-
42
-
43
-
44
-
45
-
46
-
47
-
48
-
49
-
50
-
51
-
52
-
53
-
54
-
55
-
56
-
57
-
58
-
59
-
60
-
61
-
62
-
63
-
64
-
65
-
66
-
67
-
68
-
69
-
70
-
71
-
72
-
73
-
74
-
75
-
76
-
77
-
78
-
79
-
80
-
81
-
82
-
83
-
84
-
85
-
86
-
87
-
88
-
89
-
90
-
91
-
92
-
93
-
94
-
 95
95 -
 96
96 -
 97
97 -
 98
98 -
 99
99 -
 100
100 -
 101
101 -
 102
102 -
 103
103 -
 104
104 -
 105
105 -
106
-
107
-
108
-
109
-
110
-
111
-
112
-
113
-
114
-
115
-
116
-
117
-
118
-
119
-
120
-
121
-
122
-
123
-
124
-
125
-
126
-
127
-
128
-
129
-
130
-
131
-
132
-
133
-
134
-
135
-
136
-
137
-
138
-
139
-
140
-
141
-
142
-
143
-
144
-
145
-
146
-
147
-
148
-
149
-
150
-
151
-
152
-
153
-
154
-
155
-
156
-
157
-
158
-
159
-
160
-
161
-
162
-
163
-
164
-
165
-
166
-
167
-
168
-
169
-
170
-
171
-
172
-
173
-
174
-
175
-
176
-
177
-
178
-
179
-
180
-
181
-
182
-
183
-
184
-
185
-
186
-
187
-
188
-
189
-
190
-
191
-
192
-
193
-
194
-
195
-
196
 |
 |
