Sony DCR-IP5 Operating Instructions - Page 106
Icon/item, Titleerase, Title Dspl, Tape Title, Erase All, Infodspl, Remain, Clock Set, Ltr Size
 |
UPC - 027242597945
View all Sony DCR-IP5 manuals
Add to My Manuals
Save this manual to your list of manuals |
Page 106 highlights
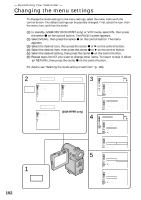
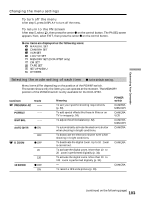
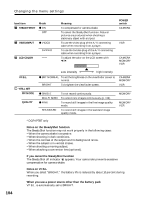
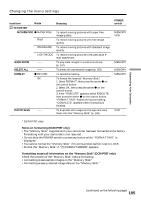
Changing the menu settings Icon/item TITLEERASE Mode -- TITLE DSPL TAPE TITLE z ON OFF -- ERASE ALL -- q INFODSPL z ON qREMAIN OFF z AUTO CLOCK SET ON -- LTR SIZE z NORMAL 2× DEMO MODE z ON OFF Meaning To erase a superimposed title (p. 94). To display a superimposed title. To not display the title. To label a cassette (p. 99). To erase all the data in the Micro Cassette Memory (p. 101). To display the cassette information of the tape. This is displayed for 5 seconds in the following cases: (p. 98). • When turning on the power with a cassette inserted or inserting a cassette. • When entering the VCR mode using the POWER switch. To not display the cassette information of the tape. To display the remaining tape bar: • for about 8 seconds after your camcorder is turned on or a cassette is inserted, and also calculate the remaining amount of tape. • for about 8 seconds after you select and you press the center z on the control button or DISPLAY is pressed to display the screen indicators. • During fast-forwarding or rewinding the tape. To always display the remaining tape indicator. To set the date or time (p. 23). To display the selected menu item in normal size. To display the selected menu item at twice the normal size. To make the demonstration appear. To cancel the demonstration mode. POWER switch CAMERA VCR VCR CAMERA VCR CAMERA VCR CAMERA VCR CAMERA VCR CAMERA MEMORY CAMERA MEMORY VCR CAMERA Notes on DEMO MODE • You cannot select DEMO MODE when a cassette is inserted in your camcorder. • DEMO MODE is set to STBY (Standby) as the default setting and the demonstration starts about 10 minutes after you have set the POWER switch to CAMERA without a cassette inserted. To cancel the demonstration, insert a cassette, set the POWER switch to a position other than CAMERA, or set DEMO MODE to OFF. To set to STBY (Standby) again, leave the DEMO MODE to ON in the menu settings, set the POWER switch to OFF (CHG), and slide the POWER switch to CAMERA. 106
-
 1
1 -
2
-
3
-
4
-
5
-
6
-
7
-
8
-
9
-
10
-
11
-
12
-
13
-
14
-
15
-
16
-
17
-
18
-
19
-
20
-
21
-
22
-
23
-
24
-
25
-
26
-
27
-
28
-
29
-
30
-
31
-
32
-
33
-
34
-
35
-
36
-
37
-
38
-
39
-
40
-
41
-
42
-
43
-
44
-
45
-
46
-
47
-
48
-
49
-
50
-
51
-
52
-
53
-
54
-
55
-
56
-
57
-
58
-
59
-
60
-
61
-
62
-
63
-
64
-
65
-
66
-
67
-
68
-
69
-
70
-
71
-
72
-
73
-
74
-
75
-
76
-
77
-
78
-
79
-
80
-
81
-
82
-
83
-
84
-
85
-
86
-
87
-
88
-
89
-
90
-
91
-
92
-
93
-
94
-
95
-
96
-
97
-
98
-
99
-
100
-
 101
101 -
 102
102 -
 103
103 -
 104
104 -
 105
105 -
 106
106 -
 107
107 -
 108
108 -
 109
109 -
 110
110 -
 111
111 -
112
-
113
-
114
-
115
-
116
-
117
-
118
-
119
-
120
-
121
-
122
-
123
-
124
-
125
-
126
-
127
-
128
-
129
-
130
-
131
-
132
-
133
-
134
-
135
-
136
-
137
-
138
-
139
-
140
-
141
-
142
-
143
-
144
-
145
-
146
-
147
-
148
-
149
-
150
-
151
-
152
-
153
-
154
-
155
-
156
-
157
-
158
-
159
-
160
-
161
-
162
-
163
-
164
-
165
-
166
-
167
-
168
-
169
-
170
-
171
-
172
-
173
-
174
-
175
-
176
-
177
-
178
-
179
-
180
-
181
-
182
-
183
-
184
-
185
-
186
-
187
-
188
-
189
-
190
-
191
-
192
-
193
-
194
-
195
-
196
 |
 |
