Sony DCR-IP5 Operating Instructions - Page 151
INDEX, Notes, If the write-protect switch on the, Memory Stick, is set to LOCK, Before operation
 |
UPC - 027242597945
View all Sony DCR-IP5 manuals
Add to My Manuals
Save this manual to your list of manuals |
Page 151 highlights
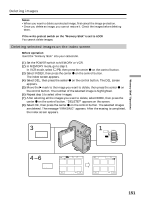
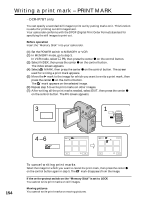
"Memory Stick" Operations Deleting images Notes •When you want to delete a protected image, first cancel the image protection. •Once you delete an image, you cannot restore it. Check the images before deleting them. If the write-protect switch on the "Memory Stick" is set to LOCK You cannot delete images. Deleting selected images on the index screen Before operation Insert the "Memory Stick" into your camcorder. (1) Set the POWER switch to MEMORY or VCR. (2) In MEMORY mode, go to step 3. In VCR mode, select PB, then press the center z on the control button. (3) Select INDEX, then press the center z on the control button. The index screen appears. (4) Select DEL, then press the center z on the control button. The DEL screen appears. (5) Move the B mark to the image you want to delete, then press the center z on the control button. The number of the selected image is highlighted. (6) Repeat step 5 to select other images. (7) After selecting all the images you want to delete, select EXEC, then press the center z on the control button. "DELETE?" appears on the screen. (8) Select OK, then press the center z on the control button. The selected images are deleted. The message "ERASING" appears. After the erasing is completed, the index screen appears. 3 INDEX 1 CAMERA MEMORY/ NETWORK VCR POWER (CHG) OFF ON MODE 4-6 DEL -MARK MARK DEL EXIT 1 2 3 4 5 6 T 1 / 40 t RET. DEL 1- EXEC EXIT 2 3 4 5 6 T 3 / 40 t 151
-
 1
1 -
2
-
3
-
4
-
5
-
6
-
7
-
8
-
9
-
10
-
11
-
12
-
13
-
14
-
15
-
16
-
17
-
18
-
19
-
20
-
21
-
22
-
23
-
24
-
25
-
26
-
27
-
28
-
29
-
30
-
31
-
32
-
33
-
34
-
35
-
36
-
37
-
38
-
39
-
40
-
41
-
42
-
43
-
44
-
45
-
46
-
47
-
48
-
49
-
50
-
51
-
52
-
53
-
54
-
55
-
56
-
57
-
58
-
59
-
60
-
61
-
62
-
63
-
64
-
65
-
66
-
67
-
68
-
69
-
70
-
71
-
72
-
73
-
74
-
75
-
76
-
77
-
78
-
79
-
80
-
81
-
82
-
83
-
84
-
85
-
86
-
87
-
88
-
89
-
90
-
91
-
92
-
93
-
94
-
95
-
96
-
97
-
98
-
99
-
100
-
101
-
102
-
103
-
104
-
105
-
106
-
107
-
108
-
109
-
110
-
111
-
112
-
113
-
114
-
115
-
116
-
117
-
118
-
119
-
120
-
121
-
122
-
123
-
124
-
125
-
126
-
127
-
128
-
129
-
130
-
131
-
132
-
133
-
134
-
135
-
136
-
137
-
138
-
139
-
140
-
141
-
142
-
143
-
144
-
145
-
 146
146 -
 147
147 -
 148
148 -
 149
149 -
 150
150 -
 151
151 -
 152
152 -
 153
153 -
 154
154 -
 155
155 -
 156
156 -
157
-
158
-
159
-
160
-
161
-
162
-
163
-
164
-
165
-
166
-
167
-
168
-
169
-
170
-
171
-
172
-
173
-
174
-
175
-
176
-
177
-
178
-
179
-
180
-
181
-
182
-
183
-
184
-
185
-
186
-
187
-
188
-
189
-
190
-
191
-
192
-
193
-
194
-
195
-
196
 |
 |
