Sony DCR-TRV70 Operating Instructions - Page 121
Interval Photo Recording
 |
View all Sony DCR-TRV70 manuals
Add to My Manuals
Save this manual to your list of manuals |
Page 121 highlights
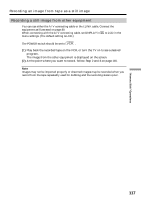
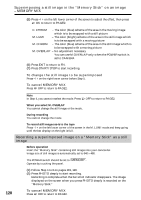
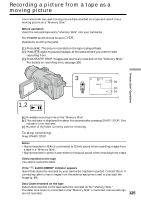
"Memory Stick" Operations Interval Photo Recording You can make a time-lapse recording by setting the camcorder to automatically record still images. [a] [a] [a] [b] [b] [a] Memory Photo recording [b] INTERVAL The POWER switch should be set to . Operate by touching the panel. (1) Press FN to display PAGE1. (2) Press MENU. (3) Select INT. R-STL in , then press EXEC. (4) Select SET, then press EXEC. (5) Select INTERVAL, then press EXEC. (6) Select a desired interval time, then press EXEC. (7) Press RET. (8) Set INT.R-STL to ON, then press EXEC. (9) Press EXIT to return to FN. The INTERVAL MEM STILL indicator flashes on the screen. (10) Press PHOTO deeply. Interval Photo Recording starts. The INTERVAL MEM STILL indicator lights up on the screen during Interval Photo Recording. PHOTO 4 MEM SET 2 INT. R -STL INTERVAL EXIT 1MIN 5 MEM SET 2 INT. R -STL INTERVAL EXIT 1MIN 5MIN 10MIN EXEC RET. EXEC RET. To cancel Interval Photo Recording Set INT. R-STL to OFF. 121
-
 1
1 -
2
-
3
-
4
-
5
-
6
-
7
-
8
-
9
-
10
-
11
-
12
-
13
-
14
-
15
-
16
-
17
-
18
-
19
-
20
-
21
-
22
-
23
-
24
-
25
-
26
-
27
-
28
-
29
-
30
-
31
-
32
-
33
-
34
-
35
-
36
-
37
-
38
-
39
-
40
-
41
-
42
-
43
-
44
-
45
-
46
-
47
-
48
-
49
-
50
-
51
-
52
-
53
-
54
-
55
-
56
-
57
-
58
-
59
-
60
-
61
-
62
-
63
-
64
-
65
-
66
-
67
-
68
-
69
-
70
-
71
-
72
-
73
-
74
-
75
-
76
-
77
-
78
-
79
-
80
-
81
-
82
-
83
-
84
-
85
-
86
-
87
-
88
-
89
-
90
-
91
-
92
-
93
-
94
-
95
-
96
-
97
-
98
-
99
-
100
-
101
-
102
-
103
-
104
-
105
-
106
-
107
-
108
-
109
-
110
-
111
-
112
-
113
-
114
-
115
-
 116
116 -
 117
117 -
 118
118 -
 119
119 -
 120
120 -
 121
121 -
 122
122 -
 123
123 -
 124
124 -
 125
125 -
 126
126 -
127
-
128
-
129
-
130
-
131
-
132
-
133
-
134
-
135
-
136
-
137
-
138
-
139
-
140
-
141
-
142
-
143
-
144
-
145
-
146
-
147
-
148
-
149
-
150
-
151
-
152
-
153
-
154
-
155
-
156
-
157
-
158
-
159
-
160
-
161
-
162
-
163
-
164
-
165
-
166
-
167
-
168
-
169
-
170
-
171
-
172
-
173
-
174
-
175
-
176
-
177
-
178
-
179
-
180
-
181
-
182
-
183
-
184
-
185
-
186
-
187
-
188
-
189
-
190
-
191
-
192
-
193
-
194
-
195
-
196
-
197
-
198
-
199
-
200
-
201
-
202
-
203
-
204
-
205
-
206
-
207
-
208
-
209
-
210
-
211
-
212
-
213
-
214
-
215
-
216
-
217
-
218
-
219
-
220
 |
 |