Sony DCR-TRV70 Operating Instructions - Page 62
Using the spot light-metering function – Flexible Spot Meter
 |
View all Sony DCR-TRV70 manuals
Add to My Manuals
Save this manual to your list of manuals |
Page 62 highlights
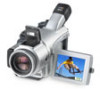
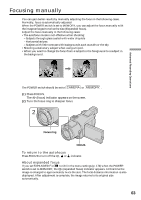
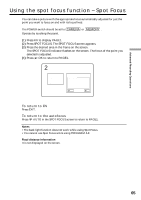
Using the spot light-metering function - Flexible Spot Meter You can take a picture with the appropriate exposure automatically adjusted for just the point you want to focus on and with its exposure fixed. Use Flexible Spot Meter in the following cases: - The subject is backlit. - When there is strong contrast between the subject and background such as with a subject that is on stage and lit by a spotlight. The POWER switch should be set to or . Operate by touching the panel. (1) Press FN to display PAGE1. (2) Press SPOT METER. The SPOT METER screen appears. (3) Press the desired area in the frame on the screen. The SPOT METER indicator flashes on the screen. The exposure of the point you selected is adjusted. (4) Press OK to return to PAGE1. 2 SPOT METER SPOT METER AUTO OK To return to FN Press EXIT. To return to the automatic exposure Press AUTO in the SPOT METER screen to return to PAGE1. Note The following functions do not work while using Flexible Spot Meter: - Back light - Color Slow Shutter - Spot focus 62
-
 1
1 -
2
-
3
-
4
-
5
-
6
-
7
-
8
-
9
-
10
-
11
-
12
-
13
-
14
-
15
-
16
-
17
-
18
-
19
-
20
-
21
-
22
-
23
-
24
-
25
-
26
-
27
-
28
-
29
-
30
-
31
-
32
-
33
-
34
-
35
-
36
-
37
-
38
-
39
-
40
-
41
-
42
-
43
-
44
-
45
-
46
-
47
-
48
-
49
-
50
-
51
-
52
-
53
-
54
-
55
-
56
-
 57
57 -
 58
58 -
 59
59 -
 60
60 -
 61
61 -
 62
62 -
 63
63 -
 64
64 -
 65
65 -
 66
66 -
 67
67 -
68
-
69
-
70
-
71
-
72
-
73
-
74
-
75
-
76
-
77
-
78
-
79
-
80
-
81
-
82
-
83
-
84
-
85
-
86
-
87
-
88
-
89
-
90
-
91
-
92
-
93
-
94
-
95
-
96
-
97
-
98
-
99
-
100
-
101
-
102
-
103
-
104
-
105
-
106
-
107
-
108
-
109
-
110
-
111
-
112
-
113
-
114
-
115
-
116
-
117
-
118
-
119
-
120
-
121
-
122
-
123
-
124
-
125
-
126
-
127
-
128
-
129
-
130
-
131
-
132
-
133
-
134
-
135
-
136
-
137
-
138
-
139
-
140
-
141
-
142
-
143
-
144
-
145
-
146
-
147
-
148
-
149
-
150
-
151
-
152
-
153
-
154
-
155
-
156
-
157
-
158
-
159
-
160
-
161
-
162
-
163
-
164
-
165
-
166
-
167
-
168
-
169
-
170
-
171
-
172
-
173
-
174
-
175
-
176
-
177
-
178
-
179
-
180
-
181
-
182
-
183
-
184
-
185
-
186
-
187
-
188
-
189
-
190
-
191
-
192
-
193
-
194
-
195
-
196
-
197
-
198
-
199
-
200
-
201
-
202
-
203
-
204
-
205
-
206
-
207
-
208
-
209
-
210
-
211
-
212
-
213
-
214
-
215
-
216
-
217
-
218
-
219
-
220
 |
 |