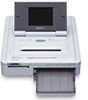
Sony DPP-EX7 Operating Instructions - Page 25
Printing multiple images, the Memory Stick or PC card insertion slot s 14
 |
View all Sony DPP-EX7 manuals
Add to My Manuals
Save this manual to your list of manuals |
Page 25 highlights
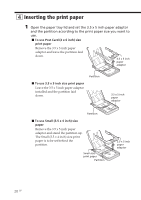
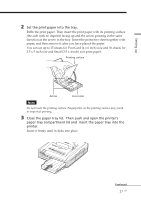
Basic printing operations To print the previewed image To print a copy of the previewed image, press the PRINT button. To print multiple copies, tap [+] until the desired print quantity is displayed and then press the PRINT button. To reduce the print quantity, tap [-]. Notes •While the printer is accessing the "Memory Stick" or a PC card, do not eject the "Memory Stick" or PC card. Otherwise, they may crash. •The displayed image on the screen is not identical in picture quality and colors with the printed image because phosphor methods or profiles differ. Please regard the displayed image as just a reference. Printing multiple images 1 Insert a "Memory Stick" or PC card with recorded images into the "Memory Stick" or PC card insertion slot (pages 14, 15). 2 Press the POWER button to turn on the printer. The POWER indicator lights in green. 3 Press the INPUT SELECT button repeatedly until the "MEMORY STICK" or PC CARD indicator turns on. The list of the images stored in the "Memory Stick" or PC card is displayed on the screen. 4 Tap the image you want to print on the screen. The cursor moves to the tapped image. 5 Tap [+]. The image is selected and its background turns to yellow. The print quantity becomes "1." Selected image with yellow background To cancel the selection Tap [-] repeatedly until the print quantity becomes "0." The background turns yellow to gray and the selection is canceled. Continued 25 GB
-
 1
1 -
2
-
3
-
4
-
5
-
6
-
7
-
8
-
9
-
10
-
11
-
12
-
13
-
14
-
15
-
16
-
17
-
18
-
19
-
 20
20 -
 21
21 -
 22
22 -
 23
23 -
 24
24 -
 25
25 -
 26
26 -
 27
27 -
 28
28 -
 29
29 -
 30
30 -
31
-
32
-
33
-
34
-
35
-
36
-
37
-
38
-
39
-
40
-
41
-
42
-
43
-
44
-
45
-
46
-
47
-
48
-
49
-
50
-
51
-
52
-
53
-
54
-
55
-
56
-
57
-
58
-
59
-
60
-
61
-
62
-
63
-
64
-
65
-
66
-
67
-
68
-
69
-
70
-
71
-
72
-
73
-
74
-
75
-
76
-
77
-
78
-
79
-
80
-
81
-
82
-
83
-
84
-
85
-
86
-
87
-
88
-
89
-
90
-
91
-
92
-
93
-
94
-
95
-
96
-
97
-
98
-
99
-
100
-
101
-
102
-
103
-
104
-
105
-
106
-
107
-
108
-
109
-
110
-
111
-
112
-
113
-
114
-
115
-
116
-
117
-
118
-
119
-
120
-
121
-
122
-
123
-
124
-
125
-
126
-
127
-
128
-
129
-
130
-
131
-
132
-
133
-
134
-
135
-
136
-
137
-
138
-
139
-
140
-
141
-
142
-
143
-
144
-
145
-
146
-
147
-
148
-
149
-
150
-
151
-
152
-
153
-
154
-
155
-
156
-
157
-
158
-
159
-
160
-
161
-
162
-
163
-
164
-
165
-
166
-
167
-
168
-
169
-
170
-
171
-
172
-
173
-
174
-
175
-
176
-
177
-
178
-
179
-
180
-
181
-
182
-
183
-
184
-
185
-
186
-
187
-
188
-
189
-
190
-
191
-
192
-
193
-
194
-
195
-
196
-
197
-
198
-
199
-
200
-
201
-
202
-
203
-
204
-
205
-
206
-
207
-
208
-
209
-
210
-
211
-
212
-
213
-
214
-
215
-
216
-
217
-
218
-
219
-
220
-
221
-
222
-
223
-
224
-
225
-
226
-
227
-
228
-
229
-
230
-
231
-
232
-
233
-
234
-
235
-
236
-
237
-
238
-
239
-
240
-
241
-
242
-
243
-
244
-
245
-
246
-
247
-
248
-
249
-
250
-
251
-
252
-
253
-
254
-
255
-
256
-
257
-
258
-
259
-
260
-
261
-
262
-
263
-
264
-
265
-
266
-
267
-
268
-
269
-
270
-
271
-
272
-
273
-
274
-
275
-
276
-
277
-
278
-
279
-
280
-
281
-
282
-
283
-
284
-
285
-
286
-
287
-
288
-
289
-
290
-
291
-
292
-
293
-
294
-
295
-
296
 |
 |
