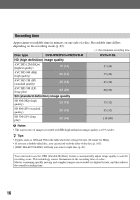
Sony HDR UX5 Instruction Manual - Page 21
Step 2: Charging the battery pack, Getting Started
 |
UPC - 027242701434
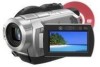
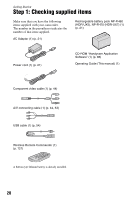
View all Sony HDR UX5 manuals
Add to My Manuals
Save this manual to your list of manuals |
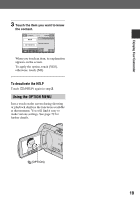
Page 21 highlights
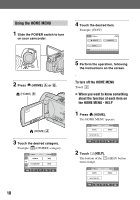
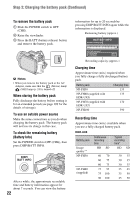
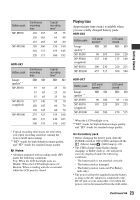
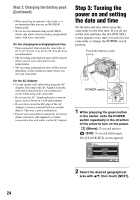
Step 2: Charging the battery pack POWER switch Getting Started Battery DC IN jack DC plug Jack cover AC Adaptor CHG (charge) lamp Power cord To the wall outlet You can charge the "InfoLITHIUM" battery pack (H series) (p. 108) after attaching it to your camcorder. b Notes • You can use only the H series of "InfoLITHIUM" battery pack with your camcorder. 1 Slide the POWER switch in the direction of the arrow to OFF (CHG) (The default setting). 2 Raise the viewfinder, then attach the battery pack by sliding it in the direction of the arrow until it clicks. 3 Connect the AC Adaptor to the DC IN jack of your camcorder. Open the jack cover, and connect the DC plug of the AC Adaptor. Match the v mark on the DC plug with the v mark on your camcorder. 4 Connect the power cord to the AC Adaptor and the wall outlet. The CHG (charge) lamp lights up and charging starts. The CHG (charge) lamp turns off when the battery is fully charged. 5 Disconnect the AC Adaptor from the DC IN jack on your camcorder. b Notes • Disconnect the AC Adaptor from the DC IN jack holding both the camcorder and the DC plug. 21
-
 1
1 -
2
-
3
-
4
-
5
-
6
-
7
-
8
-
9
-
10
-
11
-
12
-
13
-
14
-
15
-
 16
16 -
 17
17 -
 18
18 -
 19
19 -
 20
20 -
 21
21 -
 22
22 -
 23
23 -
 24
24 -
 25
25 -
 26
26 -
27
-
28
-
29
-
30
-
31
-
32
-
33
-
34
-
35
-
36
-
37
-
38
-
39
-
40
-
41
-
42
-
43
-
44
-
45
-
46
-
47
-
48
-
49
-
50
-
51
-
52
-
53
-
54
-
55
-
56
-
57
-
58
-
59
-
60
-
61
-
62
-
63
-
64
-
65
-
66
-
67
-
68
-
69
-
70
-
71
-
72
-
73
-
74
-
75
-
76
-
77
-
78
-
79
-
80
-
81
-
82
-
83
-
84
-
85
-
86
-
87
-
88
-
89
-
90
-
91
-
92
-
93
-
94
-
95
-
96
-
97
-
98
-
99
-
100
-
101
-
102
-
103
-
104
-
105
-
106
-
107
-
108
-
109
-
110
-
111
-
112
-
113
-
114
-
115
-
116
-
117
-
118
-
119
-
120
-
121
-
122
-
123
-
124
-
125
-
126
-
127
-
128
-
129
-
130
-
131
-
132
-
133
-
134
-
135
-
136
-
137
-
138
-
139
-
140
-
141
-
142
-
143
 |
 |
