Sony HDR UX5 Instruction Manual - Page 49
Deleting the still images in the, Memory Stick Duo, To delete SD standard definition
 |
UPC - 027242701434
View all Sony HDR UX5 manuals
Add to My Manuals
Save this manual to your list of manuals |
Page 49 highlights
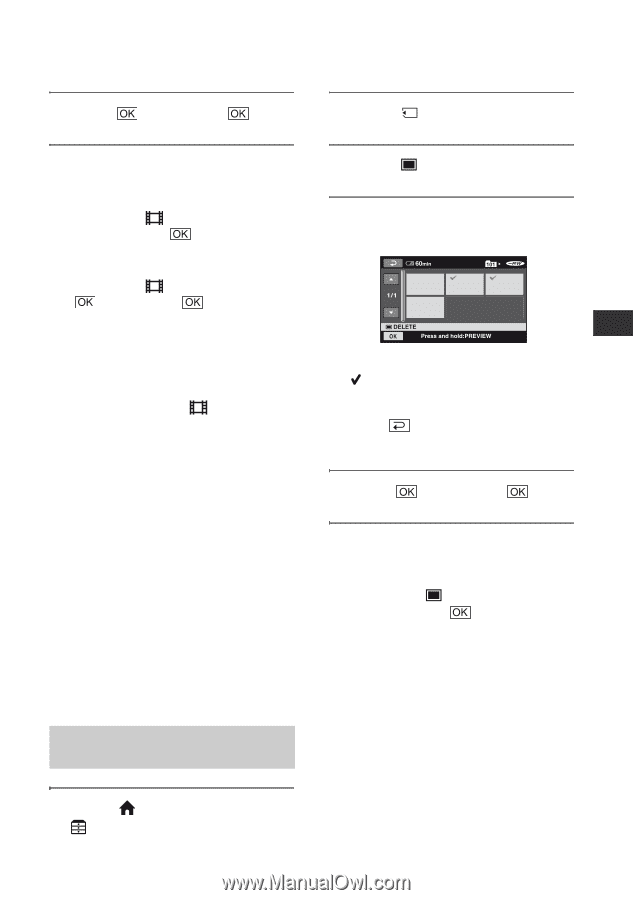
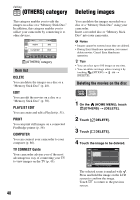
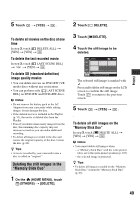
5 Touch t [YES] t . To delete all movies on the disc at one time In step 3, touch [ DELETE ALL] t [YES] t [YES] t . To delete the last recorded movie In step 3, touch [ LAST SCENE DEL] t t [YES] t . To delete SD (standard definition) image quality movies • You can delete movies on DVD-RW (VR mode) discs without any restrictions. • You can perform only [ LAST SCENE DEL] on DVD-RW and DVD+RW discs. b Notes • Do not remove the battery pack or the AC Adaptor from your camcorder while editing images. It may damage the disc. • If the deleted movie is included in the Playlist (p. 51), the movie is deleted also from the Playlist. • Even if you delete unnecessary images from the disc, the remaining disc capacity may not increase as much as you can make additional recording. • To delete all images recorded in the disc and restore the original capacity of the disc, format the disc (p. 62). z Tips • A movie recorded by your camcorder onto a disc is called an "original." Deleting the still images in the "Memory Stick Duo" 1 On the (HOME MENU), touch (OTHERS) t [DELETE]. 2 Touch [ DELETE]. 3 Touch [ DELETE]. 4 Touch the still image to be deleted. The selected still image is marked with . Press and hold the still image on the LCD screen to confirm the still image. Touch to return to the previous screen. 5 Touch t [YES] t . To delete all still images on the "Memory Stick Duo" In step 3, touch [ DELETE ALL] t [YES] t [YES] t . b Notes • You cannot delete still images when: - a "Memory Stick Duo" with the write-protect tab is set to the write-protect position (p. 107) - the selected image is protected. z Tips • To delete all images recorded on the "Memory Stick Duo," format the "Memory Stick Duo" (p. 63). 49 Editing
-
 1
1 -
2
-
3
-
4
-
5
-
6
-
7
-
8
-
9
-
10
-
11
-
12
-
13
-
14
-
15
-
16
-
17
-
18
-
19
-
20
-
21
-
22
-
23
-
24
-
25
-
26
-
27
-
28
-
29
-
30
-
31
-
32
-
33
-
34
-
35
-
36
-
37
-
38
-
39
-
40
-
41
-
42
-
43
-
 44
44 -
 45
45 -
 46
46 -
 47
47 -
 48
48 -
 49
49 -
 50
50 -
 51
51 -
 52
52 -
 53
53 -
 54
54 -
55
-
56
-
57
-
58
-
59
-
60
-
61
-
62
-
63
-
64
-
65
-
66
-
67
-
68
-
69
-
70
-
71
-
72
-
73
-
74
-
75
-
76
-
77
-
78
-
79
-
80
-
81
-
82
-
83
-
84
-
85
-
86
-
87
-
88
-
89
-
90
-
91
-
92
-
93
-
94
-
95
-
96
-
97
-
98
-
99
-
100
-
101
-
102
-
103
-
104
-
105
-
106
-
107
-
108
-
109
-
110
-
111
-
112
-
113
-
114
-
115
-
116
-
117
-
118
-
119
-
120
-
121
-
122
-
123
-
124
-
125
-
126
-
127
-
128
-
129
-
130
-
131
-
132
-
133
-
134
-
135
-
136
-
137
-
138
-
139
-
140
-
141
-
142
-
143
 |
 |