Sony HDR UX5 Instruction Manual - Page 24
Step 3: Turning the power on and setting the date and time, Step 2: Charging the battery pack - video
 |
UPC - 027242701434
View all Sony HDR UX5 manuals
Add to My Manuals
Save this manual to your list of manuals |
Page 24 highlights
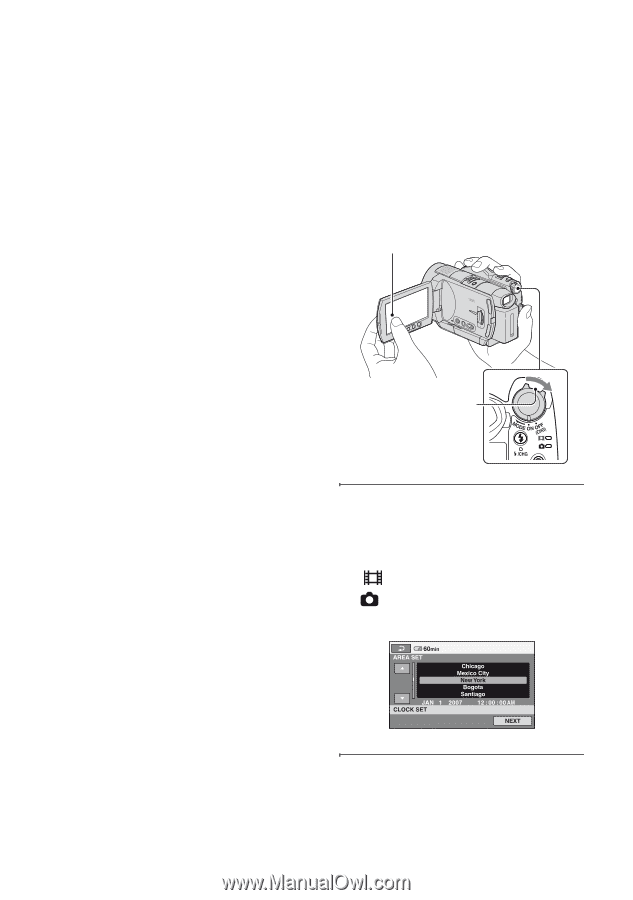
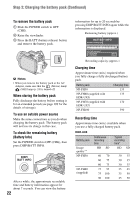
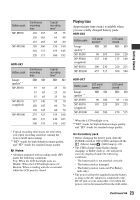
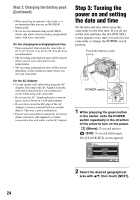
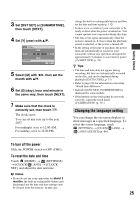
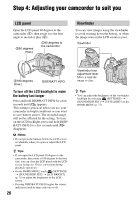
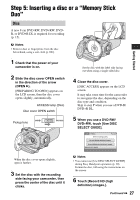
Step 2: Charging the battery pack (Continued) • When attaching an optional video light, it is recommended that you use an NP-FH100 battery pack. • We do not recommend using an NP-FH30, which only allows short recording and playback times, with your camcorder. On the charging/recording/playback time • Times measured when using the camcorder at 25 °C (77 °F) (10 °C to 30 °C (50 °F to 86 °F) is recommended). • The recording and playback time will be shorter when you use your camcorder in low temperatures. • The recording and playback time will be shorter depending on the conditions under which you use your camcorder. On the AC Adaptor • Use the nearby wall outlet when using the AC Adaptor. Disconnect the AC Adaptor from the wall outlet immediately if any malfunction occurs while using your camcorder. • Do not use the AC Adaptor placed in a narrow space, such as between a wall and furniture. • Do not short-circuit the DC plug of the AC Adaptor or battery terminal with any metallic objects. This may cause a malfunction. • Even if your camcorder is turned off, AC power (house current) is still supplied to it while connected to the wall outlet via the AC Adaptor. Step 3: Turning the power on and setting the date and time Set the date and time when using this camcorder for the first time. If you do not set the date and time, the [CLOCK SET] screen appears every time you turn on your camcorder or change the POWER switch position. Touch the buttons on the screen. POWER switch 1 While pressing the green button in the center, slide the POWER switch repeatedly in the direction of the arrow to turn on the power. (Movie): To record movies (Still): To record still images The [CLOCK SET] screen appears. 2 Select the desired geographical area with v/V, then touch [NEXT]. 24
-
 1
1 -
2
-
3
-
4
-
5
-
6
-
7
-
8
-
9
-
10
-
11
-
12
-
13
-
14
-
15
-
16
-
17
-
18
-
 19
19 -
 20
20 -
 21
21 -
 22
22 -
 23
23 -
 24
24 -
 25
25 -
 26
26 -
 27
27 -
 28
28 -
 29
29 -
30
-
31
-
32
-
33
-
34
-
35
-
36
-
37
-
38
-
39
-
40
-
41
-
42
-
43
-
44
-
45
-
46
-
47
-
48
-
49
-
50
-
51
-
52
-
53
-
54
-
55
-
56
-
57
-
58
-
59
-
60
-
61
-
62
-
63
-
64
-
65
-
66
-
67
-
68
-
69
-
70
-
71
-
72
-
73
-
74
-
75
-
76
-
77
-
78
-
79
-
80
-
81
-
82
-
83
-
84
-
85
-
86
-
87
-
88
-
89
-
90
-
91
-
92
-
93
-
94
-
95
-
96
-
97
-
98
-
99
-
100
-
101
-
102
-
103
-
104
-
105
-
106
-
107
-
108
-
109
-
110
-
111
-
112
-
113
-
114
-
115
-
116
-
117
-
118
-
119
-
120
-
121
-
122
-
123
-
124
-
125
-
126
-
127
-
128
-
129
-
130
-
131
-
132
-
133
-
134
-
135
-
136
-
137
-
138
-
139
-
140
-
141
-
142
-
143
 |
 |