Sony HDR UX5 Instruction Manual - Page 43
Playing the image on a TV, Operation flow, Selecting the most, advantageous connection - TV
 |
UPC - 027242701434
View all Sony HDR UX5 manuals
Add to My Manuals
Save this manual to your list of manuals |
Page 43 highlights
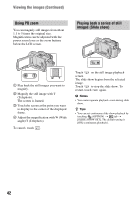
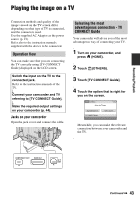
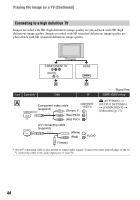
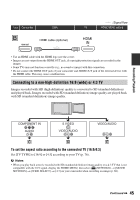
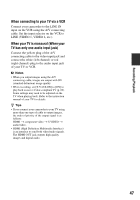
Recording/Playback Playing the image on a TV Connection methods and quality of the image viewed on the TV screen differ depending on what type of TV is connected, and the connectors used. Use the supplied AC Adaptor as the power source (p. 21). Refer also to the instruction manuals supplied with the device to be connected. Operation flow You can make sure that you are connecting the TV correctly using [TV CONNECT Guide] displayed on the LCD screen. Switch the input on the TV to the connected jack. Refer to the instruction manuals of the TV. r Connect your camcorder and TV referring to [TV CONNECT Guide]. r Make the required output settings on your camcorder (p. 44). Jacks on your camcorder Open the jack cover and connect the cable. Selecting the most advantageous connection - TV CONNECT Guide Your camcorder will advise you of the most advantageous way of connecting your TV. 1 Turn on your camcorder, and press (HOME). 2 Touch (OTHERS). 3 Touch [TV CONNECT Guide]. 4 Touch the option that is right for you on the screen. Meanwhile, you can make the relevant connection between your camcorder and the TV. Continued , 43
-
 1
1 -
2
-
3
-
4
-
5
-
6
-
7
-
8
-
9
-
10
-
11
-
12
-
13
-
14
-
15
-
16
-
17
-
18
-
19
-
20
-
21
-
22
-
23
-
24
-
25
-
26
-
27
-
28
-
29
-
30
-
31
-
32
-
33
-
34
-
35
-
36
-
37
-
 38
38 -
 39
39 -
 40
40 -
 41
41 -
 42
42 -
 43
43 -
 44
44 -
 45
45 -
 46
46 -
 47
47 -
 48
48 -
49
-
50
-
51
-
52
-
53
-
54
-
55
-
56
-
57
-
58
-
59
-
60
-
61
-
62
-
63
-
64
-
65
-
66
-
67
-
68
-
69
-
70
-
71
-
72
-
73
-
74
-
75
-
76
-
77
-
78
-
79
-
80
-
81
-
82
-
83
-
84
-
85
-
86
-
87
-
88
-
89
-
90
-
91
-
92
-
93
-
94
-
95
-
96
-
97
-
98
-
99
-
100
-
101
-
102
-
103
-
104
-
105
-
106
-
107
-
108
-
109
-
110
-
111
-
112
-
113
-
114
-
115
-
116
-
117
-
118
-
119
-
120
-
121
-
122
-
123
-
124
-
125
-
126
-
127
-
128
-
129
-
130
-
131
-
132
-
133
-
134
-
135
-
136
-
137
-
138
-
139
-
140
-
141
-
142
-
143
 |
 |
