Sony HDR UX5 Instruction Manual - Page 59
To select a disc menu style, Utilizing Recording Media
 |
UPC - 027242701434
View all Sony HDR UX5 manuals
Add to My Manuals
Save this manual to your list of manuals |
Page 59 highlights
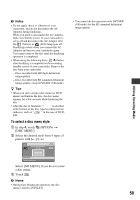
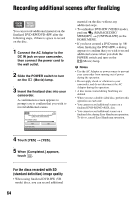
b Notes • Do not apply shock or vibration to your camcorder, and do not disconnect the AC Adaptor during finalizing. When you need to disconnect the AC Adaptor, make sure that the power of your camcorder is set to off and disconnect the AC Adaptor after the (Movie) or (Still) lamp goes off. Finalizing restarts when you connect the AC Adaptor and turn on your camcorder again. You cannot remove the disc until the finalizing operation is completed. • When using the following discs, Z flashes after finalizing is completed on the recording standby screen of your camcorder. Remove the disc from your camcorder. - Discs recorded with HD (high definition) image quality - Discs recorded with SD (standard definition) image quality, except DVD-RW (VR mode) z Tips • When you set to create a disc menu (or DVD menu) and finalize the disc, the disc menu appears for a few seconds while finalizing the disc. • After the disc is finalized, " " is attached at the bottom of the disc type/recording format indicator, such as " " in the case of DVD- RW. To select a disc menu style 1 In step 4, touch (OPTION) t [DISC MENU]. 2 Select the desired style from 4 types of pattern with [T]/[t]. • You cannot do this operation with DVD-RW (VR mode) for the SD (standard definition) image quality. Utilizing Recording Media Select [NO MENU] if you do not create a disc menu. 3 Touch . b Notes • During Easy Handycam operation, the disc menu is fixed to [STYLE1]. 59
-
 1
1 -
2
-
3
-
4
-
5
-
6
-
7
-
8
-
9
-
10
-
11
-
12
-
13
-
14
-
15
-
16
-
17
-
18
-
19
-
20
-
21
-
22
-
23
-
24
-
25
-
26
-
27
-
28
-
29
-
30
-
31
-
32
-
33
-
34
-
35
-
36
-
37
-
38
-
39
-
40
-
41
-
42
-
43
-
44
-
45
-
46
-
47
-
48
-
49
-
50
-
51
-
52
-
53
-
 54
54 -
 55
55 -
 56
56 -
 57
57 -
 58
58 -
 59
59 -
 60
60 -
 61
61 -
 62
62 -
 63
63 -
 64
64 -
65
-
66
-
67
-
68
-
69
-
70
-
71
-
72
-
73
-
74
-
75
-
76
-
77
-
78
-
79
-
80
-
81
-
82
-
83
-
84
-
85
-
86
-
87
-
88
-
89
-
90
-
91
-
92
-
93
-
94
-
95
-
96
-
97
-
98
-
99
-
100
-
101
-
102
-
103
-
104
-
105
-
106
-
107
-
108
-
109
-
110
-
111
-
112
-
113
-
114
-
115
-
116
-
117
-
118
-
119
-
120
-
121
-
122
-
123
-
124
-
125
-
126
-
127
-
128
-
129
-
130
-
131
-
132
-
133
-
134
-
135
-
136
-
137
-
138
-
139
-
140
-
141
-
142
-
143
 |
 |