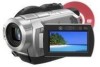
Sony HDR UX5 Instruction Manual - Page 27
Step 5: Inserting a disc or a “Memory Stick Duo”, DVD+RW, touch [Use DISC - high definition dvd handycam camcorder
 |
UPC - 027242701434
View all Sony HDR UX5 manuals
Add to My Manuals
Save this manual to your list of manuals |
Page 27 highlights
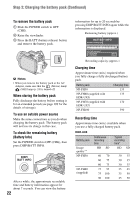
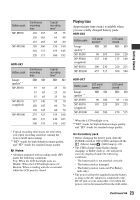
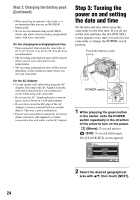
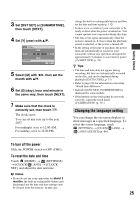
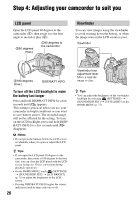
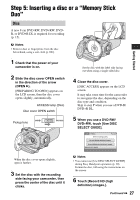
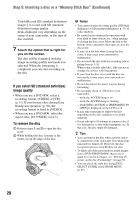
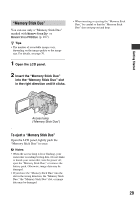
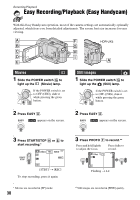
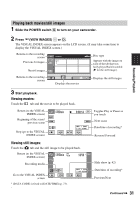
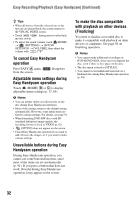
Getting Started Step 5: Inserting a disc or a "Memory Stick Duo" Disc A new 8 cm DVD-RW, DVD+RW, DVDR, or DVD+R DL is required for recording (p. 15). b Notes • Remove dust or fingerprints from the disc beforehand, using a soft cloth (p.106). 1 Check that the power of your camcorder is on. 2 Slide the disc cover OPEN switch in the direction of the arrow (OPEN B). [PREPARING TO OPEN] appears on the LCD screen, then the disc cover opens slightly, automatically. ACCESS lamp (Disc) Disc cover OPEN switch Pickup lens Set the disc with the label side facing out when using a single-sided disc. 4 Close the disc cover. [DISC ACCESS] appears on the LCD screen. It may take some time for the camcorder to recognize the disc, depending on the disc type and condition. Skip to step 7 when you use a DVD-R/ DVD+R DL. 5 When you use a DVD-RW/ DVD+RW, touch [Use DISC SELECT GUIDE]. When the disc cover opens slightly, open it further. 3 Set the disc with the recording side facing your camcorder, then press the center of the disc until it clicks. b Notes • You cannot use [Use DISC SELECT GUIDE] during Easy Handycam operation (p. 30). Format the disc, following the instructions on the screen. 6 Touch [Record HD (high definition) images.]. Continued , 27
-
 1
1 -
2
-
3
-
4
-
5
-
6
-
7
-
8
-
9
-
10
-
11
-
12
-
13
-
14
-
15
-
16
-
17
-
18
-
19
-
20
-
21
-
 22
22 -
 23
23 -
 24
24 -
 25
25 -
 26
26 -
 27
27 -
 28
28 -
 29
29 -
 30
30 -
 31
31 -
 32
32 -
33
-
34
-
35
-
36
-
37
-
38
-
39
-
40
-
41
-
42
-
43
-
44
-
45
-
46
-
47
-
48
-
49
-
50
-
51
-
52
-
53
-
54
-
55
-
56
-
57
-
58
-
59
-
60
-
61
-
62
-
63
-
64
-
65
-
66
-
67
-
68
-
69
-
70
-
71
-
72
-
73
-
74
-
75
-
76
-
77
-
78
-
79
-
80
-
81
-
82
-
83
-
84
-
85
-
86
-
87
-
88
-
89
-
90
-
91
-
92
-
93
-
94
-
95
-
96
-
97
-
98
-
99
-
100
-
101
-
102
-
103
-
104
-
105
-
106
-
107
-
108
-
109
-
110
-
111
-
112
-
113
-
114
-
115
-
116
-
117
-
118
-
119
-
120
-
121
-
122
-
123
-
124
-
125
-
126
-
127
-
128
-
129
-
130
-
131
-
132
-
133
-
134
-
135
-
136
-
137
-
138
-
139
-
140
-
141
-
142
-
143
 |
 |
