Sony HDR UX5 Instruction Manual - Page 78
GENERAL SET, (Other setup items), DEMO MODE, REC LAMP Recording, CALIBRATION, A.SHUT OFF Auto shut
 |
UPC - 027242701434
View all Sony HDR UX5 manuals
Add to My Manuals
Save this manual to your list of manuals |
Page 78 highlights
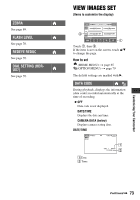
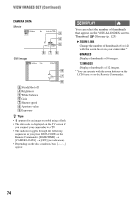
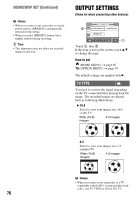
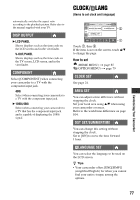
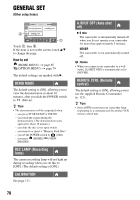
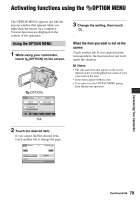
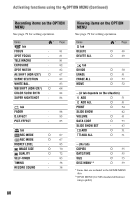
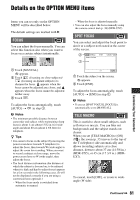
GENERAL SET (Other setup items) Touch 1, then 2. If the item is not on the screen, touch v/V to change the page. How to set (HOME MENU) t page 65 (OPTION MENU) t page 79 The default settings are marked with B. DEMO MODE The default setting is [ON], allowing you to view the demonstration in about 10 minutes, after you slide the POWER switch to (Movie). z Tips • The demonstration will be suspended when: - you press START/STOP or PHOTO - you touch the screen during the demonstration. (The demonstration starts again after about 10 minutes.) - you slide the disc cover open switch. - you remove or insert a "Memory Stick Duo." - you set the POWER switch to (Still). - you press (HOME)/ (VIEW IMAGES). REC LAMP (Recording lamp) The camera recording lamp will not light up during recording when you set this to [OFF]. (The default setting is [ON].) CALIBRATION See page 111. A.SHUT OFF (Auto shut off) B 5 min The camcorder is automatically turned off when you do not operate your camcorder for more than approximately 5 minutes. NEVER The camcorder is not automatically turned off. b Notes • When you connect your camcorder to a wall outlet, [A.SHUT OFF] is automatically set to [NEVER]. REMOTE CTRL (Remote control) The default setting is [ON], allowing you to use the supplied Remote Commander (p. 121). z Tips • Set to [OFF] to prevent your camcorder from responding to a command sent by another VCR remote control unit. 78
-
 1
1 -
2
-
3
-
4
-
5
-
6
-
7
-
8
-
9
-
10
-
11
-
12
-
13
-
14
-
15
-
16
-
17
-
18
-
19
-
20
-
21
-
22
-
23
-
24
-
25
-
26
-
27
-
28
-
29
-
30
-
31
-
32
-
33
-
34
-
35
-
36
-
37
-
38
-
39
-
40
-
41
-
42
-
43
-
44
-
45
-
46
-
47
-
48
-
49
-
50
-
51
-
52
-
53
-
54
-
55
-
56
-
57
-
58
-
59
-
60
-
61
-
62
-
63
-
64
-
65
-
66
-
67
-
68
-
69
-
70
-
71
-
72
-
 73
73 -
 74
74 -
 75
75 -
 76
76 -
 77
77 -
 78
78 -
 79
79 -
 80
80 -
 81
81 -
 82
82 -
 83
83 -
84
-
85
-
86
-
87
-
88
-
89
-
90
-
91
-
92
-
93
-
94
-
95
-
96
-
97
-
98
-
99
-
100
-
101
-
102
-
103
-
104
-
105
-
106
-
107
-
108
-
109
-
110
-
111
-
112
-
113
-
114
-
115
-
116
-
117
-
118
-
119
-
120
-
121
-
122
-
123
-
124
-
125
-
126
-
127
-
128
-
129
-
130
-
131
-
132
-
133
-
134
-
135
-
136
-
137
-
138
-
139
-
140
-
141
-
142
-
143
 |
 |
