Sony SNC-DF40N User Guide - Page 63
Using the Custom Home Installer
 |
View all Sony SNC-DF40N manuals
Add to My Manuals
Save this manual to your list of manuals |
Page 63 highlights
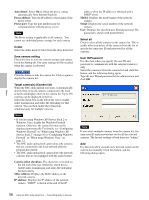
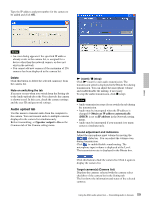
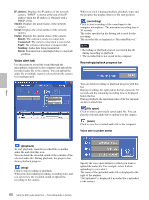
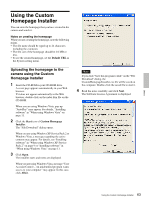
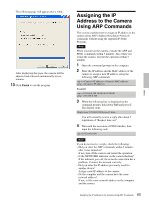
Others Using the Custom Homepage Installer You can store the homepage that you have created in the camera and watch it. Notes on creating the homepage When you are creating the homepage, note the following points. • The file name should be typed up to 24 characters including the extension. • The file size of the homepage should be 2.0 MB or less. • To see the created homepage, set the Default URL in the System setting menu. Uploading the homepage to the camera using the Custom Homepage Installer 1 Insert the CD-ROM in your CD-ROM drive. A cover page appears automatically in your Web browser. If it does not appear automatically in the Web browser, double-click on the index.htm file on the CD-ROM. When you are using Windows Vista, pop-up "AutoPlay" may appear. For details, "Installing software" in "When using Windows Vista" on page 11. 2 Click the Start icon of Custom Homepage Installer. The "File Download" dialog opens. When you are using Windows XP Service Pack 2 or Windows Vista, a message regarding the active contents may appear. For details, see "Installing software" in "When using Windows XP Service Pack 2" on page 9 or "Installing software" in "When using Windows Vista" on page 11. 3 Click Open. The installer starts and notes are displayed. When you are using Windows Vista, message "User Account Control - An unidentified program wants access to your computer" may appear. In this case, click Allow. Note If you click "Save this program to disk" on the "File Download" dialog, the CustomHomepageInstaller.exe file will be saved on the computer. Double-click the saved file to start it. 4 Read the notes carefully, and click Next. The Software License Agreement is displayed. 63 Using the Custom Homepage Installer
-
 1
1 -
2
-
3
-
4
-
5
-
6
-
7
-
8
-
9
-
10
-
11
-
12
-
13
-
14
-
15
-
16
-
17
-
18
-
19
-
20
-
21
-
22
-
23
-
24
-
25
-
26
-
27
-
28
-
29
-
30
-
31
-
32
-
33
-
34
-
35
-
36
-
37
-
38
-
39
-
40
-
41
-
42
-
43
-
44
-
45
-
46
-
47
-
48
-
49
-
50
-
51
-
52
-
53
-
54
-
55
-
56
-
57
-
 58
58 -
 59
59 -
 60
60 -
 61
61 -
 62
62 -
 63
63 -
 64
64 -
 65
65 -
 66
66 -
 67
67 -
 68
68 -
69
 |
 |
