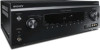
Sony STR-DA1800ES Operating Instructions (Large File - 20.62 MB) - Page 41
Preparing the Receiver, Connecting the AC power cord (mains lead), Turning on the receiver
 |
View all Sony STR-DA1800ES manuals
Add to My Manuals
Save this manual to your list of manuals |
Page 41 highlights
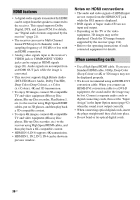
Preparing the Receiver Preparing the Receiver Connecting the AC power cord (mains lead) Connect the AC power cord (mains lead) to a wall outlet. Turning on the receiver ?/1 AC IN terminal To the wall outlet AC power cord (mains lead) (supplied) A several space is left between the plug and the rear panel even when the power cord (mains lead) is inserted firmly. The cord is supposed be connected this way. This is not malfunction. Press ?/1 to turn on the receiver. You can also turn on the receiver using ?/1 on the remote control. When you turn off the receiver, press ?/1 again. "STANDBY" flashes on the display window. Do not disconnect the AC power cord (mains lead) while "STANDBY" is flashing. This may cause a malfunction. Note When the receiver is in standby mode, the ON/STANDBY indicator on the front panel lights up in amber. To save the power in standby mode Set "Ctrl for HDMI" (page 103), "Pass Through" (page 103), "Network Standby" (page 106) and "BT Standby" (page 107) to "OFF", and turn off the power for zone 2. If "Ctrl for HDMI" (page 103), "Pass Through" (page 103), "Network Standby" (page 106), or "BT Standby" (page 107) is set to "ON", or the power for zone 2 is turned on, the lamp above ?/1 lights up in amber. Note The top of the receiver may become hot while the receiver is in standby mode. This condition occurs because current is flowing in the internal circuits of the receiver. This is not a malfunction. 41US
-
 1
1 -
2
-
3
-
4
-
5
-
6
-
7
-
8
-
9
-
10
-
11
-
12
-
13
-
14
-
15
-
16
-
17
-
18
-
19
-
20
-
21
-
22
-
23
-
24
-
25
-
26
-
27
-
28
-
29
-
30
-
31
-
32
-
33
-
34
-
35
-
 36
36 -
 37
37 -
 38
38 -
 39
39 -
 40
40 -
 41
41 -
 42
42 -
 43
43 -
 44
44 -
 45
45 -
 46
46 -
47
-
48
-
49
-
50
-
51
-
52
-
53
-
54
-
55
-
56
-
57
-
58
-
59
-
60
-
61
-
62
-
63
-
64
-
65
-
66
-
67
-
68
-
69
-
70
-
71
-
72
-
73
-
74
-
75
-
76
-
77
-
78
-
79
-
80
-
81
-
82
-
83
-
84
-
85
-
86
-
87
-
88
-
89
-
90
-
91
-
92
-
93
-
94
-
95
-
96
-
97
-
98
-
99
-
100
-
101
-
102
-
103
-
104
-
105
-
106
-
107
-
108
-
109
-
110
-
111
-
112
-
113
-
114
-
115
-
116
-
117
-
118
-
119
-
120
-
121
-
122
-
123
-
124
-
125
-
126
-
127
-
128
-
129
-
130
-
131
-
132
-
133
-
134
-
135
-
136
-
137
-
138
-
139
-
140
-
141
-
142
-
143
-
144
-
145
-
146
-
147
-
148
-
149
-
150
-
151
-
152
-
153
-
154
-
155
-
156
-
157
-
158
-
159
-
160
-
161
-
162
-
163
-
164
-
165
-
166
-
167
-
168
-
169
-
170
-
171
-
172
-
173
-
174
-
175
-
176
-
177
-
178
-
179
-
180
-
181
-
182
-
183
-
184
-
185
-
186
-
187
-
188
-
189
-
190
-
191
-
192
-
193
-
194
-
195
-
196
-
197
-
198
-
199
-
200
-
201
-
202
-
203
-
204
-
205
-
206
-
207
-
208
-
209
-
210
-
211
-
212
-
213
-
214
-
215
-
216
-
217
-
218
-
219
-
220
-
221
-
222
-
223
-
224
-
225
-
226
-
227
-
228
-
229
-
230
-
231
-
232
-
233
-
234
-
235
-
236
-
237
-
238
-
239
-
240
-
241
-
242
-
243
-
244
-
245
-
246
-
247
-
248
-
249
-
250
-
251
-
252
-
253
-
254
-
255
-
256
-
257
-
258
-
259
-
260
-
261
-
262
-
263
-
264
-
265
-
266
-
267
-
268
-
269
-
270
-
271
-
272
-
273
-
274
-
275
-
276
-
277
-
278
-
279
-
280
-
281
-
282
-
283
-
284
-
285
-
286
-
287
-
288
 |
 |
