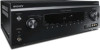
Sony STR-DA1800ES Operating Instructions (Large File - 20.62 MB) - Page 45
Confirm active subwoofer setup, Performing Auto Calibration
 |
View all Sony STR-DA1800ES manuals
Add to My Manuals
Save this manual to your list of manuals |
Page 45 highlights
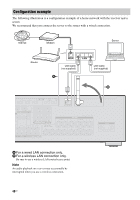
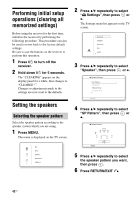
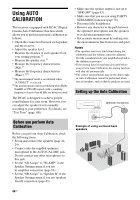
Preparing the Receiver 1 Select the speaker pattern (page 42). If you connect front high speakers, select the speaker pattern that has front high speakers (5/x.x or 4/x.x) each time you perform Auto Calibration. Otherwise, the characteristics of the front high speakers cannot be measured. 2 Connect the supplied optimizer microphone to the AUTO CAL MIC jack. 3 Set up the optimizer microphone. Place the optimizer microphone at your seating position. Use a stool or tripod so that the optimizer microphone remains at the same height as your ears. Confirm active subwoofer setup • When a subwoofer is connected, turn on the subwoofer and turn up the volume prior to activating the subwoofer. Turn the LEVEL to just before the mid-point. • If you connect a subwoofer with a crossover frequency function, set the value to maximum. • If you connect a subwoofer with an auto standby function, set it to off (deactivated). Note Depending on the characteristics of the subwoofer you are using, the setup distance value may be different from the actual position. Performing Auto Calibration ?/1 SHIFT AUTO CAL Input buttons V/v/B/b, MENU MUTING MASTER VOL +/- 1 Press MENU. The menu is displayed on the TV screen. 2 Press V/v repeatedly to select " Settings", then press or b. The Settings menu list appears on the TV screen. continued 45US
-
 1
1 -
2
-
3
-
4
-
5
-
6
-
7
-
8
-
9
-
10
-
11
-
12
-
13
-
14
-
15
-
16
-
17
-
18
-
19
-
20
-
21
-
22
-
23
-
24
-
25
-
26
-
27
-
28
-
29
-
30
-
31
-
32
-
33
-
34
-
35
-
36
-
37
-
38
-
39
-
 40
40 -
 41
41 -
 42
42 -
 43
43 -
 44
44 -
 45
45 -
 46
46 -
 47
47 -
 48
48 -
 49
49 -
 50
50 -
51
-
52
-
53
-
54
-
55
-
56
-
57
-
58
-
59
-
60
-
61
-
62
-
63
-
64
-
65
-
66
-
67
-
68
-
69
-
70
-
71
-
72
-
73
-
74
-
75
-
76
-
77
-
78
-
79
-
80
-
81
-
82
-
83
-
84
-
85
-
86
-
87
-
88
-
89
-
90
-
91
-
92
-
93
-
94
-
95
-
96
-
97
-
98
-
99
-
100
-
101
-
102
-
103
-
104
-
105
-
106
-
107
-
108
-
109
-
110
-
111
-
112
-
113
-
114
-
115
-
116
-
117
-
118
-
119
-
120
-
121
-
122
-
123
-
124
-
125
-
126
-
127
-
128
-
129
-
130
-
131
-
132
-
133
-
134
-
135
-
136
-
137
-
138
-
139
-
140
-
141
-
142
-
143
-
144
-
145
-
146
-
147
-
148
-
149
-
150
-
151
-
152
-
153
-
154
-
155
-
156
-
157
-
158
-
159
-
160
-
161
-
162
-
163
-
164
-
165
-
166
-
167
-
168
-
169
-
170
-
171
-
172
-
173
-
174
-
175
-
176
-
177
-
178
-
179
-
180
-
181
-
182
-
183
-
184
-
185
-
186
-
187
-
188
-
189
-
190
-
191
-
192
-
193
-
194
-
195
-
196
-
197
-
198
-
199
-
200
-
201
-
202
-
203
-
204
-
205
-
206
-
207
-
208
-
209
-
210
-
211
-
212
-
213
-
214
-
215
-
216
-
217
-
218
-
219
-
220
-
221
-
222
-
223
-
224
-
225
-
226
-
227
-
228
-
229
-
230
-
231
-
232
-
233
-
234
-
235
-
236
-
237
-
238
-
239
-
240
-
241
-
242
-
243
-
244
-
245
-
246
-
247
-
248
-
249
-
250
-
251
-
252
-
253
-
254
-
255
-
256
-
257
-
258
-
259
-
260
-
261
-
262
-
263
-
264
-
265
-
266
-
267
-
268
-
269
-
270
-
271
-
272
-
273
-
274
-
275
-
276
-
277
-
278
-
279
-
280
-
281
-
282
-
283
-
284
-
285
-
286
-
287
-
288
 |
 |
