Sony STR-DA1800ES Operating Instructions (Large File - 20.62 MB) - Page 52
Guide to on-screen display operation, Do Not Use, then press
 |
View all Sony STR-DA1800ES manuals
Add to My Manuals
Save this manual to your list of manuals |
Page 52 highlights
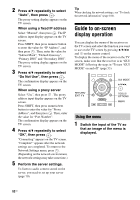
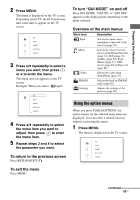
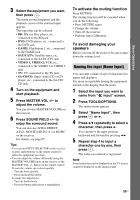
2 Press V/v repeatedly to select "Auto", then press . The proxy setting display appears on the TV screen. When using a fixed IP address Select "Manual", then press . The IP address input display appears on the TV screen. Press SHIFT, then press numeric button to enter the value for "IP Address", and then press . Then, enter the value for "Subnet Mask", "Default Gateway", "Primary DNS" and "Secondary DNS". The proxy setting display appears on the TV screen. 3 Press V/v repeatedly to select "Do Not Use", then press . The confirmation display appears on the TV screen. When using a proxy server Select "Use", then press . The proxy address input display appears on the TV screen. Press SHIFT, then press numeric/text button to enter the value for "Proxy Address", and then press . Then, enter the value for "Port Number". The confirmation display appears on the TV screen. 4 Press V/v repeatedly to select "OK", then press . "Connecting" appears on the TV screen. "Complete!" appears after the network settings are completed. To return to the Network Settings menu, press . (Depending on the network environment, the network settings may take some time.) 5 Perform the server settings. To listen to audio content stored on the server, you need to set up your server (page 70). Tip When checking the network settings, see "To check the network information" (page 104). Guide to on-screen display operation You can display the menu of the receiver on the TV screen and select the function you want to use on the TV screen by pressing V/v/B/b and on the remote control. To display the menu of the receiver on the TV screen, make sure that the receiver is in "GUI MODE" following the steps in "To turn "GUI MODE" on and off" (page 53). RETURN/ EXIT O GUI MODE V/v/B/b, TOOLS/ OPTIONS MENU Using the menu 1 Switch the input of the TV so that an image of the menu is displayed. 52US
-
 1
1 -
2
-
3
-
4
-
5
-
6
-
7
-
8
-
9
-
10
-
11
-
12
-
13
-
14
-
15
-
16
-
17
-
18
-
19
-
20
-
21
-
22
-
23
-
24
-
25
-
26
-
27
-
28
-
29
-
30
-
31
-
32
-
33
-
34
-
35
-
36
-
37
-
38
-
39
-
40
-
41
-
42
-
43
-
44
-
45
-
46
-
 47
47 -
 48
48 -
 49
49 -
 50
50 -
 51
51 -
 52
52 -
 53
53 -
 54
54 -
 55
55 -
 56
56 -
 57
57 -
58
-
59
-
60
-
61
-
62
-
63
-
64
-
65
-
66
-
67
-
68
-
69
-
70
-
71
-
72
-
73
-
74
-
75
-
76
-
77
-
78
-
79
-
80
-
81
-
82
-
83
-
84
-
85
-
86
-
87
-
88
-
89
-
90
-
91
-
92
-
93
-
94
-
95
-
96
-
97
-
98
-
99
-
100
-
101
-
102
-
103
-
104
-
105
-
106
-
107
-
108
-
109
-
110
-
111
-
112
-
113
-
114
-
115
-
116
-
117
-
118
-
119
-
120
-
121
-
122
-
123
-
124
-
125
-
126
-
127
-
128
-
129
-
130
-
131
-
132
-
133
-
134
-
135
-
136
-
137
-
138
-
139
-
140
-
141
-
142
-
143
-
144
-
145
-
146
-
147
-
148
-
149
-
150
-
151
-
152
-
153
-
154
-
155
-
156
-
157
-
158
-
159
-
160
-
161
-
162
-
163
-
164
-
165
-
166
-
167
-
168
-
169
-
170
-
171
-
172
-
173
-
174
-
175
-
176
-
177
-
178
-
179
-
180
-
181
-
182
-
183
-
184
-
185
-
186
-
187
-
188
-
189
-
190
-
191
-
192
-
193
-
194
-
195
-
196
-
197
-
198
-
199
-
200
-
201
-
202
-
203
-
204
-
205
-
206
-
207
-
208
-
209
-
210
-
211
-
212
-
213
-
214
-
215
-
216
-
217
-
218
-
219
-
220
-
221
-
222
-
223
-
224
-
225
-
226
-
227
-
228
-
229
-
230
-
231
-
232
-
233
-
234
-
235
-
236
-
237
-
238
-
239
-
240
-
241
-
242
-
243
-
244
-
245
-
246
-
247
-
248
-
249
-
250
-
251
-
252
-
253
-
254
-
255
-
256
-
257
-
258
-
259
-
260
-
261
-
262
-
263
-
264
-
265
-
266
-
267
-
268
-
269
-
270
-
271
-
272
-
273
-
274
-
275
-
276
-
277
-
278
-
279
-
280
-
281
-
282
-
283
-
284
-
285
-
286
-
287
-
288
 |
 |
