Stihl MS 311 User Manual - Page 35
Inspect and clean the sealing
 |
View all Stihl MS 311 manuals
Add to My Manuals
Save this manual to your list of manuals |
Page 35 highlights
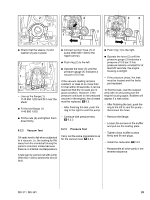
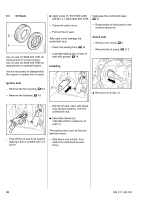
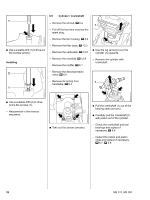
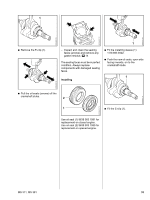
1 533RA104 TG 4903RA076 TG 4903RA078 TG - Lubricate the piston, piston rings and cylinder wall with oil. : Position the piston rings so that the radii at the ring gap meet at the fixing pin in the piston groove (arrows) - there is otherwise a risk of ring breakage. When properly aligned, the piston rings are compressed by the cylinder's taper. : Carefully push the piston with crankshaft (1) into the cylinder. 1 - Inspect and clean the sealing face on the engine housing and remove any gasket residue, b 14 The sealing faces must be in perfect condition. Always replace components with damaged sealing faces. : Apply sealant to the groove in the sealing face, b 14 4903RA075 TG 4903RA090 TG 4903RA079 TG - Line up the piston with crankshaft before fitting them in the cylinder. Viewed from the exhaust port (arrow), the long crankshaft stub (1) must be on the right. - Place the crankshaft with bearings and oil seals in the bearing seats, making sure the oil seals are firmly against their stops (arrows) in the cylinder. 2 1 - Hold the crankshaft (1) steady. : Fit the cylinder (2) with crankshaft (1) in the engine housing. 34 MS 311, MS 391
-
 1
1 -
2
-
3
-
4
-
5
-
6
-
7
-
8
-
9
-
10
-
11
-
12
-
13
-
14
-
15
-
16
-
17
-
18
-
19
-
20
-
21
-
22
-
23
-
24
-
25
-
26
-
27
-
28
-
29
-
 30
30 -
 31
31 -
 32
32 -
 33
33 -
 34
34 -
 35
35 -
 36
36 -
 37
37 -
 38
38 -
 39
39 -
 40
40 -
41
-
42
-
43
-
44
-
45
-
46
-
47
-
48
-
49
-
50
-
51
-
52
-
53
-
54
-
55
-
56
-
57
-
58
-
59
-
60
-
61
-
62
-
63
-
64
-
65
-
66
-
67
-
68
-
69
-
70
-
71
-
72
-
73
-
74
-
75
-
76
-
77
-
78
-
79
-
80
-
81
-
82
-
83
-
84
-
85
-
86
-
87
-
88
-
89
-
90
-
91
-
92
-
93
-
94
 |
 |
