Stihl MS 311 User Manual - Page 73
Servicing the Carburetor, Metering Diaphragm
 |
View all Stihl MS 311 manuals
Add to My Manuals
Save this manual to your list of manuals |
Page 73 highlights
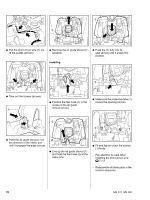
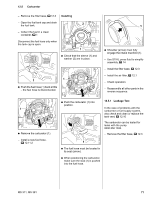
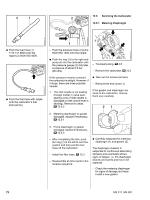
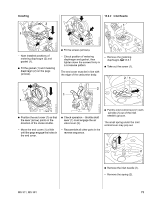
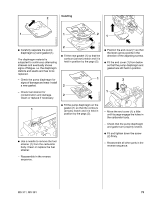
2 1 12.6 Servicing the Carburetor 2 12.6.1 Metering Diaphragm 0001RA346 TG 165RA336 TG : Push the fuel hose (1) 1110 141 8600 onto the nipple (2) 0000 855 9200. : Push the fuel hose with nipple onto the carburetor's fuel stub (arrow). 0001RA342 TG 4903RA187 TG 1 1 - Push the pressure hose of pump 0000 850 1300 onto the nipple. : Push the ring (1) to the right and pump air into the carburetor until the pressure gauge (2) indicates a pressure of about 0.8 bar (80 kPa). - Troubleshooting, b 3.6 - Remove the carburetor, b 12.5 If this pressure remains constant, the carburetor is airtight. However, if it drops, there are three possible causes: 1. The inlet needle is not sealing (foreign matter in valve seat, sealing cone of inlet needle is damaged or inlet control lever is sticking). Remove to clean, b 12.6.2 : Take out the screws (arrows). - Remove the end cover (1). If the gasket and diaphragm are stuck to the carburetor, remove them very carefully. 21 2. Metering diaphragm or gasket damaged, replace if necessary, b 12.6.1 0001RA348 TG 3. Pump diaphragm or gasket damaged, replace if necessary, b 12.6.3 - After completing the test, push the ring (1) to the left to vent the system and then pull the fuel hose off the carburetor. - Install the filter base, b 12.3 - Reassemble all other parts in the reverse sequence. : Carefully separate the metering diaphragm (1) and gasket (2). The diaphragm material is subjected to continuous alternating stresses and eventually shows signs of fatigue. i.e. the diaphragm distorts and swells and has to be replaced. - Check the metering diaphragm for signs of damage and wear. Install a new gasket. 72 MS 311, MS 391
-
 1
1 -
2
-
3
-
4
-
5
-
6
-
7
-
8
-
9
-
10
-
11
-
12
-
13
-
14
-
15
-
16
-
17
-
18
-
19
-
20
-
21
-
22
-
23
-
24
-
25
-
26
-
27
-
28
-
29
-
30
-
31
-
32
-
33
-
34
-
35
-
36
-
37
-
38
-
39
-
40
-
41
-
42
-
43
-
44
-
45
-
46
-
47
-
48
-
49
-
50
-
51
-
52
-
53
-
54
-
55
-
56
-
57
-
58
-
59
-
60
-
61
-
62
-
63
-
64
-
65
-
66
-
67
-
 68
68 -
 69
69 -
 70
70 -
 71
71 -
 72
72 -
 73
73 -
 74
74 -
 75
75 -
 76
76 -
 77
77 -
 78
78 -
79
-
80
-
81
-
82
-
83
-
84
-
85
-
86
-
87
-
88
-
89
-
90
-
91
-
92
-
93
-
94
 |
 |
