Symphonic VR69WF Owner's Manual - Page 15
Change, Clock, Setting
 |
View all Symphonic VR69WF manuals
Add to My Manuals
Save this manual to your list of manuals |
Page 15 highlights
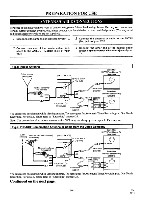
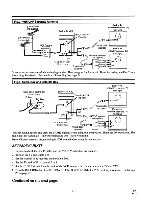
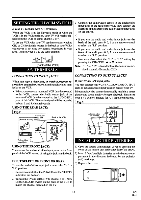
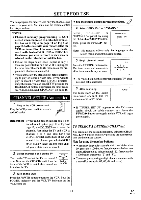
CLOCK SET UP 4 Select the year SETTING CLOCK Set the clock accurately for proper automatic timer re- Press the PLAY/A or STOP/V cording. We suggest that you use a TV or radio station button until the desired year ap- as your time source. ; pears. (Example: 1999) MONTH DAY 03 / 01 HOUR MINUTE YEtR 998 In the example below, the clock is to be set to: DATE March 1st, 1999 SETTING TIME 5:40PM • Use the remote control for this procedure. Then, press the F.FWD* button. 5 Select the hour • When the VCR is in the Menu mode, the following Press the PLAY/A or STOP/V buttons only work (PLAY/A, F.FWD/I0-, REW/-411, button until the desired hour apSTOP/V, RESET/EXIT, POWER and MENU). i pears. (Example: 05) • Be sure to check that the POWER and the VCR/TV Then, press the F.FWD/II- button. indicators are both on. SETTING CLOCK MONTH DAY YEAR 03 / 01 MON1999 MINUTE AM/PM 7N " - • Turn on the TV and set the TV to channel 3 or 4. Now set the CH3/CH4 switch on the back of the VCR to match the channel selected on the TV. CH3 CH4 [Back of the VCR] 1 Select "SETTING CLOCK" *Om 6 Select the minute Press the PLAY/A or STOP/V button until the desired minute appears. (Example: 40) Then, press the F.FWD/10- button. SETTING CLOCK MONTH DAY YEAR 03 / 01 MON1999 HOUR MINUTE AM/PM 0S 10# Press the MENU button. The SETTING CLOCK menu appears. SETTING CLOCK Sr . : DAY YEAR !1F MINUTE AM/PM • The number buttons on the remote control do not work in this Menu mode. • When you press the F.FWD/II button during steps [2] to [6], you may move to the next step. 7 Select "AM" or "PM" Press the PLAY/A or STOP/V button to point to "AM" or "PM". (Example: PM) SETTING CLOCK MONTH DAY YEAR 03 / 01 MON1999 HOUR MINUTE 05 : 40 AMeM • e 77174 8 Start the clock Press the RESET/EXIT or F.FWD/W button. • Press the REW/1 button to go back one step from the current step during steps [3] to [7]. 2 Select the month Press the PLAY/A or STOP/V button until the desired month appears. (Example: March -> 03) Then, press the F.FWD/10- button. SETTING CLOCK MONTH DAY YEAR '71'1. 1,07:INUTE AM/PM Although seconds are not displayed, they begin counting from 00 when you press the RESET/EXIT or F.FWD/10.- button. Use this feature to synchronize the clock with the correct time. • When unplugging the AC-cord or if there is a power failure for more than 30 seconds, you may have to reset the clock. • If the display shows an abnormal reading or no reading, unplug the power cord for more than 30 seconds. Then plug it back in and reset clock. 3 Select the day Press the PLAY/A or STOP/V button until the desired day appears. (Example: 1st -> 01) Then, press the F.FWD/110- button. SETTING CLOCK MONTH8 D4 ne,I` 034401 HOE YEAR AM/PM TO CHANGE CLOCK SETTING 1) Press the MENU button until the INITIALIZE menu appears. 2) Press the PLAY/A or STOP/V button to point to INITIALIZE CHANNEL SET UP -k SETTING CLOCK LANGUAGE SELECT "SETTING CLOCK". Then, press the F.FWD/10.- button. 3) Follow steps [2] to [8]. - 15 - EN 8L15
-
 1
1 -
2
-
3
-
4
-
5
-
6
-
7
-
8
-
9
-
 10
10 -
 11
11 -
 12
12 -
 13
13 -
 14
14 -
 15
15 -
 16
16 -
 17
17 -
 18
18 -
 19
19 -
 20
20 -
21
-
22
-
23
-
24
-
25
-
26
-
27
-
28
-
29
-
30
-
31
-
32
-
33
-
34
-
35
-
36
-
37
-
38
-
39
-
40
-
41
-
42
-
43
-
44
-
45
-
46
-
47
-
48
 |
 |
