Symphonic VR69WF Owner's Manual - Page 9
V/60Hz.
 |
View all Symphonic VR69WF manuals
Add to My Manuals
Save this manual to your list of manuals |
Page 9 highlights
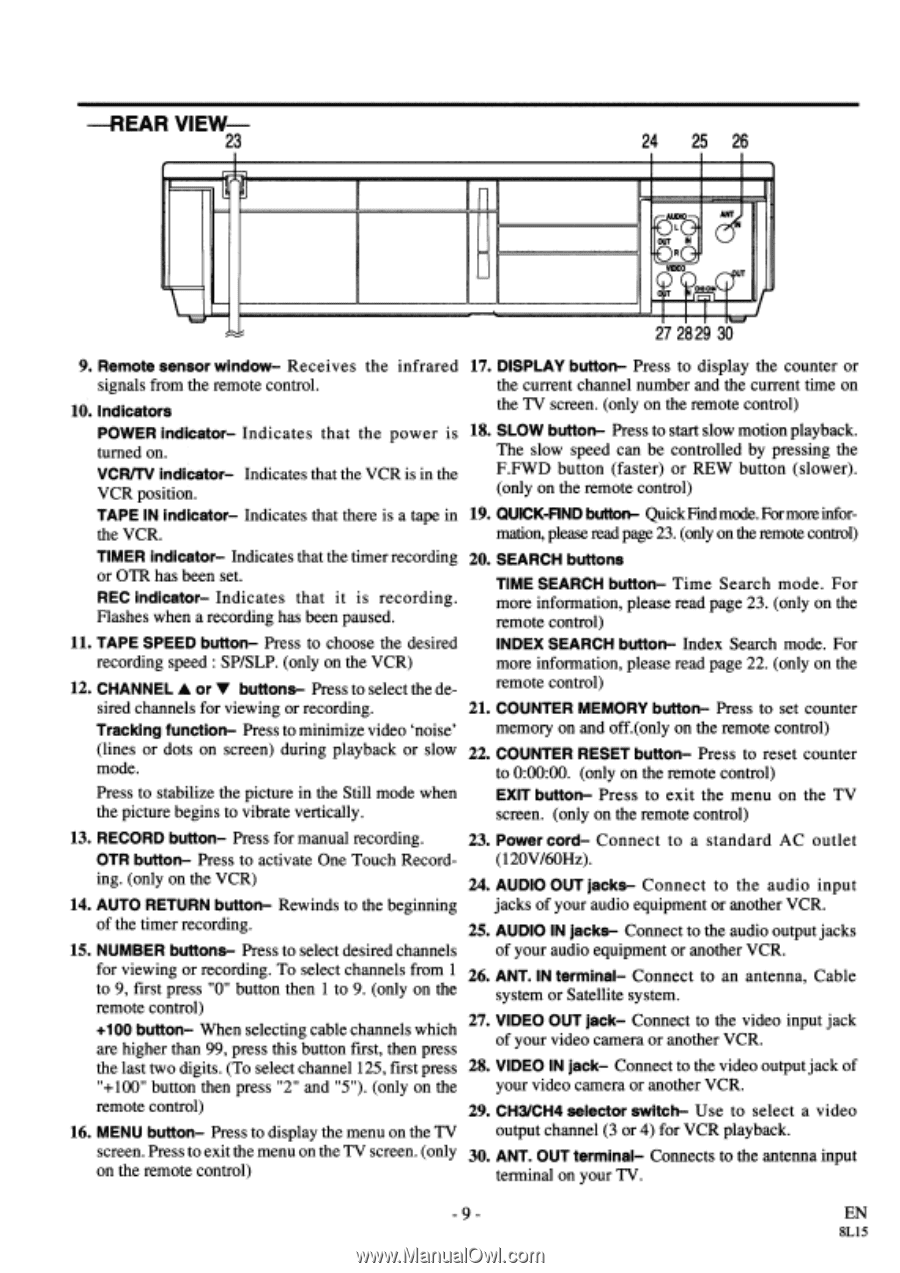
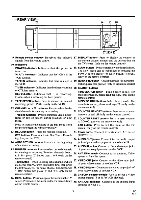
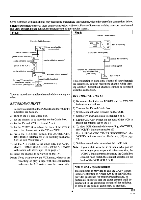
-REAR VIEW- 23 ummommonommot,--1,. 24 25 26 27 2829 30 9. Remote sensor window- Receives the infrared 17. DISPLAY button- Press to display the counter or signals from the remote control. the current channel number and the current time on 10. Indicators the TV screen. (only on the remote control) POWER indicator- Indicates that the power is 18. SLOW button- Press to start slow motion playback. turned on. The slow speed can be controlled by pressing the VCR/TV indicator- Indicates that the VCR is in the F.FWD button (faster) or REW button (slower). VCR position. (only on the remote control) TAPE IN indicator- Indicates that there is a tape in 19. QUICK-AND button- Quick Find mode. For more infor- the VCR. mation, please read page 23. (only on the remote control) TIMER indicator- Indicates that the timer recording 20. SEARCH buttons or OTR has been set. REC indicator- Indicates that it is recording. Flashes when a recording has been paused. TIME SEARCH button- Time Search mode. For more information, please read page 23. (only on the remote control) 11. TAPE SPEED button- Press to choose the desired INDEX SEARCH button- Index Search mode. For recording speed : SP/SLP. (only on the VCR) more information, please read page 22. (only on the 12. CHANNEL A or V buttons- Press to select the de- remote control) sired channels for viewing or recording. 21. COUNTER MEMORY button- Press to set counter Tracking function- Press to minimize video `noise' memory on and off.(only on the remote control) (lines or dots on screen) during playback or slow 22. COUNTER RESET button- Press to reset counter mode. to 0:00:00. (only on the remote control) Press to stabilize the picture in the Still mode when the picture begins to vibrate vertically. EXIT button- Press to exit the menu on the TV screen. (only on the remote control) 13. RECORD button- Press for manual recording. 23. Power cord- Connect to a standard AC outlet OTR button- Press to activate One Touch Record- (120V/60Hz). ing. (only on the VCR) 24. AUDIO OUT jacks- Connect to the audio input 14. AUTO RETURN button- Rewinds to the beginning jacks of your audio equipment or another VCR. of the timer recording. 25. AUDIO IN jacks- Connect to the audio output jacks 15. NUMBER buttons- Press to select desired channels of your audio equipment or another VCR. for viewing or recording. To select channels from 1 26. ANT. IN terminal- Connect to an antenna, Cable to 9, first press "0" button then 1 to 9. (only on the system or Satellite system. remote control) +100 button- When selecting cable channels which are higher than 99, press this button first, then press 27. VIDEO OUT jack- Connect to the video input jack of your video camera or another VCR. the last two digits. (To select channel 125, first press 28. VIDEO IN jack- Connect to the video output jack of "+100" button then press "2" and "5"). (only on the your video camera or another VCR. remote control) 29. CH3/CH4 selector switch- Use to select a video 16. MENU button- Press to display the menu on the TV output channel (3 or 4) for VCR playback. screen. Press to exit the menu on the TV screen. (only 30. ANT. OUT terminal- Connects to the antenna input on the remote control) terminal on your TV. - 9 - EN 8L15
-
 1
1 -
2
-
3
-
 4
4 -
 5
5 -
 6
6 -
 7
7 -
 8
8 -
 9
9 -
 10
10 -
 11
11 -
 12
12 -
 13
13 -
 14
14 -
15
-
16
-
17
-
18
-
19
-
20
-
21
-
22
-
23
-
24
-
25
-
26
-
27
-
28
-
29
-
30
-
31
-
32
-
33
-
34
-
35
-
36
-
37
-
38
-
39
-
40
-
41
-
42
-
43
-
44
-
45
-
46
-
47
-
48
 |
 |