Symphonic VR69WF Owner's Manual - Page 30
Counter, Rewind
 |
View all Symphonic VR69WF manuals
Add to My Manuals
Save this manual to your list of manuals |
Page 30 highlights
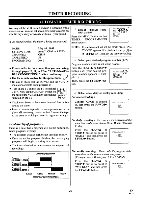
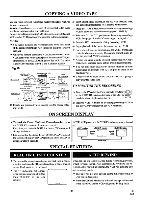
COPYING A VIDEO TAPE You can make copies of video tapes made by friends or relatives for your enjoyment. Warning:Unauthorized recordings of copyrighted video tapes may be an infringement of copyright laws. Connect the editing (recording) VCR(this unit), source (playing) VCR(another VCR) and your TV using the following diagram. NOTES: • You can use the audio and video input jacks on the front panel of the editing (recording) VCR instead of using the jacks on the back. • When you connect a monaural VCR(another source) to this VCR, connect the Audio output jack of the monaural VCR(another source) to the AUDIO IN L jack of this VCR. The audio signal will be recorded in both L and R channel equally. Fig.10: AudioNideo cables (not supplied) 'Connection 1' [Editing (Recording) VCR] this unit Coaxial cable (supplied) [IV set] Use for monitoring •• vIXO [Source (Playing) VCR ] (another VCR) AuclioNideo cables (not supplied) [Editing (Recordin this tin 'Connection 21 •011i • OLIT • X• DO VINO [Source (Playing) VCR ) (another VCR) 0Antenna input jack VCR] Coaxial cable (supplied) [TV set] Use for monitoring Clx.-2L,X ,r *! *Antenna input jack 1) Insert a pre-recorded video cassette into the source (playing) VCR. 2) Insert a blank video cassette, or one you want to record over, into the editing (recording) VCR cassette compartment. 3) Press the TAPE SPEED button on the editing (recording) VCR to select the desired recording speed (SP/SLP). 4) Select the "Ll" or "L2" position on the editing (recording) VCR. See page 13, under "Connecting to input jacks". 5) Press the REC button on the editing (recording) VCR. 6) Begin playback of the tape in the source (playing) VCR. • For best results during dubbing, use the VCR's front panel controls whenever possible. The remote control might affect the playback VCR's operation. • Always use video-quality shielded cables with RCA-type connectors. Standard audio cables are not recommended. • You can use a video disc player, satellite receiver, or other audio/video component with A/V outputs in place of the playback VCR. • If video or color fades in and out, you may be copying a copy guarded video tape. TO MONITOR THE RECORDING 1) Tum on the TV and set the TV to channel 3 or 4. Now CH3 CH4 1:312 set the CH3/CH4 switch on the back of the VCR to pack of match the channel selected on the TV. the VCR] 2) Press the VCR/TV button on the editing (recording) VCR so that the VCR/ TV indicator on the VCR comes on. ON SCREEN DISPLAY • To check the Count, Clock and Channel number, press the DISPLAY button on the remote control. Each time you press the DISPLAY button, TV screen will change as shown. • It is normal for the status display (STOP, PLAY etc.) and the tape speed display (SP, LP (playback only), or SLP) to disappear after 5 seconds. NOTE: VCR power and the VCR/TV indicator must be turned on. r STOP STOP Press once Press once SP Press once IJ SPECIAL FEATURES REAL TIME TAPE COUNTER AUTO REWIND • This shows the elapsed recording or playback time in hours, minutes, and seconds. (The displayed time will not change during blank portions on the tape.) • The "-" indication will appear when the tape is rewound further than "0:00:00" on the tape counter. -000:r2 When the end of a tape is reached during recording, playback, or fast-forward, the tape will automatically rewind to the beginning. After rewinding finishes, the VCR will eject the tape and turn itself to off. • The tape will not auto-rewind during timer recording or One Touch Recording. • When the Counter Memory is activated, the tape will rewind to the M0:00:00 and the VCR will go into the Stop mode. - 30 - EN 8L15
-
 1
1 -
2
-
3
-
4
-
5
-
6
-
7
-
8
-
9
-
10
-
11
-
12
-
13
-
14
-
15
-
16
-
17
-
18
-
19
-
20
-
21
-
22
-
23
-
24
-
 25
25 -
 26
26 -
 27
27 -
 28
28 -
 29
29 -
 30
30 -
 31
31 -
 32
32 -
 33
33 -
 34
34 -
 35
35 -
36
-
37
-
38
-
39
-
40
-
41
-
42
-
43
-
44
-
45
-
46
-
47
-
48
 |
 |
