TRENDnet TEW-740APBO Users Guide - Page 11
TEW-740APBO #2 Configuration, Service, Enable, Address, Security Type, Passphrase, Reboot
 |
View all TRENDnet TEW-740APBO manuals
Add to My Manuals
Save this manual to your list of manuals |
Page 11 highlights
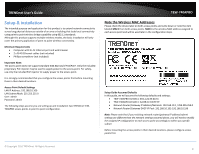
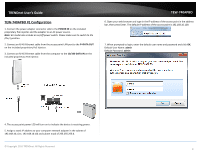
TRENDnet User's Guide 15. Under WDS Setup, set the Service setting to Enable. 16. In the first field for item 1, check the Enable option and in the WDS Peer's MAC Address fields, enter the MAC address of the 2nd TEW-740ABPO (TEW-740APBO #2 MAC1: AA:BB:CC:DD:EE:FF) noted earlier in this guide. Description field is optional. Note: You will need to enter the wireless MAC address of your 2nd access point as the one below is only used as an example in this guide. 17. In the Security Type field above, it is recommended to select AES and assign a passphrase. It is not required to create a point-to-point WDS link but strongly recommended. This setting must match on both access points. TEW-740APBO TEW-740APBO #2 Configuration 1. Repeat the same TEW-740APBO #1 configuration steps 1-9 for TEW-740ABPO #2. 2. On the TEW-740APBO #1 configuration step 10, use the IP configuration settings below for TEW-740APBO #2. Note: Please note that if your existing network IP subnet is different. You must assign IP addresses available in your IP subnet to the access points accordingly. TEW-740ABO #2 IP Configuration IP Address: 192.168.10.51 IP Netmask: 255.255.255.0 IP Gateway: 192.168.10.1 If you decide to apply encryption and assign a passphrase, select AES. Then scroll down to the bottom under the AES section and enter Passphrase. The security type and key must match on both access points. Then click Save to save the settings. Note: It is strongly recommended to assign strong passphrase. We are only using the encryption key 1234567890 as an example in this guide. 18. At the top of the page, click Reboot, then click the Reboot button on the GUI page to commit all of the changes. This completes the configuration for TEW-740APBO #1. 3. Repeat the same TEW-740APBO #1 configuration steps 11-15 for TEW-740ABPO #2. 4. On the TEW-740APBO #1 configuration step 16, enter the MAC address of the 1st TEW-740ABPO (TEW-740APBO #1 MAC1: 00:11:22:33:44:55) noted earlier in this guide. Description field is optional. Note: You will need to enter the wireless MAC address of your 1st access point as the one below is only used as an example in this guide. 5. Repeat the same TEW-740APBO #1 configuration steps 11-18 to complete the TEW740ABPO #2 configuration. This completes the configuration for TEW-740APBO #2 © Copyright 2016 TRENDnet. All Rights Reserved. 11
-
 1
1 -
2
-
3
-
4
-
5
-
 6
6 -
 7
7 -
 8
8 -
 9
9 -
 10
10 -
 11
11 -
 12
12 -
 13
13 -
 14
14 -
 15
15 -
 16
16 -
17
-
18
-
19
-
20
-
21
-
22
-
23
-
24
-
25
-
26
-
27
-
28
-
29
-
30
-
31
-
32
-
33
-
34
-
35
-
36
-
37
-
38
-
39
-
40
-
41
-
42
-
43
-
44
-
45
-
46
-
47
-
48
-
49
-
50
-
51
-
52
-
53
-
54
-
55
-
56
-
57
-
58
-
59
-
60
-
61
-
62
-
63
-
64
-
65
-
66
-
67
-
68
-
69
-
70
-
71
-
72
-
73
-
74
-
75
-
76
-
77
-
78
-
79
-
80
-
81
-
82
-
83
-
84
-
85
-
86
-
87
-
88
-
89
-
90
-
91
-
92
-
93
-
94
-
95
-
96
 |
 |
