Toshiba 40S51U Owners Manual - Page 42
Using the HDMI, settings feature, Viewing the HDMI, signal, information, Using your PC with the TV
 |
View all Toshiba 40S51U manuals
Add to My Manuals
Save this manual to your list of manuals |
Page 42 highlights
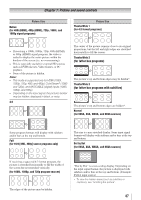
Chapter 6: Basic features Using the HDMI® settings feature Note: If some HDMI legacy sources do not work properly with your HDMI TV, set INSTAPORT™ to Off. Adjusting this setting should allow your HDMI legacy source to operate properly with your TV. Mode (default setting) Description INSTAPORT™: On Reduces the lag time when switching HDMI sources. RGB Range: Auto Adjusts the RGB full range signal automatically. When Limited is selected, the RGB output signal is output in the range of 16 to 235. When Full is selected, the RGB output signal is output in the range of 0 to 255. The RGB Range setting requires appropriate HDMI source devices. If your HDMI source device does not support this feature, the TV may not work properly when it is enabled. Note: If your HDMI connection is capable of 1080p and/or your TV is capable of refresh rates greater than 60 Hz, you will need a High Speed HDMI® cable. Conventional HDMI/DVI cables may not work properly with this mode. 1無 Select the appropriate HDMI input mode (HDMI 1, HDMI 2, HDMI 3, or HDMI 4 (except 24SL415U)). 2無 > Settings > PREFERENCES > AV Connection > . 3無 Press p or q to select HDMI Settings. Press . 4無 Press p or q to select an item. 5無 Press t or u to select a setting. Viewing the HDMI® signal information 1無 > Settings > PREFERENCES > HDMI Information Display. 2無 Press t or u to select On. Press . The normal banner and signal information banner appear. Note: • The signal information banner will appear when this feature is set to On and you watch HDMI input. • If you press when this feature is set to Off, only the normal banner will appear. Using your PC with the TV Adjusting the image If the edges of the picture are hidden, readjust Horizontal Position and Vertical Position. If the picture is affected by interference, readjust Clock Phase and Sampling Clock. 1無 Select PC input mode ( "Selecting the video input to view" on page 35). 2無 > Settings > PREFERENCES > Display Settings > . 3無 Press p or q to select PC Settings. Press . Note: If a PC is not connected or there is no PC input signal, this menu will not be available. 4無 Press p or q to select an item. 5無 Press t or u to make adjustments. Note: The screen is disrupted momentarily when adjusting the PC settings. This is not a sign of malfunction. Mode Description Adjustment range Horizontal Moves the picture Position left/right. within ±10 from center.* Vertical Position Moves the picture up/ within ±10 from down. center.* Clock Phase Helps to reduce noise within ±15 from and sharpen the picture. center. Sampling Clock Helps to reduce noise and minimize periodic vertical stripes on the screen. within ±5 from center. * The default settings and /or adjustment ranges vary depending on the input signal format. To reset PC Settings: Select Reset. Press . Setting the PC audio You can output sound from your PC when connecting it to your TV, using the AUDIO IN terminal and PC audio cable. 1無 > Settings > PREFERENCES > AV Connection > . 2無 Press p or q to select PC/HDMI 3 Audio. 3無 Press t or u to select PC. Note: To select PC, set Shared PC Audio to PC. 42
-
 1
1 -
2
-
3
-
4
-
5
-
6
-
7
-
8
-
9
-
10
-
11
-
12
-
13
-
14
-
15
-
16
-
17
-
18
-
19
-
20
-
21
-
22
-
23
-
24
-
25
-
26
-
27
-
28
-
29
-
30
-
31
-
32
-
33
-
34
-
35
-
36
-
 37
37 -
 38
38 -
 39
39 -
 40
40 -
 41
41 -
 42
42 -
 43
43 -
 44
44 -
 45
45 -
 46
46 -
 47
47 -
48
-
49
-
50
-
51
-
52
-
53
-
54
-
55
-
56
-
57
-
58
-
59
-
60
-
61
-
62
-
63
-
64
-
65
-
66
-
67
-
68
-
69
-
70
-
71
-
72
-
73
-
74
-
75
-
76
-
77
-
78
-
79
-
80
-
81
-
82
-
83
-
84
-
85
-
86
-
87
-
88
-
89
-
90
-
91
-
92
 |
 |