Toshiba NB305-N411BL User Manual - Page 84
Replacing the battery pack, Battery, Power, Hard Disk Drive
 |
View all Toshiba NB305-N411BL manuals
Add to My Manuals
Save this manual to your list of manuals |
Page 84 highlights
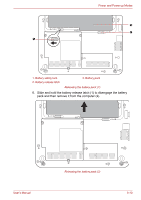
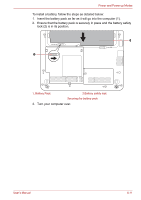
Power and Power-up Modes 5. Charge the battery pack until the Battery indicator glows green. ■ If you have extra battery packs, rotate their use. ■ If you will not be using the system for an extended period, for example for more than one month, remove the battery pack from the computer. ■ Disconnect the AC adaptor when the battery is fully charged - overcharging will make the battery hot and can shorten its operating life. ■ If you are not going to use the computer for more than eight hours, disconnect the AC adaptor. ■ Store spare battery packs in a cool dry place out of direct sunlight. Replacing the battery pack Please be aware that the battery pack is classified as a consumable item. The operating life of the battery pack will gradually reduce through repeated charging and discharging, and will need to be replaced when it reaches the end of its operating life. In addition to this, you might also replace a discharged battery pack with a charged spare when you are operating your computer away from an AC power source for an extended period of time. This section explains how to remove and install the battery pack, and begins with the removal process which is detailed through the following steps. ■ Do not remove the battery pack while the computer is in Standby Mode. Data is stored in RAM, so if the computer loses power it will be lost. ■ In Hibernation Mode, data will be lost if you remove the battery pack or disconnect the AC adaptor before the save is completed. Wait for the Hard Disk Drive indicator to go out. ■ Do not touch the battery release latch while holding the computer or the battery pack might fall out due to the unintentional release of the battery release latch and cause injuries. To remove a discharged battery, follow the steps as detailed below: 1. Save your work. 2. Turn the computer's power off - ensure that the Power indicator is off. 3. Remove all cables and peripherals that are connected to the computer. 4. Close the display panel and turn the computer upside down. 5. Slide the battery safety lock towards the release ( ) position to make the battery release latch movable. User's Manual 6-9
-
 1
1 -
2
-
3
-
4
-
5
-
6
-
7
-
8
-
9
-
10
-
11
-
12
-
13
-
14
-
15
-
16
-
17
-
18
-
19
-
20
-
21
-
22
-
23
-
24
-
25
-
26
-
27
-
28
-
29
-
30
-
31
-
32
-
33
-
34
-
35
-
36
-
37
-
38
-
39
-
40
-
41
-
42
-
43
-
44
-
45
-
46
-
47
-
48
-
49
-
50
-
51
-
52
-
53
-
54
-
55
-
56
-
57
-
58
-
59
-
60
-
61
-
62
-
63
-
64
-
65
-
66
-
67
-
68
-
69
-
70
-
71
-
72
-
73
-
74
-
75
-
76
-
77
-
78
-
 79
79 -
 80
80 -
 81
81 -
 82
82 -
 83
83 -
 84
84 -
 85
85 -
 86
86 -
 87
87 -
 88
88 -
 89
89 -
90
-
91
-
92
-
93
-
94
-
95
-
96
-
97
-
98
-
99
-
100
-
101
-
102
-
103
-
104
-
105
-
106
-
107
-
108
-
109
-
110
-
111
-
112
-
113
-
114
-
115
-
116
-
117
-
118
-
119
-
120
-
121
-
122
-
123
-
124
-
125
-
126
-
127
-
128
-
129
-
130
-
131
-
132
-
133
-
134
-
135
-
136
-
137
-
138
-
139
-
140
-
141
-
142
-
143
 |
 |