Toshiba NB305-N411BL User Manual - Page 99
Battery Packs, Universal AC Adaptor, USB floppy diskette drive, USB optical disc drive
 |
View all Toshiba NB305-N411BL manuals
Add to My Manuals
Save this manual to your list of manuals |
Page 99 highlights
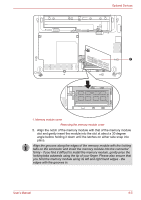
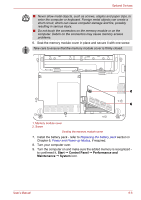
Optional Devices Removing a memory module To remove the memory module, follow the steps as detailed below: 1. Turn the computer off and remove all cables connected to the computer. 2. Turn the computer upside down and remove the battery pack (refer to Chapter 6, Power and Power-up Modes.) 3. Remove one screw securing the memory module cover. 4. Lift off the memory module cover. 5. Push the latches outward and the memory module will pop up. 6. Grasp the memory module by the sides and pull it out. 7. Seat the memory module cover in place and secure it with one screw. 8. Install the battery pack - refer to Replacing the battery pack section in Chapter 6, Power and Power-up Modes, if required. 9. Turn your computer over. Battery Packs You can increase the portability of the computer with additional battery packs so that, if you're away from an AC power source and your battery runs low, you can replace it with a freshly charged battery. Please refer to Chapter 6, Power and Power-up Modes for further information. Universal AC Adaptor If you frequently use your computer at more than one site, it may be convenient to purchase an additional AC adaptor to be kept at each site in order to remove the need to always carry the adaptor with you. USB floppy diskette drive The 3 1/2" external FDD module can be connected to the USB port. USB optical disc drive The USB Optical Disc Drive can be connected to the USB port. User's Manual 8-7
-
 1
1 -
2
-
3
-
4
-
5
-
6
-
7
-
8
-
9
-
10
-
11
-
12
-
13
-
14
-
15
-
16
-
17
-
18
-
19
-
20
-
21
-
22
-
23
-
24
-
25
-
26
-
27
-
28
-
29
-
30
-
31
-
32
-
33
-
34
-
35
-
36
-
37
-
38
-
39
-
40
-
41
-
42
-
43
-
44
-
45
-
46
-
47
-
48
-
49
-
50
-
51
-
52
-
53
-
54
-
55
-
56
-
57
-
58
-
59
-
60
-
61
-
62
-
63
-
64
-
65
-
66
-
67
-
68
-
69
-
70
-
71
-
72
-
73
-
74
-
75
-
76
-
77
-
78
-
79
-
80
-
81
-
82
-
83
-
84
-
85
-
86
-
87
-
88
-
89
-
90
-
91
-
92
-
93
-
 94
94 -
 95
95 -
 96
96 -
 97
97 -
 98
98 -
 99
99 -
 100
100 -
 101
101 -
 102
102 -
 103
103 -
 104
104 -
105
-
106
-
107
-
108
-
109
-
110
-
111
-
112
-
113
-
114
-
115
-
116
-
117
-
118
-
119
-
120
-
121
-
122
-
123
-
124
-
125
-
126
-
127
-
128
-
129
-
130
-
131
-
132
-
133
-
134
-
135
-
136
-
137
-
138
-
139
-
140
-
141
-
142
-
143
 |
 |