WestBend 41410 Instruction Manual - Page 6
Basic Steps In Making Bread
 |
View all WestBend 41410 manuals
Add to My Manuals
Save this manual to your list of manuals |
Page 6 highlights
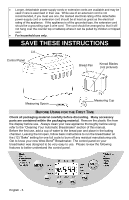
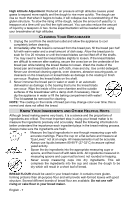
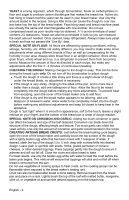
BASIC STEPS IN MAKING BREAD Always clean your new appliance thoroughly before using. Refer to "Cleaning Your Breadmaker" section. 1. Insert the bread pan; place the bread pan in the center of the baking chamber. When the bread pan is pressed lightly in the center, the fixing device locks into place. To remove the bread pan, pull with medium force on the bread pan carrying handle. CAUTION: The handle is hot after baking. Use oven mitts or hot pads when removing a hot bread pan. 2. Position the knead blades on to the shafts in the bottom of the bread pan, matching the hub shapes with the shaft shapes. You may need to twist the bars slightly for the knead blades to drop in place. Make sure the knead blades are pushed down on the shaft all the way. The knead blade is all the way down when the top of the shaft is flush with the top of the knead bar. 3. Add ingredients to the bread pan in the order listed in the recipe; liquids first, then the butter or margarine, next the dry ingredients and finally the yeast. For best results level the dry ingredients before adding the yeast. Note: Ingredients and measuring are the key to successful breadmaking. We highly recommend reading the "Know Your Ingredients and Other Helpful Hints" section of this manual before making bread. 4. Plug the breadmaker cord into a 120 volt, AC electrical outlet ONLY. 5. Use the "MENU" button to select the desired program menu. (see pg. 5) 6. Use the "LOAF" button to select the desired loaf size. 7. Use the "COLOR" button to select the desired crust darkness. 8. If desired, use the "TIME +" and "TIME -" buttons to set the elapsed time for when the program is to be completed (see pg. 4). 9. Press the "START/STOP" button to begin the program. After the breadmaker has been turned on, the programmed setting cannot be changed without canceling the program. To change the setting, hold the "START/STOP" button down until the alert sounds; program the control as desired and turn back on. • A small amount of smoke and/or odor may occur upon heating due to the release of manufacturing oils - this is normal. • Some minor expansion/contraction sounds may occur during heating and cooling - this is normal. 10. When the bread is done, an alert will sound. Turn the breadmaker off by holding the "START/STOP" button down until the alert sounds. Unplug the cord from the electrical outlet. If the breadmaker is not turned off after the cycle is complete, the breadmaker will automatically go into a one hour "Keep Warm" mode. If the machine is not turned off after the end of the "Keep Warm" period, the machine will turn itself off. 11. Remove the bread pan. CAUTION: The handle is hot after baking. Use oven mitts or hot pads when removing a hot bread pan. 12. Invert the bread pan and shake gently until the loaf falls out. Place the bread on a rack to cool 15 to 20 minutes. The knead blade will normally stay in the bread pan when the bread is removed, but may on occasion slide out in the bread. CAUTION: The knead blade is very hot, remove with care. If making another loaf of bread right away, be sure the machine is turned off, unplugged, and allowed to cool for 15 to 20 minutes with the cover open. English - 6
-
 1
1 -
 2
2 -
 3
3 -
 4
4 -
 5
5 -
 6
6 -
 7
7 -
 8
8 -
 9
9 -
 10
10 -
 11
11 -
 12
12 -
13
-
14
-
15
-
16
-
17
-
18
-
19
-
20
-
21
-
22
-
23
-
24
-
25
-
26
-
27
-
28
-
29
-
30
-
31
-
32
-
33
-
34
-
35
-
36
-
37
-
38
-
39
-
40
-
41
-
42
-
43
-
44
-
45
-
46
-
47
-
48
-
49
-
50
-
51
-
52
-
53
-
54
-
55
-
56
-
57
-
58
-
59
-
60
-
61
-
62
-
63
-
64
-
65
-
66
-
67
-
68
-
69
-
70
-
71
-
72
-
73
 |
 |