WestBend 41410 Instruction Manual - Page 7
Cleaning Your Breadmaker Know Your Ingredients And Other Helpful Hints
 |
View all WestBend 41410 manuals
Add to My Manuals
Save this manual to your list of manuals |
Page 7 highlights
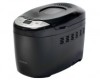
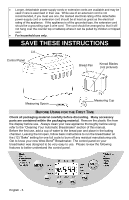
High Altitude Adjustment: Reduced air pressure at high altitudes causes yeast gases to expand more rapidly and the dough to rise more quickly. The dough can rise so much that when it begins to bake, it will collapse due to overstretching of the gluten structure. To slow the rising of the dough, reduce the amount of yeast by ¼ teaspoon at a time until you find the right amount. You can also reduce the amount of liquid by a teaspoon or two. Some experimentation will be needed when using your breadmaker at high altitudes. CLEANING YOUR BREADMAKER 1. Unplug the cord from the electrical outlet and allow the appliance to cool completely before cleaning. 2. Immediately after the bread is removed from the bread pan, fill the bread pan half full with warm water and a small amount of dish soap. Allow the bread pan to soak for 5 to 20 minutes or until the knead blades can be lifted off of the shafts. You may need to twist the knead blades slightly to loosen. If the knead blades are difficult to remove after soaking, secure the cross bar on the underside of the bread pan while twisting the knead blades to loosen. Wash the inside of the bread pan and knead blade with a soft cloth, rinse and dry. Use a mild detergent. Never use chemical cleaning agents, oven cleaners, abrasive scouring pads, or cleansers on the bread pan or knead blade as damage to the coating or finish can occur. Replace the knead blade on the shaft. 3. Never immerse the bread pan in water or wash in an automatic dishwasher as damage to the bearing that turns the knead blade can occur. Wipe the inside of the oven chamber and the outside surfaces of the breadmaker with a damp cloth if necessary. Never dip the appliance in water or fill the baking compartment with water! The lid cannot be removed for cleaning. NOTE: The coating on the inside of bread pan may change color over time; this is normal and does not affect the bread. KNOW YOUR INGREDIENTS AND OTHER HELPFUL HINTS Although bread making seems very basic, it is a science and the proportions of ingredients are critical. The most important step in using your bread maker is to measure the ingredients precisely and accurately. Read the following information to better understand the importance each ingredient plays in the bread making process. Always make sure the ingredients are fresh. • Measure the liquid ingredients in see-through measuring cups with accurate markings. Place the cup on a flat surface and measure at "Eye Level," not at an angle. All measurements must be accurate. Always use liquids between 80-90°F (27-32°C) to assure optimal yeast activity. • Spoon the dry ingredients into the appropriate measuring cups or spoons, and then level off with table knife. All ingredients measured in measuring spoons and cups must be level, not rounded or heaping. • Never scoop measuring cups into dry ingredients. This will compress the ingredients into the cup and cause the dough to be dry which will result in a short loaf of bread. BREAD FLOUR should be used in your bread maker. It contains more glutenforming proteins than all-purpose flour and will provide well-formed loaves with good structure. Several different brands of bread flour are available. Do not use selfrising or cake flour in your bread maker. English - 7
-
 1
1 -
 2
2 -
 3
3 -
 4
4 -
 5
5 -
 6
6 -
 7
7 -
 8
8 -
 9
9 -
 10
10 -
 11
11 -
 12
12 -
13
-
14
-
15
-
16
-
17
-
18
-
19
-
20
-
21
-
22
-
23
-
24
-
25
-
26
-
27
-
28
-
29
-
30
-
31
-
32
-
33
-
34
-
35
-
36
-
37
-
38
-
39
-
40
-
41
-
42
-
43
-
44
-
45
-
46
-
47
-
48
-
49
-
50
-
51
-
52
-
53
-
54
-
55
-
56
-
57
-
58
-
59
-
60
-
61
-
62
-
63
-
64
-
65
-
66
-
67
-
68
-
69
-
70
-
71
-
72
-
73
 |
 |