Yamaha CS6R Owner's Manual - Page 24
Entering Data, ENTER] Key, Knobs [A], [B], [C]
 |
View all Yamaha CS6R manuals
Add to My Manuals
Save this manual to your list of manuals |
Page 24 highlights
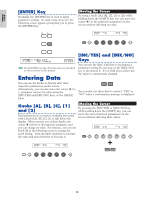
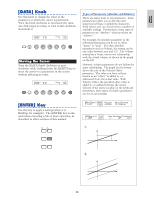
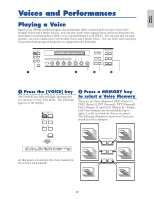
Basics Section [ENTER] Key Normally, the [ENTER] key is used to apply parameter settings. In some cases, however, the following screen appears prompting you to press the [ENTER] key. Moving the Cursor By using a knob ([A], [B], [C], [1] or [2]) while holding down the [SHIFT] key, you can move the cursor (≥) to the respective parameter on the screen without affecting its value. EF MASTER BYPASS KEYBOARD OSCíOut) Level EL1234 96 Delay InsEF ≥ 0 ins2 EXIT ENTER SHIFT PAGE A B C 1 2 DATA DEC/NO INC/YES PART/ELEMENT EFFíEF1) Ctgry Type C 1234 MOD Tremolo [ENTER] to Edit The [ENTER] key has other functions, as described in other sections in this manual. Entering Data You can use the knobs to directly alter their respective parameters on the screen. Alternatively, you can also move the cursor (≥) to a parameter and set its value using the [INC/YES] and [DEC/NO] keys, or the [DATA] knob. [INC/YES] and [DEC/NO] Keys You can use the [INC/YES] key to increment a parameter setting by one step, or the [DEC/NO] key to decrement it. If you hold down either key, the value is continuously changed. DEC/NO INC/YES You can also use these keys to answer "YES" or "NO" when a confirmation message is displayed. Knobs [A], [B], [C], [1] and [2] Each parameter in a screen is normally associated with a knob ([A], [B], [C], [1] or [2]) below the display. When you use one of these knobs, the cursor (≥) moves to its respective parameter and you can change its value. For instance, you can use Knob [B] at the following screen to change the Level setting. Turn the knob clockwise to increase the value and anti-clockwise to decrease it. Moving the Cursor By pressing the [INC/YES] or [DEC/NO] key while holding down the [SHIFT] key, you can move the cursor between parameters on the screen without affecting their values. OSCíOut) Level EL1234 ≥ 96 SHIFT PAGE A B C Delay InsEF 0 ins2 1 2 DATA PART/ELEMENT OSCíOut) Level EL1234 ≥ 96 SHIFT PAGE A B C Delay InsEF 0 ins2 1 2 DATA DEC/NO INC/YES PART/ELEMENT 24
-
 1
1 -
2
-
3
-
4
-
5
-
6
-
7
-
8
-
9
-
10
-
11
-
12
-
13
-
14
-
15
-
16
-
17
-
18
-
 19
19 -
 20
20 -
 21
21 -
 22
22 -
 23
23 -
 24
24 -
 25
25 -
 26
26 -
 27
27 -
 28
28 -
 29
29 -
30
-
31
-
32
-
33
-
34
-
35
-
36
-
37
-
38
-
39
-
40
-
41
-
42
-
43
-
44
-
45
-
46
-
47
-
48
-
49
-
50
-
51
-
52
-
53
-
54
-
55
-
56
-
57
-
58
-
59
-
60
-
61
-
62
-
63
-
64
-
65
-
66
-
67
-
68
-
69
-
70
-
71
-
72
-
73
-
74
-
75
-
76
-
77
-
78
-
79
-
80
-
81
-
82
-
83
-
84
-
85
-
86
-
87
-
88
-
89
-
90
-
91
-
92
-
93
-
94
-
95
-
96
-
97
-
98
-
99
-
100
-
101
-
102
-
103
-
104
-
105
-
106
-
107
-
108
-
109
-
110
-
111
-
112
-
113
-
114
-
115
-
116
-
117
-
118
-
119
-
120
-
121
-
122
-
123
-
124
-
125
-
126
-
127
-
128
-
129
-
130
-
131
-
132
-
133
-
134
-
135
-
136
-
137
-
138
-
139
-
140
-
141
-
142
-
143
-
144
-
145
-
146
-
147
-
148
-
149
-
150
-
151
-
152
-
153
-
154
-
155
-
156
-
157
-
158
-
159
-
160
-
161
-
162
-
163
-
164
-
165
-
166
-
167
-
168
-
169
-
170
-
171
-
172
-
173
-
174
-
175
-
176
-
177
-
178
-
179
-
180
-
181
-
182
-
183
-
184
-
185
-
186
-
187
-
188
-
189
-
190
-
191
-
192
-
193
-
194
-
195
-
196
 |
 |
