Yamaha CS6R Owner's Manual - Page 73
Performing Live while, Playing Back a Song File, Using the A/D Input Part
 |
View all Yamaha CS6R manuals
Add to My Manuals
Save this manual to your list of manuals |
Page 73 highlights
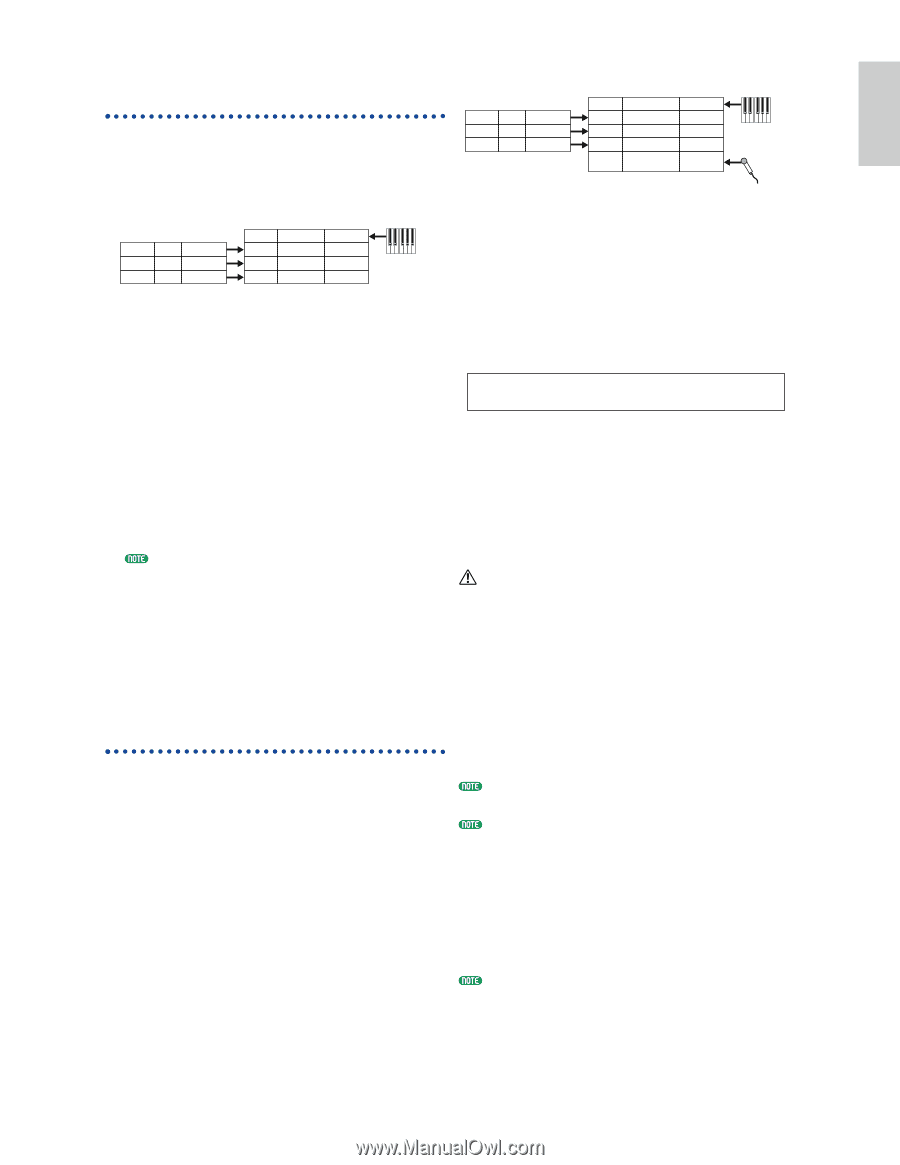
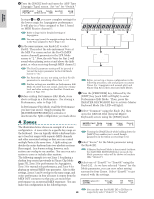
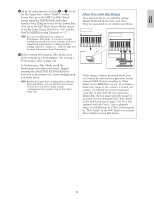
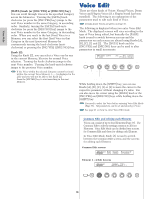
Basics Section Performing Live while Playing Back a Song File While playing back the song file with the piano, bass and drum Parts assigned earlier, you can set up the Performance so that you can also play another Part live. Song File Track 1 Piano Transmit Ch. 2 Track 2 Bass Transmit Ch. 3 Track 3 Drums Transmit Ch. 10 Performance Playback using keyboard Part 1 Solo-type Voice Layer=on Part 2 Piano-type Voice Receive Ch. 2 Part 3 Bass-type Voice Receive Ch. 3 Part 10 Drum Voice Receive Ch. 10 Song File Track 1 Piano Transmit Ch. 2 Track 2 Bass Transmit Ch. 3 Track 3 Drums Transmit Ch. 10 Performance Playback using keyboard Part 1 Solo-type Voice Layer=on Part 2 Piano-type Voice Receive Ch. 2 Part 3 Bass-type Voice Receive Ch. 3 Part 10 Drum Voice Receive Ch. 10 A/D Input Source (mic) Part Template (karaoke1) * External mic input * You need to set the receive channel to control the A/D Input Part parameters via MIDI. However, this is not vital in this example. Regarding settings, the important points are as follows. This is the same as the Performance created earlier, but with the addition of another Part for live playback. Regarding settings, the important points are as follows. • In the Performance created earlier, Parts 2, 3 and 10 were being used. As an example, we will now assign another Part (Part 1) to a solotype Voice. • At the LYR Mode screen, set the Layer parameter for Part 1 to "on," and make sure it is set to "off" for Parts 2, 3 and 10. If you want to manually play multiple (up to four) Parts using some Voices from Parts 4 to 9, 11 to 16 and Plug-in Parts, set those Parts' Layer Switch parameters to "on." • At the GEN MIDI screen, set the LayerCh (Layer Channel) parameter to BasicCh. The Voice for Part 1 can now be played live using the keyboard. • Switch to the PartAD (A/D Input Part) parameters and set the external input source and template at the MIX Template screen. MIXíTemplate)Src Number PartAD mic ≥05[Karaoke1 ] There are 13 templates available already with a variety of gain and effects settings for you to select from according to the input source. Here, we will be using the A/D Input Part for vocals so let's set the Src (Source) parameter to "mic" and the Number (Template Number) parameter to "Karaoke1." If you choose the wrong type of input source, you may possibly damage your hearing and/or any connected audio equipment. Make sure you set this parameter correctly. • Turn the [GAIN] knob (Page 11) all the way down, then connect a microphone to the A/D INPUT jack (MIC/LINE2 jack). Using the A/D Input Part • Turn the [GAIN] knob back slowly while singing/talking into the microphone until you If you have external sources (such as a microphone reach an ideal volume level. or other audio equipment) connected to the synthesizer's A/D INPUT jack, you can use them There are other settings for controlling the A/D Input Part via MIDI. Details are given on Page 132. as Parts in a Performance. Continuing with our example, you can add another Part for vocals by assigning the A/D Input Part. When you play a song file bearing the XG/GM logo (available in the market), you may want to install an optional XG Plug-in Board on the instrument, to enjoy Therefore, while the song is playing back the piano, bass and drums, you simultaneously play a solo live and sing into the microphone. Effects such as reverb can be added to the A/D Input Part (Pages 130 and 137), so you can assign an effect suited to a best playback quality with a wide variety of Voices and Effects. Note that you can install an additional XG Plug-in Board to double polyphonic notes and Effects. In such cases, you do not only enjoy the playback of a song, but also can mute a specific Part from the song file for a "minus-one" setting, which is convenient for the vocals for the song. These effect settings will practice of solo performance or karaoke. also be saved with the Performance. If you install the optional Effect Plug-in Board (PLG100-VH), you can create harmonies of up to three notes for your vocals. By assigning the harmony channel to the keyboard's MIDI transmit channel, you can create vocoder-like effects. Or you could play back a harmony line using a sequencer to create a backing chorus for your vocals. 73
-
 1
1 -
2
-
3
-
4
-
5
-
6
-
7
-
8
-
9
-
10
-
11
-
12
-
13
-
14
-
15
-
16
-
17
-
18
-
19
-
20
-
21
-
22
-
23
-
24
-
25
-
26
-
27
-
28
-
29
-
30
-
31
-
32
-
33
-
34
-
35
-
36
-
37
-
38
-
39
-
40
-
41
-
42
-
43
-
44
-
45
-
46
-
47
-
48
-
49
-
50
-
51
-
52
-
53
-
54
-
55
-
56
-
57
-
58
-
59
-
60
-
61
-
62
-
63
-
64
-
65
-
66
-
67
-
 68
68 -
 69
69 -
 70
70 -
 71
71 -
 72
72 -
 73
73 -
 74
74 -
 75
75 -
 76
76 -
 77
77 -
 78
78 -
79
-
80
-
81
-
82
-
83
-
84
-
85
-
86
-
87
-
88
-
89
-
90
-
91
-
92
-
93
-
94
-
95
-
96
-
97
-
98
-
99
-
100
-
101
-
102
-
103
-
104
-
105
-
106
-
107
-
108
-
109
-
110
-
111
-
112
-
113
-
114
-
115
-
116
-
117
-
118
-
119
-
120
-
121
-
122
-
123
-
124
-
125
-
126
-
127
-
128
-
129
-
130
-
131
-
132
-
133
-
134
-
135
-
136
-
137
-
138
-
139
-
140
-
141
-
142
-
143
-
144
-
145
-
146
-
147
-
148
-
149
-
150
-
151
-
152
-
153
-
154
-
155
-
156
-
157
-
158
-
159
-
160
-
161
-
162
-
163
-
164
-
165
-
166
-
167
-
168
-
169
-
170
-
171
-
172
-
173
-
174
-
175
-
176
-
177
-
178
-
179
-
180
-
181
-
182
-
183
-
184
-
185
-
186
-
187
-
188
-
189
-
190
-
191
-
192
-
193
-
194
-
195
-
196
 |
 |