Yamaha CS6R Owner's Manual - Page 54
Sampling Rate and Bit, Resolution, Playing Back Phrase Clips, loop in Phrase Clip Edit Mode
 |
View all Yamaha CS6R manuals
Add to My Manuals
Save this manual to your list of manuals |
Page 54 highlights
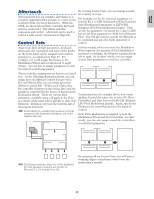
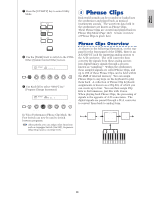
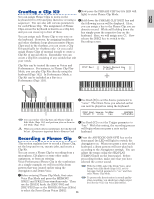
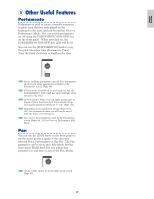
Basics Section Sampling Rate and Bit Resolution As an example, the illustration shows a sine wave. When recording (sampling) the sine wave, the A/D converter basically takes snapshots of the wave's levels at fixed intervals in time. Level Time Playing Back Phrase Clips You can play back your Phrase Clips in three different ways, as follows. First, there is "loop" playback. A section of the Phrase Clip is continuously looped during playback. This is often used for creating drum pattern loops from breakbeats. When you play a note on the keyboard, the Phrase Clip plays from the start point to the end point. It then returns to the loop point and plays to the end point again, and keeps doing this until you release the note. Level Original Analog Signal Time Sampled waveform In the graph, the horizontal axis represents time and the vertical axis represents signal level. The number of snapshots of levels taken in one second is known as the sampling rate and is given in Hertz. The A/D converter of this synthesizer has a sampling rate of 44.1kHz, which means that it takes 44100 snapshots of the waveform's levels within one second. The higher the sampling rate, the closer the reproduced (digital) signal is to the original. On the vertical axis, the number of levels is given in bits and is known as the bit resolution. The A/D converter of this synthesizer has a bit resolution of 16 bits, which means that there are 216 (i.e., 65536) levels on the vertical axis. As with the sampling rate, the higher the bit resolution, the closer the reproduced (digital) signal is to the original. Incidentally, audio on CDs is also sampled at 44.1kHz in 16 bits. Figure A: Lower sampling rate and bit resolution With musical instruments in general, the characteristic part of the sound (the "attack" section) is usually at the beginning, just after the start point. After this, the sound does not vary a great deal while the note is being held, and you can set the loop and end points at either end of this section. When playing back a Phrase Clip of an instrument that has been looped like this, the attack section of the sound is played back once and then the looped section is played back continuously until you release the note. Looping is also way of creating usable instrument sounds without using up too much memory. Phrase Clip Looped Playback Start Point Loop Point End Point The second playback method is known as "one shot." When you press a note on the keyboard, the Phrase Clip plays from beginning to end just once. This type of playback is commonly used for Phrase Clips of drum and percussion sounds. Start Point End Point Level Third, you can select "reverse" playback. When you press a note on the keyboard, the Phrase Clip plays from end to beginning just once. This is useful for creating reversed cymbal sounds and other special effects. Time Figure B: Higher sampling rate and bit resolution Level Start Point End Point You can set points and playback modes for the Time loop in Phrase Clip Edit Mode (Page 146). 54
-
 1
1 -
2
-
3
-
4
-
5
-
6
-
7
-
8
-
9
-
10
-
11
-
12
-
13
-
14
-
15
-
16
-
17
-
18
-
19
-
20
-
21
-
22
-
23
-
24
-
25
-
26
-
27
-
28
-
29
-
30
-
31
-
32
-
33
-
34
-
35
-
36
-
37
-
38
-
39
-
40
-
41
-
42
-
43
-
44
-
45
-
46
-
47
-
48
-
 49
49 -
 50
50 -
 51
51 -
 52
52 -
 53
53 -
 54
54 -
 55
55 -
 56
56 -
 57
57 -
 58
58 -
 59
59 -
60
-
61
-
62
-
63
-
64
-
65
-
66
-
67
-
68
-
69
-
70
-
71
-
72
-
73
-
74
-
75
-
76
-
77
-
78
-
79
-
80
-
81
-
82
-
83
-
84
-
85
-
86
-
87
-
88
-
89
-
90
-
91
-
92
-
93
-
94
-
95
-
96
-
97
-
98
-
99
-
100
-
101
-
102
-
103
-
104
-
105
-
106
-
107
-
108
-
109
-
110
-
111
-
112
-
113
-
114
-
115
-
116
-
117
-
118
-
119
-
120
-
121
-
122
-
123
-
124
-
125
-
126
-
127
-
128
-
129
-
130
-
131
-
132
-
133
-
134
-
135
-
136
-
137
-
138
-
139
-
140
-
141
-
142
-
143
-
144
-
145
-
146
-
147
-
148
-
149
-
150
-
151
-
152
-
153
-
154
-
155
-
156
-
157
-
158
-
159
-
160
-
161
-
162
-
163
-
164
-
165
-
166
-
167
-
168
-
169
-
170
-
171
-
172
-
173
-
174
-
175
-
176
-
177
-
178
-
179
-
180
-
181
-
182
-
183
-
184
-
185
-
186
-
187
-
188
-
189
-
190
-
191
-
192
-
193
-
194
-
195
-
196
 |
 |
