Yamaha CS6R Owner's Manual - Page 71
About Note Limit Key Range, Also, go to the LYR Mode Layer Mode screen
 |
View all Yamaha CS6R manuals
Add to My Manuals
Save this manual to your list of manuals |
Page 71 highlights
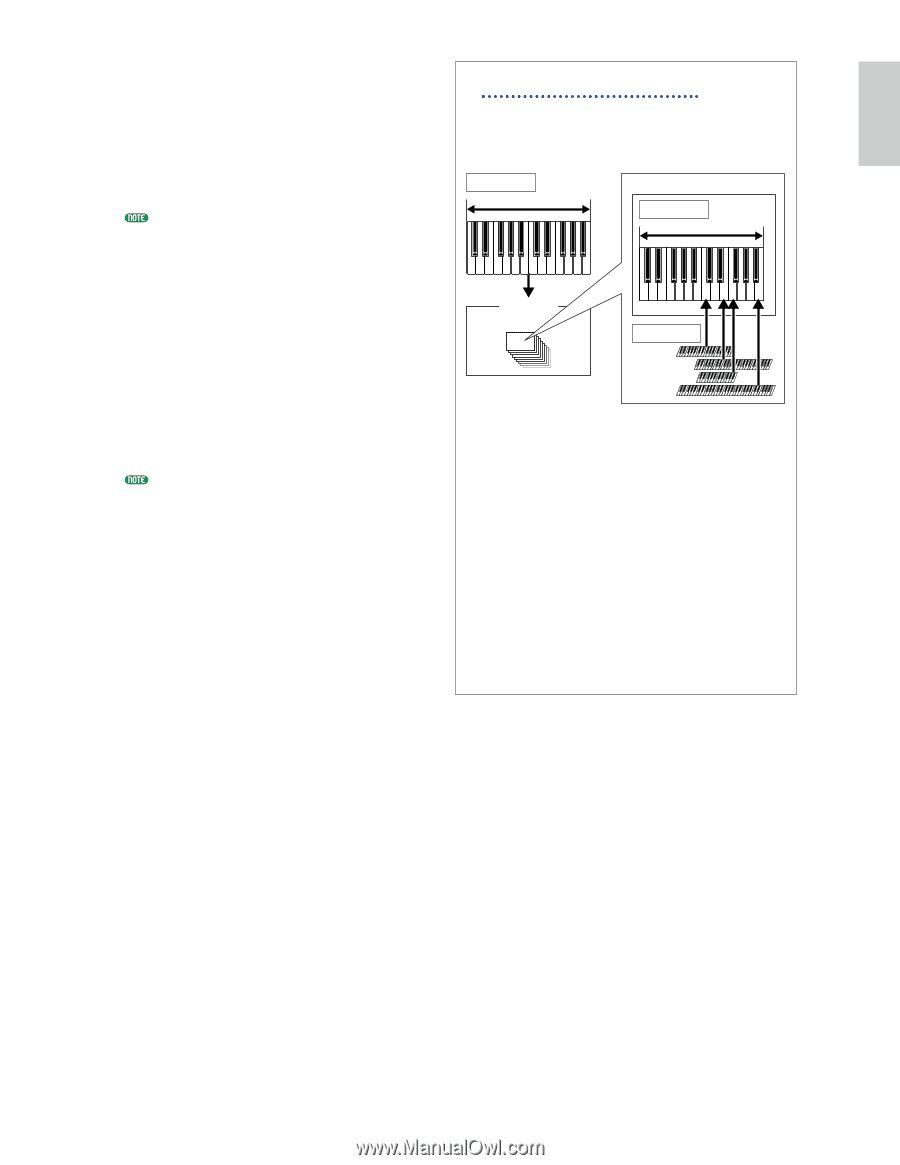
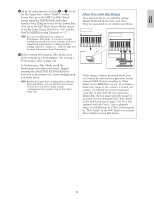
Basics Section 8As in the same manner in steps 5 to 7, set up for the Upper Part. Select "PartP1" for the Lower Part, go to the MIX Vce (Mix Voice) screen using the [PAGE] knob, and select another Voice (Plug-in Voice) for the Lower Part. Also, go to the LYR Mode (Layer Mode) screen to set the Layer (Layer Switch) to "off" and the RcvCh (MIDI Receiving Channel) to "2." You can set additional Part settings in Performance Edit Mode. If you have a trouble possibly associated with these settings, such as no sound from a specific Part, confirm any Part settings related to volume, etc. Refer to Page 130 for more information about Part settings. 9Before exiting Performance Edit Mode, store above settings in a Performance. For storing a Performance, refer to Page 141. In Performance Play Mode, recall the Performance you have just saved. Simply pressing the [MASTER KEYBOARD] key activates or deactivates the Layer configuration you made above. Besides the Layer/Zone configuration in Master Keyboard Modes, you can use the Layer (Layer Switch) for each Part to make a Layer configuration that consists of up to four Parts (Page 133). About Note Limit (Key Range) Note Limit setups are provided for setting Master Keyboard Mode, Part , and Voice. They are associated to one another as follows. MKB Note Key range for each Zone Part LYR Limit Key range for an assigned Voice Tone generator Parts OSC Limit Element 1 Element 2 Element 3 Element 4 While using in Master Keyboard Mode, you can control the internal tone generator (or an external MIDI device) according to "Note Limit" in the MKB Note screen. If you limit a Zone's key range to two octaves, it is as if you connect an external two-octaves keyboard controller to play with the tone generator. Meanwhile, the key range (playable range) of an entire Voice is determined by "Note Limit" in the LYR Limit screen (page 133) for a Part assigned with that Voice. Such a playable range of each Element of a Voice is determined by "Note Limit" in the OSC Limit screen (page 90) available in Voice Edit Mode. 71
-
 1
1 -
2
-
3
-
4
-
5
-
6
-
7
-
8
-
9
-
10
-
11
-
12
-
13
-
14
-
15
-
16
-
17
-
18
-
19
-
20
-
21
-
22
-
23
-
24
-
25
-
26
-
27
-
28
-
29
-
30
-
31
-
32
-
33
-
34
-
35
-
36
-
37
-
38
-
39
-
40
-
41
-
42
-
43
-
44
-
45
-
46
-
47
-
48
-
49
-
50
-
51
-
52
-
53
-
54
-
55
-
56
-
57
-
58
-
59
-
60
-
61
-
62
-
63
-
64
-
65
-
 66
66 -
 67
67 -
 68
68 -
 69
69 -
 70
70 -
 71
71 -
 72
72 -
 73
73 -
 74
74 -
 75
75 -
 76
76 -
77
-
78
-
79
-
80
-
81
-
82
-
83
-
84
-
85
-
86
-
87
-
88
-
89
-
90
-
91
-
92
-
93
-
94
-
95
-
96
-
97
-
98
-
99
-
100
-
101
-
102
-
103
-
104
-
105
-
106
-
107
-
108
-
109
-
110
-
111
-
112
-
113
-
114
-
115
-
116
-
117
-
118
-
119
-
120
-
121
-
122
-
123
-
124
-
125
-
126
-
127
-
128
-
129
-
130
-
131
-
132
-
133
-
134
-
135
-
136
-
137
-
138
-
139
-
140
-
141
-
142
-
143
-
144
-
145
-
146
-
147
-
148
-
149
-
150
-
151
-
152
-
153
-
154
-
155
-
156
-
157
-
158
-
159
-
160
-
161
-
162
-
163
-
164
-
165
-
166
-
167
-
168
-
169
-
170
-
171
-
172
-
173
-
174
-
175
-
176
-
177
-
178
-
179
-
180
-
181
-
182
-
183
-
184
-
185
-
186
-
187
-
188
-
189
-
190
-
191
-
192
-
193
-
194
-
195
-
196
 |
 |