Yamaha PSR-K1 Owner's Manual - Page 31
Press the [SYNC START] button., Start the style and accompaniment by playing a chord
 |
View all Yamaha PSR-K1 manuals
Add to My Manuals
Save this manual to your list of manuals |
Page 31 highlights
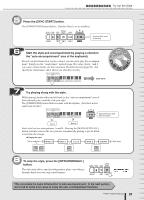
Q u i c k G u i d e Try out the Style ut! 5 Press the [SYNC START] button. The [START/STOP] button flashes. (Synchro Start is set to stand-by.) Synchro Start is set to stand-by 6 Start the style and accompaniment by playing a chord (in the "auto accompaniment" area of the keyboard). Even if you don't know how to play a chord, you can easily play the accompaniment! Simply use the "single finger" method (page 48) to play chords. And if you want to learn chords, use the convenient Chord Dictionary (page 50). Just specify the chord name, and it shows you what keys to play. Auto accompaniment area Style starts Tr y it o 7 Try playing along with the style. While playing chords with your left hand (in the "auto accompaniment" area of the keyboard), play a melody with your right. The [START/STOP] button flashes in time with the rhythm. (First beat in red, other beats in blue.) Auto accompaniment area Button flashes in time with the rhythm. Chord Melody Each style has two main patterns: A and B. Pressing the [MAIN/AUTO FILL] button switches between the two patterns, automatically playing a special fill-in to lead into the change. ● Playing the style Set up and start INTRO: A MAIN: A FILL: B MAIN: B ENDING Style stops. 8 To stop the style, press the [INTRO/ENDING/rit.] button. The style stops after a special ending pattern plays-providing a dynamic finish for your song or performance. This concludes the basic introduction to auto accompaniment. In the next section, we'll look at some more ways to enjoy the auto accompaniment features. PSR-K1 Owner's Manual 31
-
 1
1 -
2
-
3
-
4
-
5
-
6
-
7
-
8
-
9
-
10
-
11
-
12
-
13
-
14
-
15
-
16
-
17
-
18
-
19
-
20
-
21
-
22
-
23
-
24
-
25
-
 26
26 -
 27
27 -
 28
28 -
 29
29 -
 30
30 -
 31
31 -
 32
32 -
 33
33 -
 34
34 -
 35
35 -
 36
36 -
37
-
38
-
39
-
40
-
41
-
42
-
43
-
44
-
45
-
46
-
47
-
48
-
49
-
50
-
51
-
52
-
53
-
54
-
55
-
56
-
57
-
58
-
59
-
60
-
61
-
62
-
63
-
64
-
65
-
66
-
67
-
68
-
69
-
70
-
71
-
72
-
73
-
74
-
75
-
76
-
77
-
78
-
79
-
80
-
81
-
82
-
83
-
84
-
85
-
86
-
87
-
88
-
89
-
90
-
91
-
92
-
93
-
94
-
95
-
96
-
97
-
98
-
99
-
100
 |
 |
