Yamaha PSR-K1 Owner's Manual - Page 60
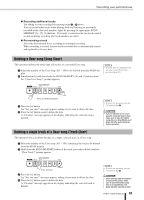
When simultaneously recording both a melody track and the, accompaniment track
 |
View all Yamaha PSR-K1 manuals
Add to My Manuals
Save this manual to your list of manuals |
Page 60 highlights
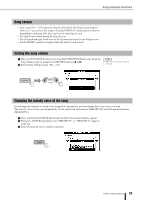
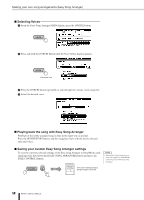
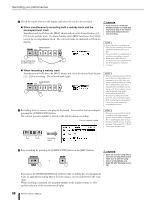
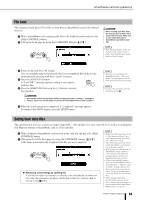
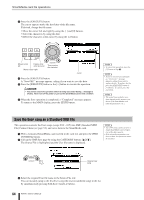
Recording your performances ᕢ Check the tracks shown in the display and select the track to be recorded. ● When simultaneously recording both a melody track and the accompaniment track Simultaneously hold down the [REC] button and press the desired button ([1] - [5]) for the melody track. Continue holding down [REC] and press the [A] button for the accompaniment track. The selected tracks are indicated as ON in the display. Keep holding down the [REC] button. • If you record to a track that already contains recorded data, all previous data in the track is erased and replaced by your new recording. NOTE • If you select the accompaniment track [A] for recording, the accompaniment automatically is set to ON. • You cannot turn accompaniment on or off once recording is started. • When using a Split Voice for recording, the voice assigned to the left of the split point cannot be recorded. ● When recording a melody track Simultaneously hold down the [REC] button and select the desired track button [1] - [5] for recording. The selected track lights. NOTE • If the accompaniment track [A] has not yet been recorded and accompaniment is set to ON, when you select a melody track for recording, the accompaniment track [A] is automatically selected for recording as well. If you want to record only the melody, turn off the accompaniment track [A]. • To cancel recording for a track, press the same track button again. Keep in mind that accompaniment cannot be turned on/off after recording has started. ᕣ Recording starts as soon as you play the keyboard. You can also start recording by pressing the [START/STOP] button. The current measure number is shown in the display during recording. Current measure number NOTE • If memory becomes full during the recording, a warning message appears and recording is stopped. Try recording again after increasing the available memory by using the Song Clear (page 61) or Track Clear (page 61) functions. Recording starts. ᕤ Stop recording by pressing the [START/STOP] button or the [REC] button. or • Since all recorded song data is lost when turning off the power, make sure to save the song data to a SmartMedia card (page 63) after finishing recording. If you press the [INTRO/ENDING/rit.] button while recording the accompaniment track, an appropriate ending phrase for your song is also recorded before the song stops. When recording is finished, the measure number in the display returns to "001," and the indicator of the recorded track lights. 60 PSR-K1 Owner's Manual
-
 1
1 -
2
-
3
-
4
-
5
-
6
-
7
-
8
-
9
-
10
-
11
-
12
-
13
-
14
-
15
-
16
-
17
-
18
-
19
-
20
-
21
-
22
-
23
-
24
-
25
-
26
-
27
-
28
-
29
-
30
-
31
-
32
-
33
-
34
-
35
-
36
-
37
-
38
-
39
-
40
-
41
-
42
-
43
-
44
-
45
-
46
-
47
-
48
-
49
-
50
-
51
-
52
-
53
-
54
-
 55
55 -
 56
56 -
 57
57 -
 58
58 -
 59
59 -
 60
60 -
 61
61 -
 62
62 -
 63
63 -
 64
64 -
 65
65 -
66
-
67
-
68
-
69
-
70
-
71
-
72
-
73
-
74
-
75
-
76
-
77
-
78
-
79
-
80
-
81
-
82
-
83
-
84
-
85
-
86
-
87
-
88
-
89
-
90
-
91
-
92
-
93
-
94
-
95
-
96
-
97
-
98
-
99
-
100
 |
 |
