Yamaha PSR-K1 Owner's Manual - Page 61
Deleting a User song (Song Clear), Deleting a single track of a User song (Track Clear)
 |
View all Yamaha PSR-K1 manuals
Add to My Manuals
Save this manual to your list of manuals |
Page 61 highlights
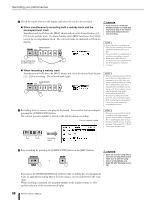
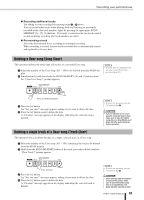
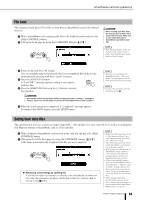
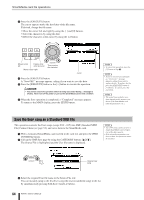
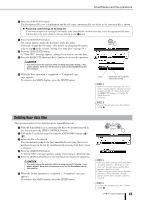
Recording your performances ● Recording additional tracks Try adding to your recording by repeating steps ᕢ - ᕤ above. You can record other tracks while playing back and listening to previously recorded tracks (the track numbers light) by pressing the appropriate SONG MEMORY [1] - [5], [A] buttons. Previously recorded tracks can also be muted as desired during recording (the track numbers are unlit). ● Re-recording a track Select the desired track for re-recording as in normal recording. When recording is started, the previously recorded data is automatically erased and replaced by the new data. Deleting a User song (Song Clear) This operation deletes the entire data (all tracks) of a recorded User song. ᕡ Select the number of the User song (101 - 105) to be deleted from the MAIN display. ᕢ Simultaneously hold down both the SONG MEMORY [A] and [1] buttons until the "Clear User Song?" prompt appears. NOTE • To delete only one individual track of a song, use the Track Clear operation (page 61). Press and hold both buttons ᕣ Press the [+] button. An "Are you sure?" message appears, asking if you want to delete the data. ᕤ Press the [+] button again to delete the data. A "Clearing" message appears in the display indicating the selected song is deleted. NOTE • To cancel the operation, press the [-] button in Step ᕣ . • If you've deleted one or more specific songs but kept others, make sure to save the edited song data to a SmartMedia card (page 63) after performing the delete operation. Deleting a single track of a User song (Track Clear) This operation lets you delete the data of a single, selected track in a User song. ᕡ Select the number of the User song (101 - 105) containing the track to be deleted from the MAIN display. ᕢ Hold down the SONG MEMORY button of the track you wish to delete until the "Clear Track?" prompt appears. Press and hold ᕣ Press the [+] button. An "Are you sure?" message appears, asking if you want to delete the data. ᕤ Press the [+] button again to delete the data. A "Clearing" message appears in the display indicating the selected track is deleted. NOTE • To cancel the operation, press the [-] button in Step ᕣ . • Since all song data is lost when turning off the power, make sure to save the edited song data to a SmartMedia card (page 63) after clearing a track. PSR-K1 Owner's Manual 61
-
 1
1 -
2
-
3
-
4
-
5
-
6
-
7
-
8
-
9
-
10
-
11
-
12
-
13
-
14
-
15
-
16
-
17
-
18
-
19
-
20
-
21
-
22
-
23
-
24
-
25
-
26
-
27
-
28
-
29
-
30
-
31
-
32
-
33
-
34
-
35
-
36
-
37
-
38
-
39
-
40
-
41
-
42
-
43
-
44
-
45
-
46
-
47
-
48
-
49
-
50
-
51
-
52
-
53
-
54
-
55
-
 56
56 -
 57
57 -
 58
58 -
 59
59 -
 60
60 -
 61
61 -
 62
62 -
 63
63 -
 64
64 -
 65
65 -
 66
66 -
67
-
68
-
69
-
70
-
71
-
72
-
73
-
74
-
75
-
76
-
77
-
78
-
79
-
80
-
81
-
82
-
83
-
84
-
85
-
86
-
87
-
88
-
89
-
90
-
91
-
92
-
93
-
94
-
95
-
96
-
97
-
98
-
99
-
100
 |
 |
