Yamaha PSR-K1 Owner's Manual - Page 73
Installation for Windows 98/Me/2000/XP, Installing Song Filer - usb midi driver
 |
View all Yamaha PSR-K1 manuals
Add to My Manuals
Save this manual to your list of manuals |
Page 73 highlights
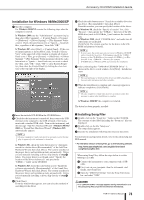
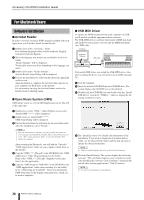
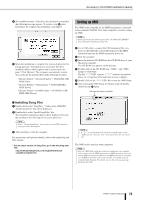
Accessory CD-ROM Installation Guide Installation for Windows 98/Me/2000/XP ᕡ Start the computer. For Windows 2000/XP execute the following steps after the computer is started. In Windows 2000, use the "Administrator" account to log in, then select [My Computer] → [Control Panel] → [System] → [Hardware] → [Driver Signing] → [File Signature Verification]. Check the radio button next to "Ignore - Install all files, regardless of file signature," then click "OK." In Windows XP, select [Start] → [Control Panel]. (If the control panel appears as shown below, click "Switch to Classic View" at the upper left of the window to display all Control Panel icons.) Next, go to [System] → [Hardware] → [Driver Signing] → [File Signature Verification] and check the radio button next to "Ignore - Install software, not want to check (I)," then click "OK." Click "OK" to close System Properties, then close the Control Panel by clicking the close box ([x]) at the top right of the display. ᕥ Check the radio button next to "Search for a suitable driver for my device. (Recommended)," then click [Next]. From this window, you can specify the location of the driver. ᕦ In Windows 98, check the "Specify a location" box, click "Browse..", then specify the "USBdrv_" directory of the CDROM drive (such as D:\USBdrv_\) and continue the installation. In Windows 2000, check "CD-ROM drive" and make sure all other items are unchecked. Click [Next]. The system searches for the driver in the CDROM and prepares to install. NOTE • In some cases, the system may ask you to insert a Windows CD-ROM while it checks for the driver. If this happens, specify the "USBdrv_" directory of the CD-ROM drive (for example, D:\USBdrv_\) in Windows 98, or the "USBdrv2k_" directory (for example, D:\USBdrv2k_\) in Windows 2000, and continue the installation. ᕧ After confirming that "YAMAHA USB MIDI Driver" is shown in the driver search window, click [Next]. Installation starts. NOTE • The exact pathname or location of the driver may differ depending on the particular instrument and other variables. ᕨ When the installation is complete and a message appears to indicate completion, click [Finish]. NOTE • On some computers, it make take about ten seconds or so for this message to appear after installation is complete. In Windows 2000/XP, the computer is restarted. The driver has been properly installed. ᕢ Insert the included CD-ROM in the CD-ROM drive. ᕣ Check that the instrument is turned off, then connect the USB terminal of the computer to the USB terminal of the instrument with a standard USB cable. Turn on the instrument, and the message "Add New Hardware Wizard" (Windows 98/Me/ 2000) or "Found New Hardware Wizard" (Windows XP) automatically appears. NOTE • On some computers, it make take about ten seconds or so for this display to appear after the instrument is turned on. In Windows Me, check the radio button next to "Automatic search for a better driver (Recommended)" of the Add New Hardware Wizard, then click [Next]. The system searches for the proper driver and installation starts automatically. Unless you are manually installing a driver, skip directly to step ᕨ below. If a proper driver is not found, select "Specify the location of the driver (Advanced)" and specify the "USBdrv_" folder on the CD-ROM In Windows XP, check the radio button next to "Install the software automatically (Recommended)" of the Found New Hardware Wizard, then click [Next]. The system searches for the proper driver and installation starts automatically. Unless you are manually installing a driver, skip directly to step ᕨ below. ᕤ Click [Next]. From the window that appears, you can select the method of searching for the driver. ■ Installing Song Filer ᕡ Double-click on the "SongFiler_" folder in the CD-ROM. The contents of the folder (including the "Setup.exe" file) are displayed. ᕢ Double-click on the file "Setup.exe". The setup dialog appears. ᕣ Execute the installation following the onscreen directions. For instructions and operation details, refer to the online help and PDF manual. * For the latest version of Song Filer, go to the following website. http://www.yamahapkclub.com./english/download/ songfiler/songfiler.htm When using Song Filer, follow the steps below to set the MIDI port to USB. ᕡ Connect the instrument to your computer with a USB cable. ᕢ First, turn on your computer, then the instrument, and finally, start Song Filer. ᕣ Open the "MIDI Port Setting" from the Song Filer menu bar, and select "USB." • If a "LOW BATTERY!!" message appears during transmission of a file using Song Filer, stop the transmission immediately. PSR-K1 Owner's Manual 73
-
 1
1 -
2
-
3
-
4
-
5
-
6
-
7
-
8
-
9
-
10
-
11
-
12
-
13
-
14
-
15
-
16
-
17
-
18
-
19
-
20
-
21
-
22
-
23
-
24
-
25
-
26
-
27
-
28
-
29
-
30
-
31
-
32
-
33
-
34
-
35
-
36
-
37
-
38
-
39
-
40
-
41
-
42
-
43
-
44
-
45
-
46
-
47
-
48
-
49
-
50
-
51
-
52
-
53
-
54
-
55
-
56
-
57
-
58
-
59
-
60
-
61
-
62
-
63
-
64
-
65
-
66
-
67
-
 68
68 -
 69
69 -
 70
70 -
 71
71 -
 72
72 -
 73
73 -
 74
74 -
 75
75 -
 76
76 -
 77
77 -
 78
78 -
79
-
80
-
81
-
82
-
83
-
84
-
85
-
86
-
87
-
88
-
89
-
90
-
91
-
92
-
93
-
94
-
95
-
96
-
97
-
98
-
99
-
100
 |
 |