Yamaha RXV765 Owner's Manual - Page 49
Other functions, Using the sleep timer, Using the HDMI™ control function - av
 |
UPC - 027108933542
View all Yamaha RXV765 manuals
Add to My Manuals
Save this manual to your list of manuals |
Page 49 highlights
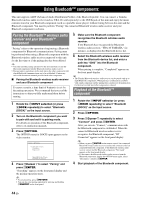
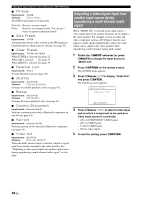
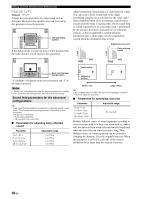
INTRODUCTION PREPARATION BASIC OPERATION Other functions Using the sleep timer You can set this unit to automatically return to standby after a set time has passed. The sleep timer is useful if you want to go to sleep while this unit is playing or recording a source. Press qSLEEP repeatedly to set the amount of time. Each time you press the key, the front panel display changes as shown below. Sleep 120min. Sleep 90min. Sleep Off Sleep 30min. Sleep 60min. When the sleep timer is set, the SLEEP indicator on the front panel display lights up. Press qSLEEP on the remote control repeatedly until "Sleep Off" appears on the front panel display. Using the HDMI™ control function This unit supports the HDMI control function. When a TV that supports the HDMI control function is connected with this unit via the HDMI connection, the following operations of this unit can be controlled with the TV remote control (except for some TVs). • Switching between on and standby (linked to the TV) • Volume control (up/down, mute) • Switching the sound output between a TV and this unit. When you use the HDMI control function, do the following referring to the instruction manuals of the TV. • Turn on the HDMI control function on the TV. • Connect the TV to this unit following the instructions for connecting the TV to an AV amplifier. y • The HDMI control-compatible components include Panasonic VIERA Link compatible TV, DVD player/recorder and Blu-ray Disc player. • When a DVD recorder/Blu-ray recorder/HD DVD recorder that supports the HDMI control function is connected via the HDMI connection, its operations are also linked to those of this unit. For details, refer to its instruction manuals. • We recommend that you use a TV, DVD recorder, Blu-ray recorder and HD DVD recorder of the same manufacturer. 1 Connect a TV that supports the HDMI control function to this unit via the HDMI connection. 2 Turn on all components connected to this unit via the HDMI connection. For details on operations of external components, refer to instruction manuals provided with them. 3 Check the settings of those components and enable the HDMI control function. This unit: Set "Control (SETUP menu → Function Setup → 1 HDMI)" to "On" in the SETUP menu (see page 57). External components: Refer to their instruction manuals. 4 Turn off the TV. All external components that support the HDMI control function turn off linked to the TV being turns off. If any component does not turn off, turn it off manually. 5 Turn on the TV. Make sure that this unit turns on linked to the TV being turned on. If it does not turn on, turn it on manually. 6 Set the input of the TV according to the component connected to this unit such as [HDMI]. 7 If a DVD recorder or Blu-ray recorder that supports the HDMI control function is connected to this unit, turn it on. This unit: Make sure that the input source to which the DVD recorder or Blu-ray recorder is connected is selected. If another input source is selected, select the input source manually. External component: Make sure that you can see images properly on the video monitor. y • You do not need to do step 1 through 7 from the second time. 8 Perform the following operations with the TV remote control to check the link. • Turning on and off • Adjusting volume • Switching sound output components Notes • If this unit does not work linked with the TV, turn the TV off and back on or unplug the AC power plug and plug back in. Doing so may solve the problem. • If the problem still persists, check the following: - This unit: Is the HDMI control function set to "On"? (see page 57) - TV: Is the HDMI control function is enabled? y • If the TV connected to this unit supports the HDMI control function, you only need to connect its audio output jacks to the AV1 jacks of this unit, which are optical digital input jacks, and turn on the video monitor. TV of SCENE is automatically selected when you turn on the TV, and you can enjoy TV sound right away. When connecting the audio output jacks to the AV2-6, AUDIO1-2 or V-AUX jacks, assign those jacks to the TV beforehand (see page 24). ADVANCED OPERATION ADDITIONAL INFORMATION APPENDIX English 45 En
-
 1
1 -
2
-
3
-
4
-
5
-
6
-
7
-
8
-
9
-
10
-
11
-
12
-
13
-
14
-
15
-
16
-
17
-
18
-
19
-
20
-
21
-
22
-
23
-
24
-
25
-
26
-
27
-
28
-
29
-
30
-
31
-
32
-
33
-
34
-
35
-
36
-
37
-
38
-
39
-
40
-
41
-
42
-
43
-
 44
44 -
 45
45 -
 46
46 -
 47
47 -
 48
48 -
 49
49 -
 50
50 -
 51
51 -
 52
52 -
 53
53 -
 54
54 -
55
-
56
-
57
-
58
-
59
-
60
-
61
-
62
-
63
-
64
-
65
-
66
-
67
-
68
-
69
-
70
-
71
-
72
-
73
-
74
-
75
-
76
-
77
-
78
-
79
-
80
-
81
-
82
-
83
-
84
-
85
-
86
-
87
-
88
-
89
-
90
-
91
-
92
-
93
-
94
-
95
-
96
-
97
-
98
 |
 |