Yamaha RXV765 Owner's Manual - Page 58
Basic operation of the SETUP menu, Speaker Setup, Auto Setup, Manual Setup
 |
UPC - 027108933542
View all Yamaha RXV765 manuals
Add to My Manuals
Save this manual to your list of manuals |
Page 58 highlights
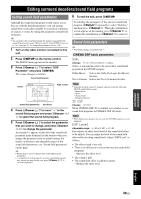
[ [ [ [ [ [ [ Changing various settings of this unit (SETUP menu) Basic operation of the SETUP menu The SETUP menu screen appears on both video display (OSD) and front panel display. Video display (OSD) Setup Menu . ;Speaker Setup ;Sound Setup ;Function Setup ;DSP Parameter ;Memory Guard [ ]/[ ]:Up/Down [ENTER]:Enter Front panel display ;Speaker Setup In this section, procedures of setting menus displayed on the video monitor are described. 1 Press jSETUP on the remote control. The SETUP menu screen appears. 2 Select a menu using kCursor k / n, and press kENTER. Items of the selected menu are displayed. For example, the following screen appears when you select "Function Setup." ;Function Setup . 1 HDMI 2 Display 3 Volume 4 Input Rename 5 Zone2 [ ]/[ ]:Up/Down [ENTER]:Enter y • You can return to the previous screen by pressing kRETURN. 3 To display submenus, select a menu that you want to set using kCursor k / n, and press kENTER. For example, the following screen appears when you select "2 Display." 2 Display . Dimmer;;;;;;;;;;;;0 FL Scroll;;Continue OSD Shift;;;;;;;;;0 [ ]/[ ]:Up/Down [ ]/[[]:Adjust 4 Select an item using kCursor k / n, and change the setting of the item using kCursor l / h. Some items in the Manual Setup menu of Speaker Setup take up a full screen. To display other items in the Manual Setup menu, press kCursor k / n. Example: A)Config A)Config Center SP None >Small Large y • You can change other items by repeating step 4. 5 To finish setting, press jSETUP. y • If kCursor or other keys do not work after exiting the SETUP menu, select the input source again using eInput selection keys. Speaker Setup You can set various items for speakers. Two kinds of adjustments are available. One is "1 Auto Setup (YPAO)" for automatic adjustment and another is "2 Manual Setup" for manual adjustment. y • The default settings are marked with "*." 1 Auto Setup Automatically adjusts output characteristics of speakers to obtain optimum balance for the output sound based on positions and performances of the speakers and acoustic characteristics or the room, which are automatically measured. For details on operations, see page 21. 2 Manual Setup Adjusts output characteristics of speakers based on manually set parameters. After Auto Setup (YPAO) is performed, you can check automatically adjusted parameters in the Manual Setup menu. Fine adjust the parameters for your preference if necessary. ■ A)Config Sets speaker configurations, such as connection status of speaker and a size of the connected speaker (sound reproduction capacity), suitable for the listening environment. y • The speaker configuration includes items for defining a speaker size: Large or Small. Large and Small refer to speakers with woofer diameters 16 cm or larger and smaller than 16 cm, respectively. Extra SP Assign Choices: Zone2*/Presence/None Selects the application for EXTRA SP jacks. Zone2 Assigns the EXTRA SP jacks for the speakers in the second zone. Presence Assigns the EXTRA SP jacks for the Presence speaker. None Disables the EXTRA SP jacks. Note • When setting "Extra SP Assign" to "Zone2" or "Presence," the surround back channel signals for main output is separately output from other channels. 54 En
-
 1
1 -
2
-
3
-
4
-
5
-
6
-
7
-
8
-
9
-
10
-
11
-
12
-
13
-
14
-
15
-
16
-
17
-
18
-
19
-
20
-
21
-
22
-
23
-
24
-
25
-
26
-
27
-
28
-
29
-
30
-
31
-
32
-
33
-
34
-
35
-
36
-
37
-
38
-
39
-
40
-
41
-
42
-
43
-
44
-
45
-
46
-
47
-
48
-
49
-
50
-
51
-
52
-
 53
53 -
 54
54 -
 55
55 -
 56
56 -
 57
57 -
 58
58 -
 59
59 -
 60
60 -
 61
61 -
 62
62 -
 63
63 -
64
-
65
-
66
-
67
-
68
-
69
-
70
-
71
-
72
-
73
-
74
-
75
-
76
-
77
-
78
-
79
-
80
-
81
-
82
-
83
-
84
-
85
-
86
-
87
-
88
-
89
-
90
-
91
-
92
-
93
-
94
-
95
-
96
-
97
-
98
 |
 |
