Yamaha SH-01 SH-01 Owners Manual - Page 30
Mastering, the completed song.
 |
View all Yamaha SH-01 manuals
Add to My Manuals
Save this manual to your list of manuals |
Page 30 highlights
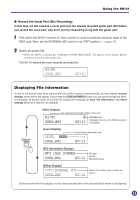
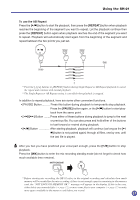
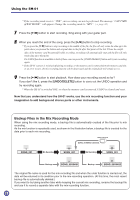
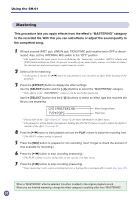
Using the SH-01 Mastering This procedure lets you apply effects from the effect's "MASTERING" category to the recorded file. With this you can add effects or adjust the sound quality to the completed song. 1 All input sources (INST. jack, LINE IN jack, PICKUP MIC jack) must be set to OFF or discon- nected. Also, set the INTERNAL MIC switch to the "OFF" position. * The signal from the input source is received during the "mastering" procedure. (INPUT volume and [PAN] button settings are fixed.) To prevent recording of any unnecessary sources, it is better to remove the internal mic and external source inputs from the circuit. 2 Select a file for mastering. * At this point, if you use the [W/A] button to start playback, you can select an effect while listening to the playback. 3 Press the [EFFECT] button to display the effect settings. Use the [SELECT] button and the [-]/[+] buttons to select the "MASTERING" category. * Only effects in the "MASTERING" category can be used when mastering. Use the [SELECT] button and the [-]/[+] buttons to select an effect type that matches the file you are mastering. CAT:MASTERING TYP:POPS Effect Category Name Effect Type * Please refer to the "Effect Type List" (page 42) for more information on effect types. * The parameter setting display that appears holding the [EFFECT] button is used to adjust the depth or amount of the effect. (See page 21) 4 Press the [W/A] button to start playback and use the PLAY volume to adjust the recording level. * The INPUT volume setting is ignored. 5 Press the [MIX] button to prepare for mix recording. (Don't forget to check the amount of time available for recording.) 6 Press the [W/A] button to start recording (mastering). * The PLAY volume is active at this time so you can use it to fade in/out. 7 Press the [W/A] button to stop recording (mastering). * Since mastering is also a mix recording function, a backup file is automatically created. (See page 28) When a "MASTERING" effect is selected, this effect is added to the original playback sound. When you are finished mastering, change the effect category to anything other than "MASTERING". 30
-
 1
1 -
2
-
3
-
4
-
5
-
6
-
7
-
8
-
9
-
10
-
11
-
12
-
13
-
14
-
15
-
16
-
17
-
18
-
19
-
20
-
21
-
22
-
23
-
24
-
 25
25 -
 26
26 -
 27
27 -
 28
28 -
 29
29 -
 30
30 -
 31
31 -
 32
32 -
 33
33 -
 34
34 -
 35
35 -
36
-
37
-
38
-
39
-
40
-
41
-
42
-
43
-
44
-
45
-
46
-
47
-
48
-
49
-
50
 |
 |
