2010 Nissan Rogue Owner's Manual - Page 121
2010 Nissan Rogue Manual
Page 121 highlights
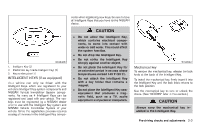
activate. 5. If the indicator light on HomeLink blinks rapidly for two seconds and then turns solid, HomeLink® has picked up a "rolling code" garage door opener signal. You will need to proceed with the next steps to train HomeLink®, completing the programming may require a ladder and another person for convenience. 6. Push and release the program button located on the garage door opener's motor to activate the "training mode". This button is usually located near the antenna wire that hangs down from the motor. If the wire originates from under a light lens, you will need to remove the lens to access the training button. NOTE: Once you have pushed and released the training button on the garage door opener's motor and the "training light" is lit, you have 30 seconds in which to perform step 7. For convenience, use the help of a second person to assist when performing this step. 7. Quickly (within 30 seconds of pushing and releasing the garage door opener training button) and firmly push and release the HomeLink® button you've just programmed. Push and release the HomeLink® button up ® to three times to complete the training. 8. Your HomeLink button should now be programmed. To program the remaining HomeLink® buttons for additional door or gate openers, follow steps 2 through 8 only. NOTE: Do not repeat step 1 unless you want to "clear" all previously programmed HomeLink® buttons. If you have any questions or are having difficulty programming your HomeLink® buttons, please refer to the HomeLink® web site at: www. homelink.com or call 1-800-355-3515. ® the "cycling" process to prevent possible damage to the garage door opener components. OPERATING THE HomeLink® UNIVERSAL TRANSCEIVER HomeLink® Universal Transceiver (once programmed) may now be used to activate the garage door, etc. To operate, simply push the appropriate programmed HomeLink® Universal Transceiver button. The red indicator light will illuminate while the signal is being transmitted. PROGRAMMING TROUBLE-DIAGNOSIS If HomeLink® does not quickly learn the handheld transmitter information: . . replace the hand-held transmitter batteries with new batteries. position the hand-held transmitter with its battery area facing away from the HomeLink® surface. push and hold both the HomeLink® and hand-held transmitter buttons without interruption. position the hand-held transmitter 2 to 5 in (50 to 127 mm) away from the HomeLink® surface. Hold the transmitter in that position for up to 15 seconds. If HomeLink® is not Instruments and controls 2-49 PROGRAMMING HomeLink® FOR CANADIAN CUSTOMERS Prior to 1992, D.O.C. regulations required hand-held transmitters to stop transmitting after 2 seconds. To program your hand-held transmitter to HomeLink®, continue to push and hold the HomeLink® button (note steps 2 through 4 under "Programming HomeLink®") while you push and re-push ("cycle") your hand-held transmitter every 2 seconds until the indicator light flashes rapidly (indicating successful programming). NOTE: If programming a garage door opener, etc., it is advised to unplug the device during . .
-
 1
1 -
2
-
3
-
4
-
5
-
6
-
7
-
8
-
9
-
10
-
11
-
12
-
13
-
14
-
15
-
16
-
17
-
18
-
19
-
20
-
21
-
22
-
23
-
24
-
25
-
26
-
27
-
28
-
29
-
30
-
31
-
32
-
33
-
34
-
35
-
36
-
37
-
38
-
39
-
40
-
41
-
42
-
43
-
44
-
45
-
46
-
47
-
48
-
49
-
50
-
51
-
52
-
53
-
54
-
55
-
56
-
57
-
58
-
59
-
60
-
61
-
62
-
63
-
64
-
65
-
66
-
67
-
68
-
69
-
70
-
71
-
72
-
73
-
74
-
75
-
76
-
77
-
78
-
79
-
80
-
81
-
82
-
83
-
84
-
85
-
86
-
87
-
88
-
89
-
90
-
91
-
92
-
93
-
94
-
95
-
96
-
97
-
98
-
99
-
100
-
101
-
102
-
103
-
104
-
105
-
106
-
107
-
108
-
109
-
110
-
111
-
112
-
113
-
114
-
115
-
 116
116 -
 117
117 -
 118
118 -
 119
119 -
 120
120 -
 121
121 -
 122
122 -
 123
123 -
 124
124 -
 125
125 -
 126
126 -
127
-
128
-
129
-
130
-
131
-
132
-
133
-
134
-
135
-
136
-
137
-
138
-
139
-
140
-
141
-
142
-
143
-
144
-
145
-
146
-
147
-
148
-
149
-
150
-
151
-
152
-
153
-
154
-
155
-
156
-
157
-
158
-
159
-
160
-
161
-
162
-
163
-
164
-
165
-
166
-
167
-
168
-
169
-
170
-
171
-
172
-
173
-
174
-
175
-
176
-
177
-
178
-
179
-
180
-
181
-
182
-
183
-
184
-
185
-
186
-
187
-
188
-
189
-
190
-
191
-
192
-
193
-
194
-
195
-
196
-
197
-
198
-
199
-
200
-
201
-
202
-
203
-
204
-
205
-
206
-
207
-
208
-
209
-
210
-
211
-
212
-
213
-
214
-
215
-
216
-
217
-
218
-
219
-
220
-
221
-
222
-
223
-
224
-
225
-
226
-
227
-
228
-
229
-
230
-
231
-
232
-
233
-
234
-
235
-
236
-
237
-
238
-
239
-
240
-
241
-
242
-
243
-
244
-
245
-
246
-
247
-
248
-
249
-
250
-
251
-
252
-
253
-
254
-
255
-
256
-
257
-
258
-
259
-
260
-
261
-
262
-
263
-
264
-
265
-
266
-
267
-
268
-
269
-
270
-
271
-
272
-
273
-
274
-
275
-
276
-
277
-
278
-
279
-
280
-
281
-
282
-
283
-
284
-
285
-
286
-
287
-
288
-
289
-
290
-
291
-
292
-
293
-
294
-
295
-
296
-
297
-
298
-
299
-
300
-
301
-
302
-
303
-
304
-
305
-
306
-
307
-
308
-
309
-
310
-
311
-
312
-
313
-
314
-
315
-
316
-
317
-
318
-
319
-
320
-
321
-
322
-
323
-
324
-
325
-
326
-
327
-
328
 |
 |
