3Com 3C17304 Getting Started Guide - Page 33
IP Configuration, Manually Configuring IP Information,
 |
View all 3Com 3C17304 manuals
Add to My Manuals
Save this manual to your list of manuals |
Page 33 highlights
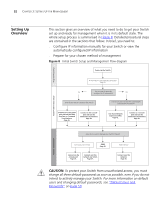
Setting Up Overview 33 IP Configuration You can use one of the following methods to allocate IP information to your Switch (essential if you wish to manage your Switch across the network). Manual IP Configuration You can choose to configure the IP information yourself. The Switch remembers the information that you enter until you change it again or set the configuration method to Automatic. You should use the Manual IP configuration method if: ■ you do not have a DHCP or BootP server on your network, or ■ you want to remove the risk of the IP address ever changing, or ■ your DHCP or BootP server does not allow you to allocate static IP addresses. (Static IP addresses are necessary to ensure that the Switch is always allocated the same IP information.) For most installations, 3Com recommends that you configure the Switch IP information manually. This makes management simpler and more reliable as it is not dependent on a DHCP or BootP server, and eliminates the risk of the IP address changing. If you wish to manually enter IP information for your Switch, work through the "Manually Configuring IP Information" section on page 35. Automatic IP Configuration By default the Switch tries to configure itself with IP information without requesting user intervention. It tries to obtain an IP address from a DHCP or BootP server on the network. If neither server is found, the Switch will configure itself with its default IP address 169.254.100.100 if it is operating in a standalone mode, and/or no other Switches on the network have this IP address. If this default IP address is already in use on the network then the Switch detects this and configures itself with an IP address in the range 169.254.1.0 to 169.254.254.255. This process is known as Auto-IP and is the same mechanism used by Windows 98 and Windows 2000. IP addresses configured by Auto-IP are temporary as they cannot be routed but are useful for small networks which are not connected to other networks, or for initial configuration.
-
 1
1 -
2
-
3
-
4
-
5
-
6
-
7
-
8
-
9
-
10
-
11
-
12
-
13
-
14
-
15
-
16
-
17
-
18
-
19
-
20
-
21
-
22
-
23
-
24
-
25
-
26
-
27
-
 28
28 -
 29
29 -
 30
30 -
 31
31 -
 32
32 -
 33
33 -
 34
34 -
 35
35 -
 36
36 -
 37
37 -
 38
38 -
39
-
40
-
41
-
42
-
43
-
44
-
45
-
46
-
47
-
48
-
49
-
50
-
51
-
52
-
53
-
54
-
55
-
56
-
57
-
58
-
59
-
60
-
61
-
62
-
63
-
64
-
65
-
66
-
67
-
68
-
69
-
70
-
71
-
72
-
73
-
74
-
75
-
76
-
77
-
78
-
79
-
80
-
81
-
82
-
83
-
84
 |
 |