Belkin F5D7231-4P User Manual - Page 82
click Apply Changes.
 |
UPC - 722868525173
View all Belkin F5D7231-4P manuals
Add to My Manuals
Save this manual to your list of manuals |
Page 82 highlights
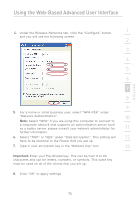
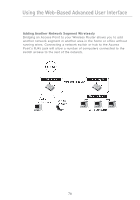
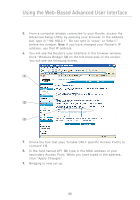
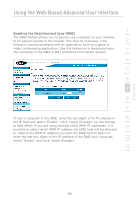
Using the Web-Based Advanced User Interface 5. From a computer already connected to your Router, access the Advanced Setup Utility by opening your browser. In the address bar, type in "192.168.2.1". Do not type in "www" or "http://" before the number. Note: If you have changed your Router's IP address, use that IP address. 6. You will see the Router's user interface in the browser window. Click "Wireless Bridge" (2) on the left-hand side of the screen. You will see the following screen. (1) (2) (3) 7. Check the box that says "Enable ONLY specific Access Points to connect" (1). 8. In the field named AP1 (3), type in the MAC address of your secondary Access Point. When you have typed in the address, click "Apply Changes". 9. Bridging is now set up. 80
-
 1
1 -
2
-
3
-
4
-
5
-
6
-
7
-
8
-
9
-
10
-
11
-
12
-
13
-
14
-
15
-
16
-
17
-
18
-
19
-
20
-
21
-
22
-
23
-
24
-
25
-
26
-
27
-
28
-
29
-
30
-
31
-
32
-
33
-
34
-
35
-
36
-
37
-
38
-
39
-
40
-
41
-
42
-
43
-
44
-
45
-
46
-
47
-
48
-
49
-
50
-
51
-
52
-
53
-
54
-
55
-
56
-
57
-
58
-
59
-
60
-
61
-
62
-
63
-
64
-
65
-
66
-
67
-
68
-
69
-
70
-
71
-
72
-
73
-
74
-
75
-
76
-
 77
77 -
 78
78 -
 79
79 -
 80
80 -
 81
81 -
 82
82 -
 83
83 -
 84
84 -
 85
85 -
 86
86 -
 87
87 -
88
-
89
-
90
-
91
-
92
-
93
-
94
-
95
-
96
-
97
-
98
-
99
-
100
-
101
-
102
-
103
-
104
-
105
-
106
-
107
-
108
-
109
-
110
-
111
-
112
-
113
-
114
-
115
-
116
-
117
-
118
-
119
-
120
-
121
-
122
-
123
-
124
-
125
-
126
-
127
-
128
-
129
-
130
-
131
-
132
-
133
-
134
-
135
-
136
-
137
-
138
-
139
-
140
-
141
-
142
-
143
-
144
-
145
-
146
 |
 |
