Brother International LK3-B432E MKII Instruction Manual - English - Page 45
Adjusting the needle up stop position, 10-13. Adjusting the thread wiper
 |
View all Brother International LK3-B432E MKII manuals
Add to My Manuals
Save this manual to your list of manuals |
Page 45 highlights
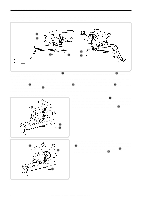
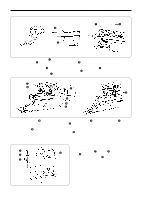
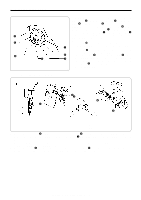
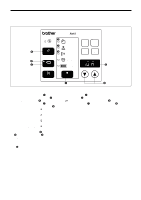
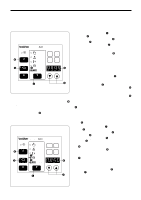
10 . STANDARD ADJUSTMENTS 10-12. Adjusting the needle up stop position The needle up stop position is adjusted so that the index mark w on the machine pulley q is inside the mark r on the belt cover e. If adjustment is necessary, loosen the screw t at the "U" mark of the machine pulley q and adjust the po- sition of the machine pulley q. The machine pulley q e stops later if it is turned clockwise, and it stops earlier if it is turned counterclockwise. NOTE: r The screw y at the "D" mark is an adjusting screw for the needle down detection function and is adjusted to match q the feed timing, so it should not be loosened. The screw u is a screw for detecting the machine stop position, and should not be loosened. w t * If the index mark w is not inside the mark r when y u the sewing machine is started, error code "E-50" will be displayed. Turn the machine pulley to move the index mark w to the correct position and then start the sewing machine. 10-13. Adjusting the thread wiper q 2±0.5mm we r t Approx. 20mm 1. Loosen the set screw w and move the wiper arm support e up or down to adjust so that the clearance between the top of the thread wiper and the needle point q is 2 ± 0.5 mm when the thread wiper is aligned with the center of the needle. * Before carrying out this adjustment, check that the needle bar is lowered 5 to 5.5 mm from the needle up stop position when the sewing machine stops. 2. Loosen the screw r and move the thread guide connecting plate t up or down so that the thread wiper is approximately 20 mm from the needle when it is at the standby position. 39 LK3-B430E-, B431E-, B432E-, B433E- Mark II
-
 1
1 -
2
-
3
-
4
-
5
-
6
-
7
-
8
-
9
-
10
-
11
-
12
-
13
-
14
-
15
-
16
-
17
-
18
-
19
-
20
-
21
-
22
-
23
-
24
-
25
-
26
-
27
-
28
-
29
-
30
-
31
-
32
-
33
-
34
-
35
-
36
-
37
-
38
-
39
-
 40
40 -
 41
41 -
 42
42 -
 43
43 -
 44
44 -
 45
45 -
 46
46 -
 47
47 -
 48
48 -
 49
49 -
 50
50 -
51
-
52
-
53
-
54
-
55
-
56
-
57
-
58
-
59
-
60
-
61
-
62
-
63
-
64
-
65
-
66
-
67
-
68
-
69
-
70
-
71
-
72
-
73
 |
 |
