Brother International LK3-B432E MKII Instruction Manual - English - Page 50
CHANGING FUNCTIONS USING THE DIP SWITCHES, 12-1. Operation panel DIP switches
 |
View all Brother International LK3-B432E MKII manuals
Add to My Manuals
Save this manual to your list of manuals |
Page 50 highlights
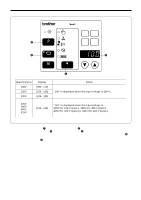
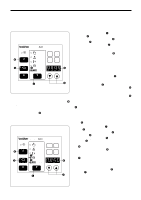
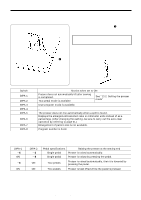
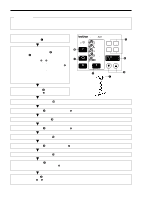
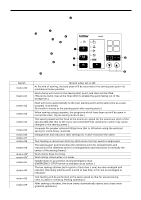
12 . CHANGING FUNCTIONS USING THE DIP SWITCHES 12. CHANGING FUNCTIONS USING THE DIP SWITCHES 12-1. Operation panel DIP switches The operation panel DIP switches q are used to change functions which might need to be changed depending on the sewing conditions. NOTE: Always turn off the power before setting the DIP switches. The functions shown in the table below can be changed by means of these DIP switches. * All DIP switches are set to OFF at the time of ship- ment. q Switch DIPA-1 DIPA-2 DIPA-3 DIPA-4 DIPA-5 DIPA-6 DIPA-7 DIPA-8 Motion when set to ON Presser does not automatically lift after sewing is completed. Two-pedal mode is available. See "12-2. Setting the presser mode" User program mode is available. - The presser does not rise automatically when a split is found. Displays the enlargement/reduction ratio in millimeter units instead of as a percentage. (After changing this setting, be sure to carry out the auto-clear operation by referring to page 41.) Enlargement of pattern size is not available. Program number is fixed. 12-2. Setting the presser mode Through the combination of DIP switches A-1 and A-2 on the operation panel, presser motions can be set as follows: DIPA-1 ʵ ON ʵ ON DIPA-2 ʵ ʵ ON ON Pedal specifications Single pedal Single pedal Raising the presser at the sewing end Presser is raised automatically. Presser is raised by pressing the pedal. Two pedals Presser is raised automatically, then it is lowered by pressing the pedal. Two pedals Presser is kept lifted while the pedal is pressed. LK3-B430E-, B431E-, B432E-, B433E- Mark II 44
-
 1
1 -
2
-
3
-
4
-
5
-
6
-
7
-
8
-
9
-
10
-
11
-
12
-
13
-
14
-
15
-
16
-
17
-
18
-
19
-
20
-
21
-
22
-
23
-
24
-
25
-
26
-
27
-
28
-
29
-
30
-
31
-
32
-
33
-
34
-
35
-
36
-
37
-
38
-
39
-
40
-
41
-
42
-
43
-
44
-
 45
45 -
 46
46 -
 47
47 -
 48
48 -
 49
49 -
 50
50 -
 51
51 -
 52
52 -
 53
53 -
 54
54 -
 55
55 -
56
-
57
-
58
-
59
-
60
-
61
-
62
-
63
-
64
-
65
-
66
-
67
-
68
-
69
-
70
-
71
-
72
-
73
 |
 |
