Brother International PC-3000 Users Manual - English - Page 38
Utility Stitches
 |
View all Brother International PC-3000 manuals
Add to My Manuals
Save this manual to your list of manuals |
Page 38 highlights
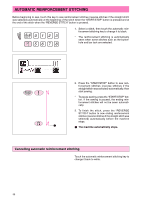
2. UTILITY STITCHES STRAIGHT STITCHES 00 01 02 03 5 1 6 J 00: Straight stitch (center needle position) for normal sewing 01: Straight stitch (left needle position) for normal sewing 02: For reinforced sewing 03: For stretch fabric 1. Baste or pin the fabrics together. 2. Attach presser foot "J", sew three or four reverse stitches at the beginning, then start sewing. 1 3 to 4 reverse stitches * Place the fabric under presser foot allowing enough space from the edge for reverse sewing. 5 6 3. Sew at a slow speed as you approach the end of the sewing area, then press the "REVERSE STITCH" button to sew several reverse stitches and stop the machine. * Before sewing, touch the automatic reinforcement stitching key to sew reverse stitches or reinforcement stitches automatically at the beginning and at the end of the stitch. 4. Raise the presser foot, remove the fabric and cut the thread. 1 Thread cutter 1 35
-
 1
1 -
2
-
3
-
4
-
5
-
6
-
7
-
8
-
9
-
10
-
11
-
12
-
13
-
14
-
15
-
16
-
17
-
18
-
19
-
20
-
21
-
22
-
23
-
24
-
25
-
26
-
27
-
28
-
29
-
30
-
31
-
32
-
 33
33 -
 34
34 -
 35
35 -
 36
36 -
 37
37 -
 38
38 -
 39
39 -
 40
40 -
 41
41 -
 42
42 -
 43
43 -
44
-
45
-
46
-
47
-
48
-
49
-
50
-
51
-
52
-
53
-
54
-
55
-
56
-
57
-
58
-
59
-
60
-
61
-
62
-
63
-
64
-
65
-
66
-
67
-
68
-
69
-
70
-
71
-
72
-
73
-
74
-
75
-
76
-
77
-
78
-
79
-
80
-
81
-
82
-
83
-
84
-
85
-
86
-
87
-
88
-
89
-
90
-
91
-
92
-
93
-
94
-
95
-
96
-
97
-
98
-
99
-
100
-
101
-
102
-
103
-
104
 |
 |
