Brother International PC-3000 Users Manual - English - Page 46
Buttonhole Stitching
 |
View all Brother International PC-3000 manuals
Add to My Manuals
Save this manual to your list of manuals |
Page 46 highlights
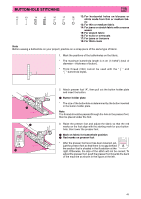
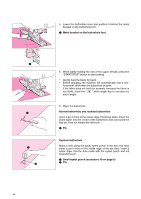
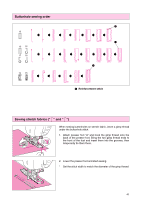
BUTTONHOLE STITCHING A 12 13 14 15 16 17 18 12: For horizontal holes on blouses or shirts made from thin or medium fab- ric 13: For thin or medium fabric 14: For jeans or stretch fabric with a coarse weave 15: For stretch fabric 16: For suits or overcoats 17: For jeans or trousers 18: For thick coats Note Before sewing a buttonhole on your project, practice on a scrap piece of the same type of fabric. 1. Mark the positions of the buttonholes on the fabric. * The maximum buttonhole length is 3 cm (1-13/64") (total of diameter + thickness of button). * Thick thread (#30) cannot be used with the " 14 " and " 15 " buttonhole styles. 1 A 5 6 5 6 2. Attach presser foot "A", then pull out the button holder plate and insert the button. 1 Button holder plate * The size of the buttonhole is determined by the button inserted in the button holder plate. Note The thread should be passed through the hole in the presser foot, then be placed under the foot. 3. Raise the presser foot and adjust the fabric so that the red marks on the foot align with the starting mark for your buttonhole, then lower the presser foot. 1 Mark on fabric for buttonhole position 2 Red marks on presser foot * After the presser foot lever has been lowered, ad- just the presser foot so that there is no gap behind A the section that is shaded in the illustration at the right. Otherwise, the size of the stitch will not be correct. To adjust the presser foot, push the presser foot towards the back of the machine as shown in the figure at the left. 43
-
 1
1 -
2
-
3
-
4
-
5
-
6
-
7
-
8
-
9
-
10
-
11
-
12
-
13
-
14
-
15
-
16
-
17
-
18
-
19
-
20
-
21
-
22
-
23
-
24
-
25
-
26
-
27
-
28
-
29
-
30
-
31
-
32
-
33
-
34
-
35
-
36
-
37
-
38
-
39
-
40
-
 41
41 -
 42
42 -
 43
43 -
 44
44 -
 45
45 -
 46
46 -
 47
47 -
 48
48 -
 49
49 -
 50
50 -
 51
51 -
52
-
53
-
54
-
55
-
56
-
57
-
58
-
59
-
60
-
61
-
62
-
63
-
64
-
65
-
66
-
67
-
68
-
69
-
70
-
71
-
72
-
73
-
74
-
75
-
76
-
77
-
78
-
79
-
80
-
81
-
82
-
83
-
84
-
85
-
86
-
87
-
88
-
89
-
90
-
91
-
92
-
93
-
94
-
95
-
96
-
97
-
98
-
99
-
100
-
101
-
102
-
103
-
104
 |
 |