Brother International PC-3000 Users Manual - English - Page 49
Buttons that do not fit into the guide plate Odd-shaped buttons
 |
View all Brother International PC-3000 manuals
Add to My Manuals
Save this manual to your list of manuals |
Page 49 highlights
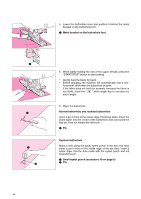
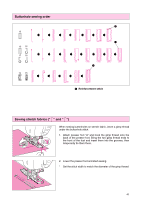
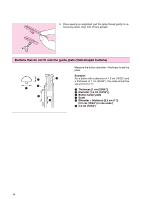
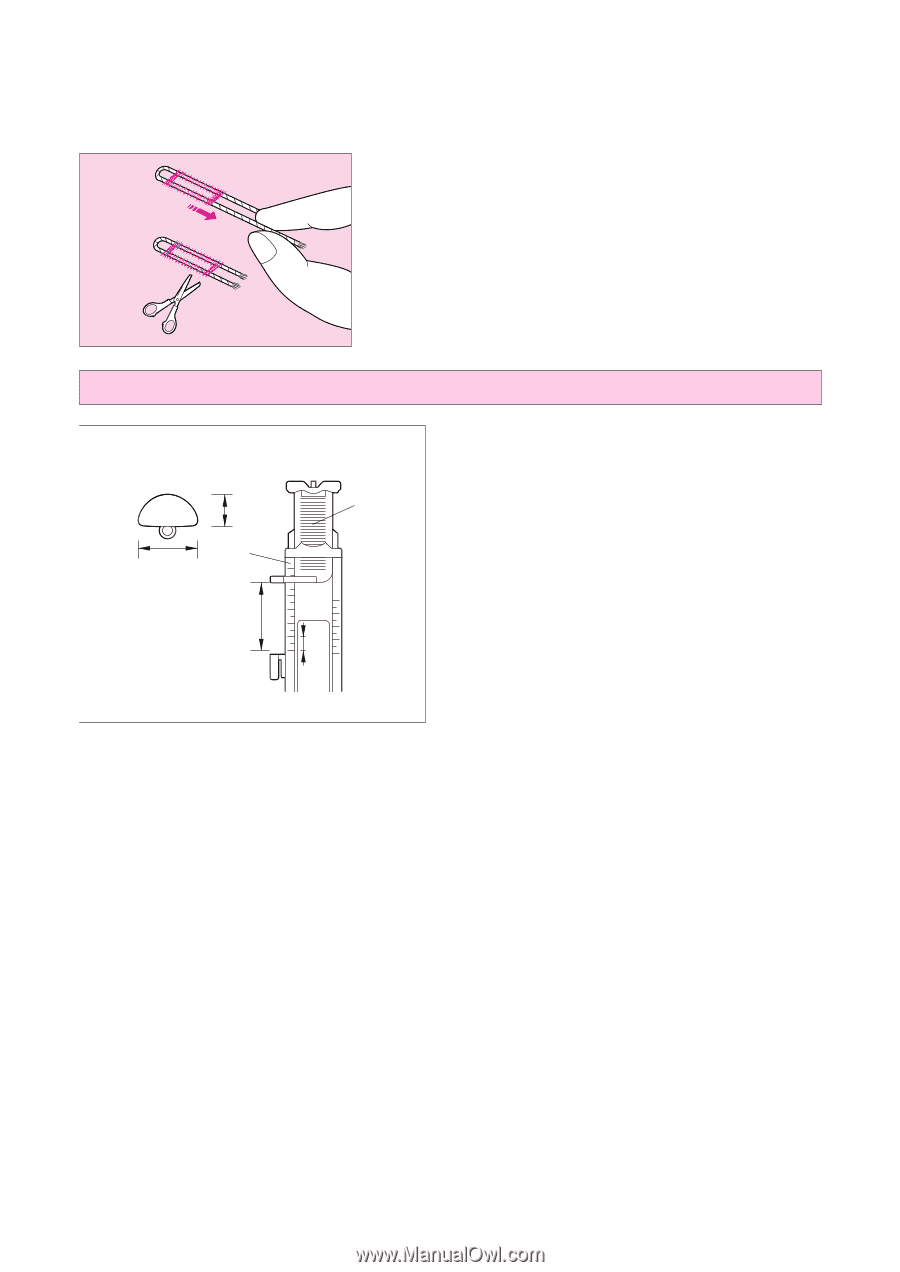
3. Once sewing is completed, pull the gimp thread gently to remove any slack, then trim off any excess. Buttons that do not fit into the guide plate (Odd-shaped buttons) 1 3 4 2 5 6 Measure the button diameter + thickness to set the plate. Example: For a button with a diameter of 1.5 cm (19/32") and a thickness of 1 cm (25/64"), the scale should be set at 2.5 cm (1") 1 Thickness [1 cm (25/64")] 2 Diameter [1.5 cm (19/32")] 3 Button holder plate 4 Scale 5 Diameter + thickness [2.5 cm (1")] [0.5 cm (13/64") in one scale.] 6 0.5 cm (13/64") 46
-
 1
1 -
2
-
3
-
4
-
5
-
6
-
7
-
8
-
9
-
10
-
11
-
12
-
13
-
14
-
15
-
16
-
17
-
18
-
19
-
20
-
21
-
22
-
23
-
24
-
25
-
26
-
27
-
28
-
29
-
30
-
31
-
32
-
33
-
34
-
35
-
36
-
37
-
38
-
39
-
40
-
41
-
42
-
43
-
 44
44 -
 45
45 -
 46
46 -
 47
47 -
 48
48 -
 49
49 -
 50
50 -
 51
51 -
 52
52 -
 53
53 -
 54
54 -
55
-
56
-
57
-
58
-
59
-
60
-
61
-
62
-
63
-
64
-
65
-
66
-
67
-
68
-
69
-
70
-
71
-
72
-
73
-
74
-
75
-
76
-
77
-
78
-
79
-
80
-
81
-
82
-
83
-
84
-
85
-
86
-
87
-
88
-
89
-
90
-
91
-
92
-
93
-
94
-
95
-
96
-
97
-
98
-
99
-
100
-
101
-
102
-
103
-
104
 |
 |
46
4
1
2
6
5
3
Measure the button diameter + thickness to set the
plate.
Example:
For a button with a diameter of 1.5 cm (19/32") and
a thickness of 1 cm (25/64"), the scale should be
set at 2.5 cm (1")
1
Thickness [1 cm (25/64")]
2
Diameter [1.5 cm (19/32")]
3
Button holder plate
4
Scale
5
Diameter + thickness [2.5 cm (1")]
[0.5 cm (13/64") in one scale.]
6
0.5 cm (13/64")
3.
Once sewing is completed, pull the gimp thread gently to re-
move any slack, then trim off any excess.
Buttons that do not fit into the guide plate (Odd-shaped buttons)