Brother International PC-3000 Users Manual - English - Page 96
Trouble with threads and stitches
 |
View all Brother International PC-3000 manuals
Add to My Manuals
Save this manual to your list of manuals |
Page 96 highlights
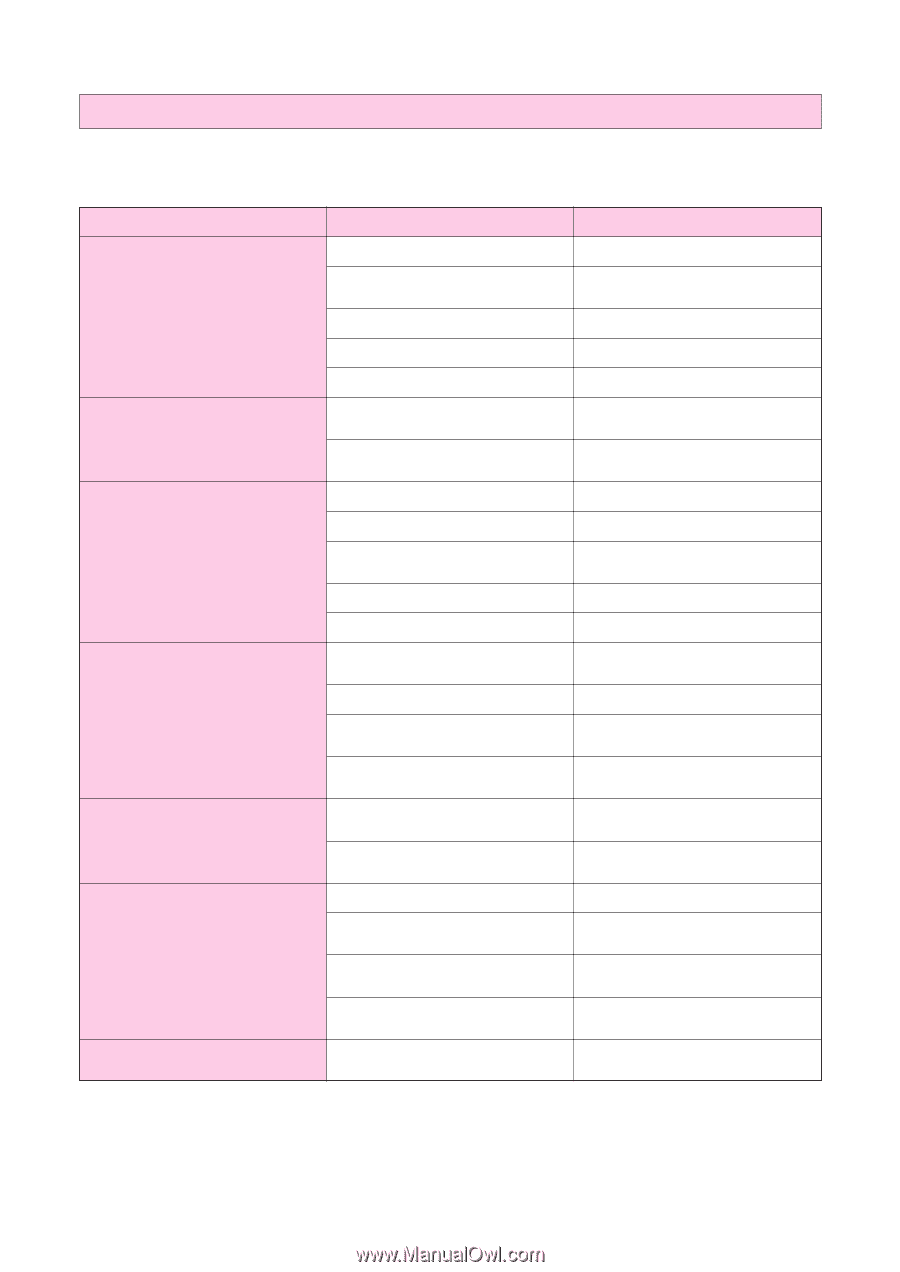
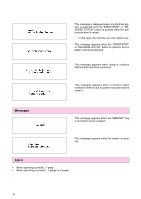
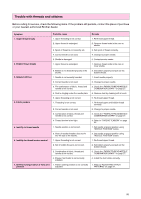
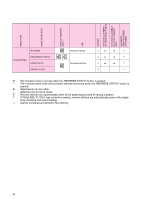
Trouble with threads and stitches Before calling for service, check the following items. If the problem still persists, contact the place of purchase or your nearest authorized Brother dealer. Symptom Probable cause Remedy 1. Upper thread breaks 1. Upper threading is not correct. 1. Re-thread upper thread. 2. Upper thread is entangled. 2. Remove thread ends in the race or shuttle. 3. Spool of thread is not correctly set. 3. Set spool of thread correctly. 4. Correct needle is not used. 4. Change to proper needle. 5. Shuttle is damaged. 5. Contact service center. 2. Bobbin thread breaks 1. Upper thread is entangled. 1. Remove thread ends in the race or inner shuttle. 2. Bobbin is not threaded properly in the shuttle. 2. Set bobbin properly and pull out the bobbin thread. 3. Skipped stitches 1. Needle is not correctly inserted. 1. Insert needle properly. 2. Correct needle is not used. 2. Change to proper needle. 3. The combination of fabric, thread and needle is not correct. 3. Check the "FABRIC/THREAD/NEEDLE COMBINATION CHART" on page 27. 4. Dust is clinging under the needle plate. 4. Remove dust by cleaning with a brush. 4. Fabric puckers 5. Upper threading is not correct. 1. Threading is not correct. 5. Re-thread upper thread. 1. Re-thread upper and bobbin thread correctly. 2. Correct needle is not used. 2. Change to proper needle. 3. Combination of fabric, thread and needle is not correct. 3. Check the "FABRIC/THREAD/NEEDLE COMBINATION CHART" on page 27. 4. Thread tension is too tight. 4. Refer to "THREAD TENSION" on page 22. 5. Inability to thread needle 1. Needle position is not correct. 1. Set needle at proper position using "NEEDLE POSITION" button. 2. Hook of needle threader does not fit into the eye of the needle. 2. Set needle at proper position using "NEEDLE POSITION" button. 6. Inability for thread tension control 1. Upper threading is not correct. 1. Re-thread upper thread. 2. Set of bobbin thread is not correct. 2. Set bobbin properly and pull out the bobbin thread. 3. Combination of fabric, thread and needle is not correct. 3. Check the "FABRIC/THREAD/NEEDLE COMBINATION CHART" on page 27. 4. Presser foot holder is not correctly installed. 4. Install the foot holder correctly. 7. Shifted sewing position of fonts and 1. Pattern sewing position is not correctly 1. Refer to "ADJUSTING STITCH patterns adjusted. PATTERNS" on page 87. 93
-
 1
1 -
2
-
3
-
4
-
5
-
6
-
7
-
8
-
9
-
10
-
11
-
12
-
13
-
14
-
15
-
16
-
17
-
18
-
19
-
20
-
21
-
22
-
23
-
24
-
25
-
26
-
27
-
28
-
29
-
30
-
31
-
32
-
33
-
34
-
35
-
36
-
37
-
38
-
39
-
40
-
41
-
42
-
43
-
44
-
45
-
46
-
47
-
48
-
49
-
50
-
51
-
52
-
53
-
54
-
55
-
56
-
57
-
58
-
59
-
60
-
61
-
62
-
63
-
64
-
65
-
66
-
67
-
68
-
69
-
70
-
71
-
72
-
73
-
74
-
75
-
76
-
77
-
78
-
79
-
80
-
81
-
82
-
83
-
84
-
85
-
86
-
87
-
88
-
89
-
90
-
 91
91 -
 92
92 -
 93
93 -
 94
94 -
 95
95 -
 96
96 -
 97
97 -
 98
98 -
 99
99 -
 100
100 -
 101
101 -
102
-
103
-
104
 |
 |